🎯 Objective
In this lab, we will learn the concepts, basic commands and practice these below topics in real applications:
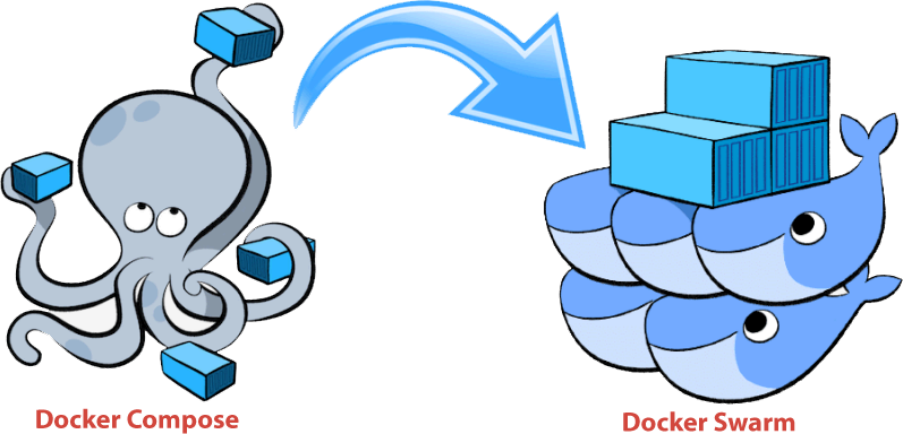
Docker Compose: an excellent tool for development, testing, CI workflows, and staging environments.Docker Swarm: a tool allows you to manageDockerengine clusters locally within the Docker platform. You can use the Docker CLI to create a cluster, deploy application services to the cluster, and manage cluster behavior.
1. Docker Compose

In this section, we will learn how to use Docker Compose to deploy a simple voting application .
A great sample application for docker & docker compose demonstration!
The source files of this voting application is available on Github:
https://github.com/TomHuynhSG/simple-voting-application

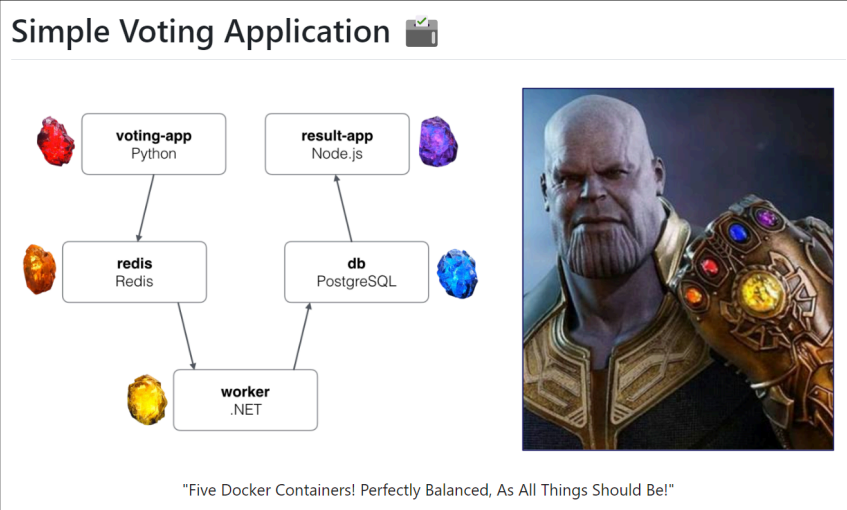
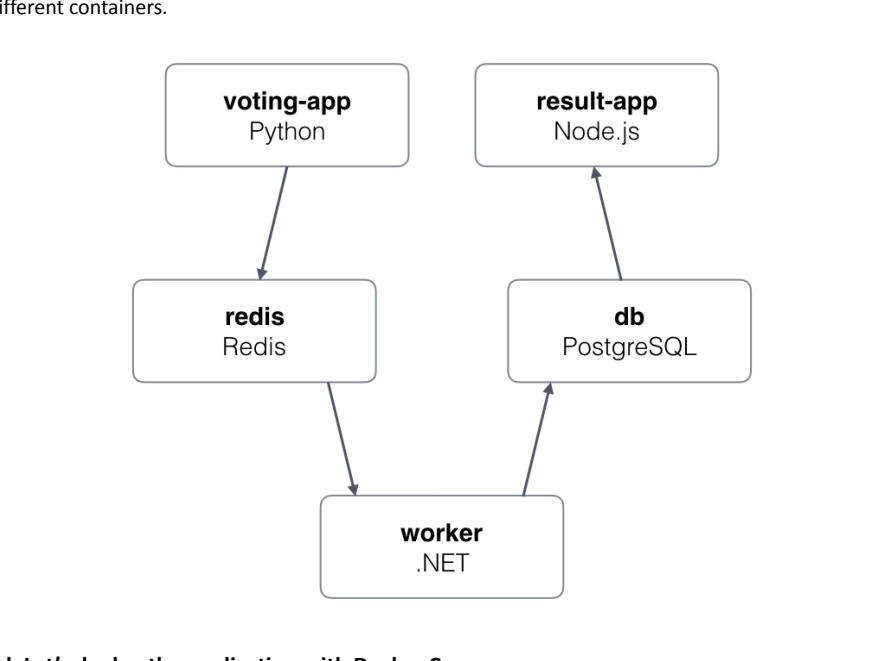
Indeed, this is a distributed application running across five Docker containers.
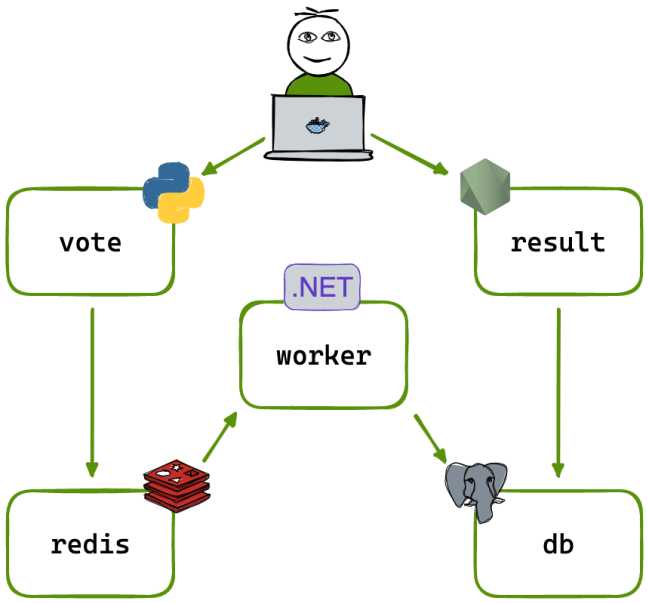
The Simple Voting Application Docker project consists of five Docker containers connected as follows:
Vote : A
Flaskfront-end app that allows users to vote between two options.Redis: A Redis queue that collects new votes.Worker : A
.NETCore and Java application that processes votes and stores them in aPostgreSQLdatabase.Database (db) : A PostgreSQL database container.
Result : A
Node.jsapp that displays the voting results in real time.
Docker Compose is used to define and run these multi-container Docker applications. The docker-compose.yml file specifies the configuration of each service and their interconnections.
1a. Create the Docker Compose EC2 server
In this experiment, we only need one single EC2 instance to learn docker-compose:

Here are the settings of the EC2:
Name : up to you! You can choose the name “
voting-server”.OS : default Amazon Linux 2023 AMI (Free-tier)
Instance Type : t3.micro (Free-tier)
Key pair : select and reuse your old key in other labs (
devops_project_key)Storage : Default 8 GB is plenty enough!
Security Group:
Optional Name:
voting-app-security-groupSource Type: Anywhere
Open these ports:
22 for SSH
8080-8081 (only two ports 8080 and 8081)
1b. Install the required tools
After that, let’s SSH to the EC2 server.
To keep things simple without dealing with permission, let’s login as a root user and change our current directory to /root:
sudo su -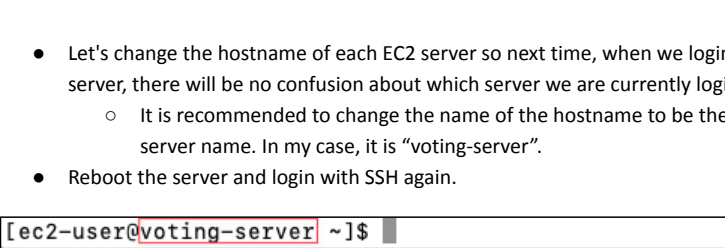
Let's change the hostname of each EC2 server so next time, when we login into that EC2 server, there will be no confusion about which server we are currently login to.
It is recommended to change the name of the hostname to be the same as your ec2 server name. In my case, it is “
voting-server”.
Reboot the server and login with SSH again.
Don’t forget to login as the root user:
sudo su -Install Git:
yum install -y gitInstall
Docker:
yum install -y dockerStart Docker:
service docker startCheck Docker’s service status:
service docker status
Git clone this repository:
git clone https://github.com/TomHuynhSG/simple-voting-application.gitChange current directory inside it:
cd simple-voting-applicationLet’s list all files and directories inside our voting project:
ls -la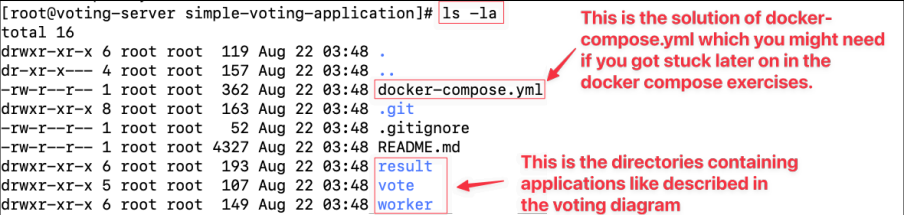
1c. Deploy the application without Docker Compose
Change current directory to vote directory which contains the voting website:
cd votePlease feel free to explore this folder to understand how the vote website works.
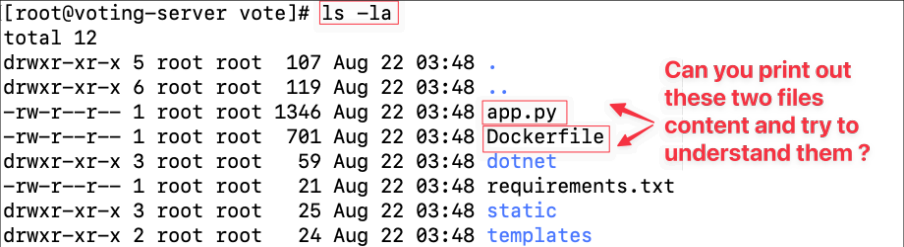
Checkout the
Dockerfileof that voting website:
cat DockerfileCan you figure out line by line what it does?
Build a
Dockerimage of voting application with that Dockerfile:
docker build . -t voting-appCheck if the new
voting-appimage is there:
docker images
Aha, the voting-app image is here!

Run a Docker container from the voting app image ➜ The voting website is now live via
port 8080:
docker run --name voting-container -p 8080:80 voting-app
Remember, we run the container without the “-d” detach mode so we can see what is happening inside the container when we send the requests via the browser.
Let’s open the website via the port 8080 on your browser:
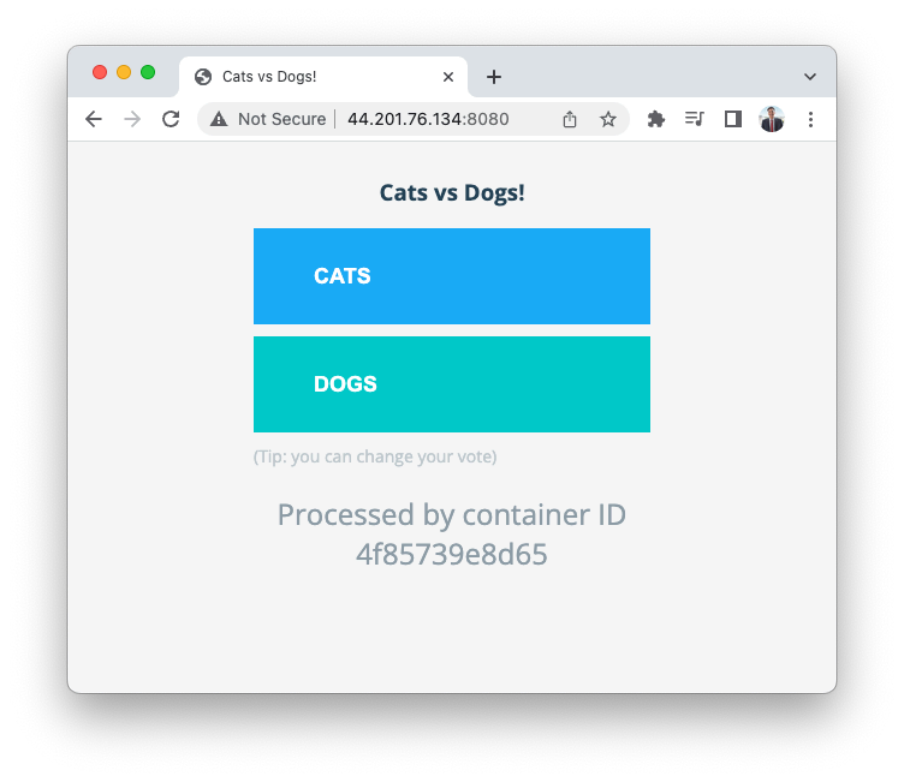
Very nice! However, when you interact with the website by voting for either cats or dogs, we receive an internal server error:
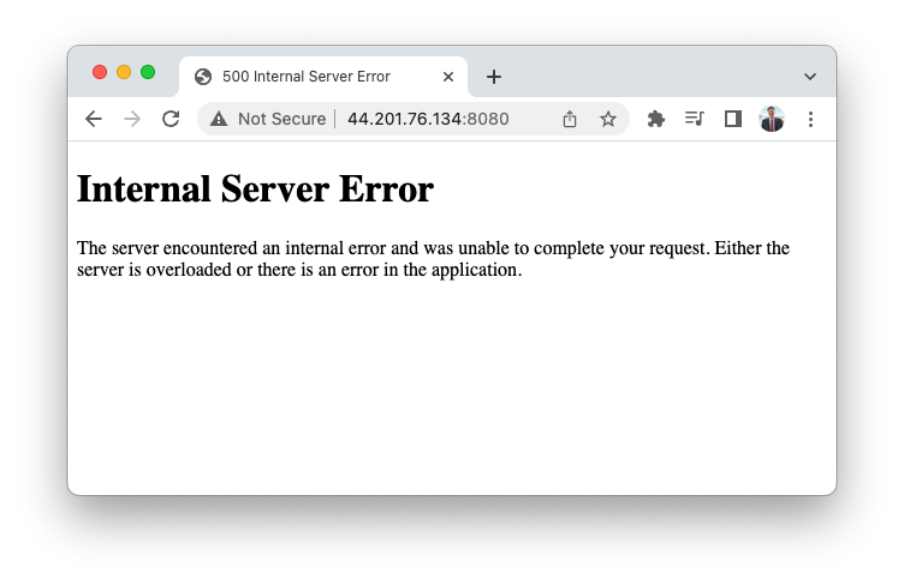
[Question] Why is that?
If you check your terminal, you will see an error message inside our voting-app container:
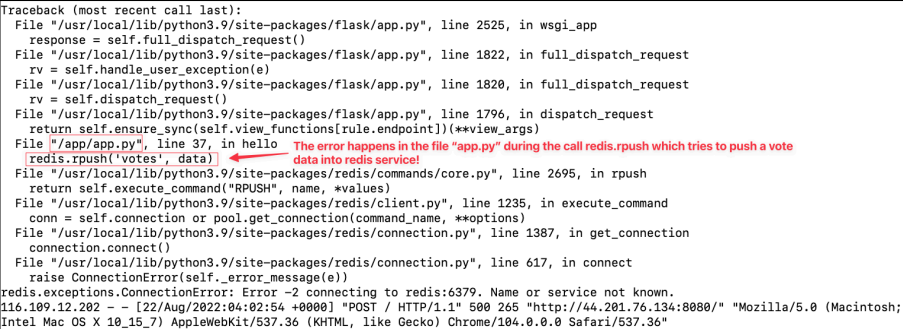
[Explanation] In the app.py, there is a line where python flask is looking for the “redis” (in-memory data structure store) to store the new voting. Since there is no redis container running, that’s why we got the error.

That’s why we need to run the redis container first!
You can stop the running
voting-appcontainer by pressing the keys combination “Ctrl+C”

Let’s remove the
voting-appcontainer so we can start from scratch but correctly this time:
docker ps -a
docker rm <container_id or container_name>

Good! Let’s start from scratch again!

Run a Docker container from the
Redisimage ofDockerHub:
docker run -d --name=redis redis[Info] You can learn more about the redis image on Docker Hub here: https://hub.docker.com/_/redis. Keep in mind that in a voting application (like polls, upvotes, likes), Redis is often used as a message queue or in-memory store to handle a high volume of votes quickly. Redis is an in-memory database, so it can handle thousands or millions of vote operations per second with very low latency. The purpose of a Redis container in a voting queue system is to act as a fast, reliable middle layer that collects votes instantly , ensures they are processed safely, and relieves pressure on the backend database.
Check if the new redis container is there and running:
docker ps
Run a Docker container from the voting app image ➜ The voting website is now live via
port 8080:
docker run -d --name voting-container -p 8080:80 --link redis:redis voting-app
Notice that, we use “-d” detach mode so a Docker container runs in the background of your terminal. It does not receive input or display output. Also, we use “--link” to add links to another container so they can connect together (allow containers to discover each other and securely transfer information about one container to another container).
So far, we have two containers running: voting-container and redis like below diagram:
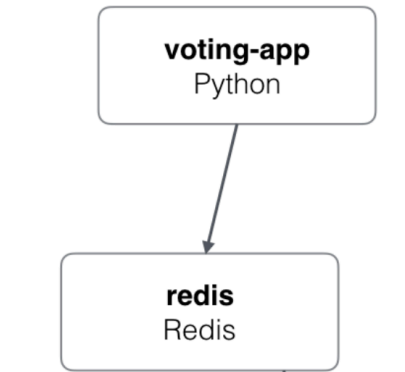
Let’s open the website via the port 8080 on your browser:
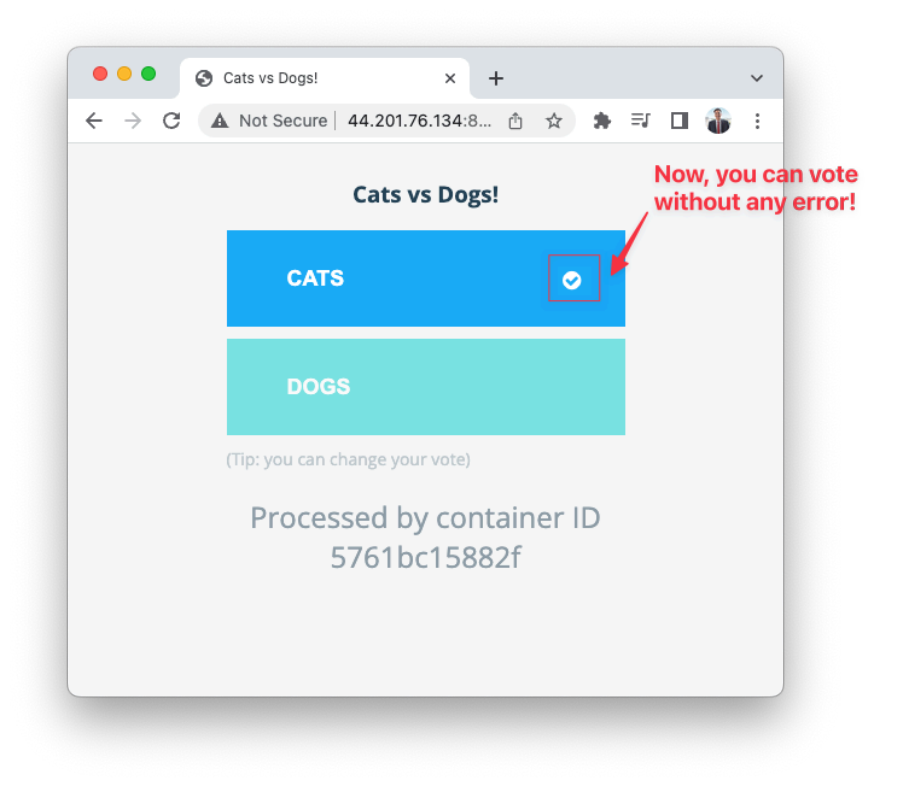
Very nice! Now you can interact with the website by voting for either cats or dogs.
However, we need to complete other containers, so we can have a result page to show the voting result so far.

Run a Docker container from the
Postgresimage of DockerHub:
docker run -d --name=db -e POSTGRES_PASSWORD=postgres postgres:9.4For the Postgres container, the only variable required is POSTGRES_PASSWORD. The only variable required is POSTGRES_PASSWORDThis environment variable sets the superuser password for PostgreSQL. The default superuser is defined by the POSTGRES_USER environment variable. You can read it more here: https://hub.docker.com/_/postgres
Check if the new postgres container is there and running:
docker ps
So far, we have three containers running: voting-container, db and redis like below diagram:
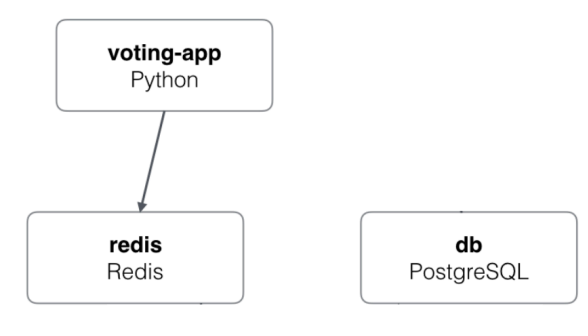
Change current directory to
worker-appdirectory:
cd ../workerCheckout the Dockerfile of that voting website:
cat DockerfileCan you figure out line by line what it does? Note : this Dockerfile is building and packaging a .NET Core Worker service to read from the Redis votes list, aggregates votes, and writes results eventually in PostgreSQL containers.
Build a Docker image of worker app with that Dockerfile:
docker build . -t worker-appCheck if the new work image is there:
docker images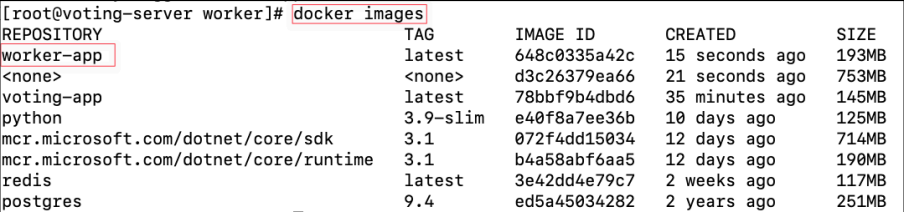
If you look inside “
Worker.java” in “src/main/java/worker” directory, you should see that the Worker application depends on redis and db services:
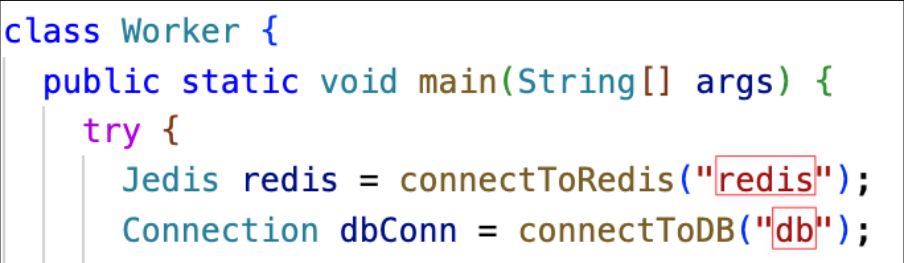
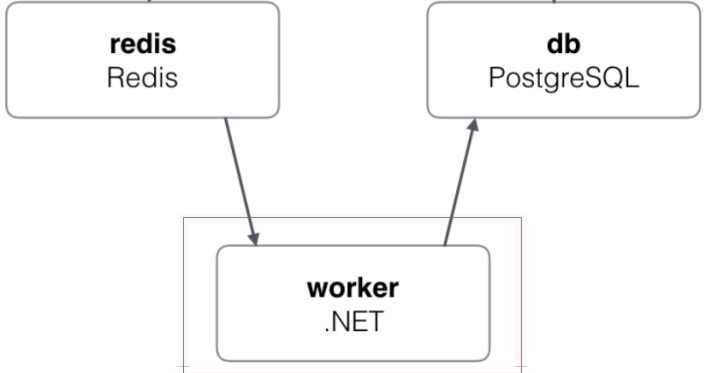
Run a Docker container from the worker app image. Note, do you notice we have “
--linkredis:redis--linkdb:db” to link connections between different containers?:
docker run -d --name worker-container --link redis:redis --link db:db worker-appCheck if the new worker container is there and running:
docker ps
Change current directory to result directory which contains the result website:
cd ../resultCheckout the Dockerfile of that result website:
cat DockerfileCan you figure out line by line what it does?
Note : this Dockerfile is building the Result website of the voting app with Node.js. This Result app reads the votes from PostgresSQL container and serves a web page with current vote counts.
Build a Docker image of result app with that Dockerfile:
docker build . -t result-appCheck if the new
result-appimage is there:
docker images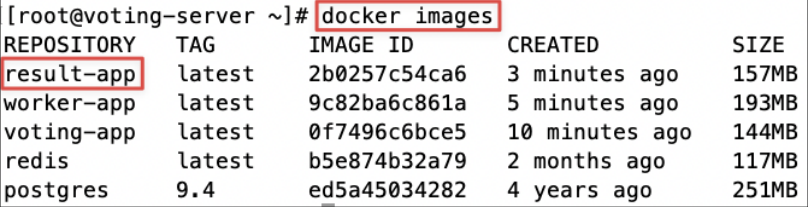
Run a Docker container from the result app image ➜ The result website is now live via
port 8081:
docker run -d --name result-container -p 8081:80 --link db:db result-app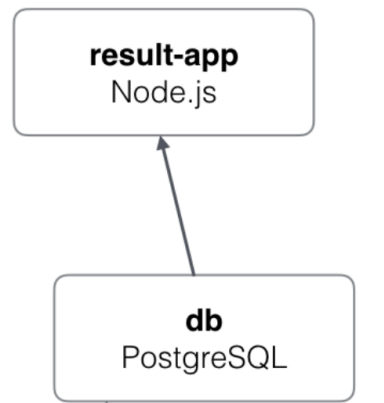
Check if all five containers are running:
docker ps
Now, you can open the browser to check the result website via the port 8081:
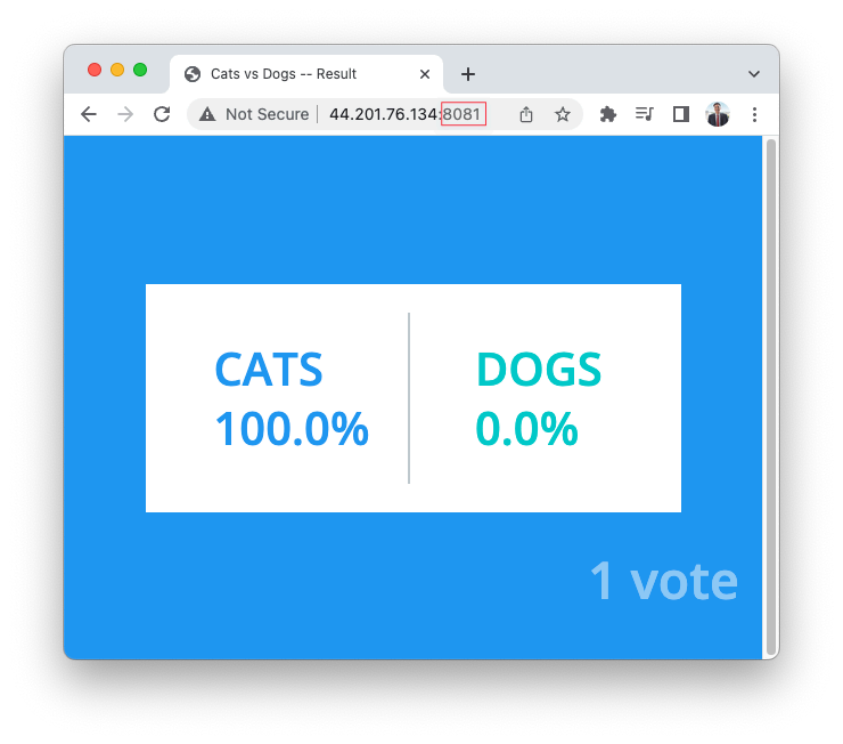
You can send the voting website (
port 8080- http://public-ip-address-ec2:8080/) to your friends and ask them to vote, and check the result website (port 8081- http://public-ip-address-ec2:8081/):
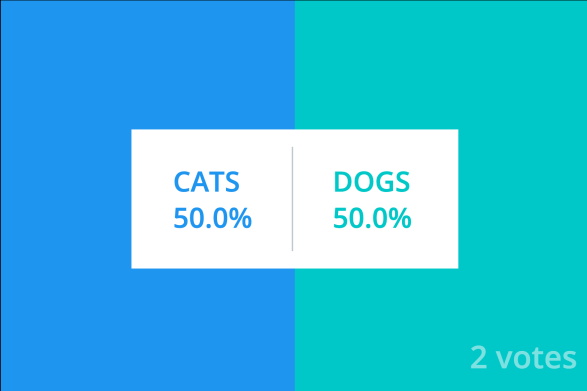
[Tips for testing] you can test the app by opening the 8080 in incognito mode in the browser to be able vote multiple times and the result website should show the result updated in real time!

In conclusion, you have successfully deployed the voting application by running and connecting 5 different containers.
1d. Deploy the application with Docker Compose
It took some time to deploy this application by running line by line commands.
A better way is to use Docker Compose by defining a YAML file to configure your Docker application's services. Let’s get started!!!
Let’s install Docker Compose :
sudo curl -L
https://github.com/docker/compose/releases/latest/download/docker-compose-$(uname
-s)-$(uname -m) -o /usr/local/bin/docker-compose
sudo chmod +x /usr/local/bin/docker-compose
You can check out more about the installation of Docker Compose here: https://docs.docker.com/compose/install/linux/
Let’s check the version of Docker Compose:
docker-compose version
Let’s start from scratch so we need to stop all running containers and remove all containers:
docker kill $(docker ps -q)
docker rm $(docker ps -a -q)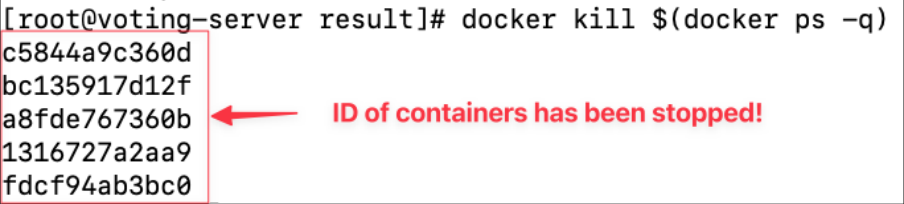
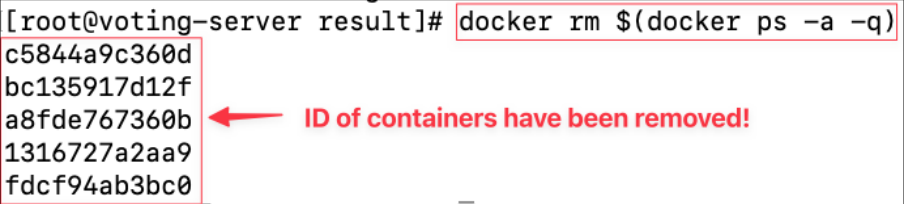
Let’s list all containers again to make sure all have been stopped and removed:
docker ps -a
Note: please don’t delete any docker images as we still need to use them for our docker compose exercises.
Nice, now we just need to create a file “docker-compose”.yml.
Before that, let’s get back to the home directory of root user:
cd ~Create a file “
docker-compose”.yml
nano docker-compose.ymlHistorically, Docker Compose configuration files evolved from version 1 through 3. However, the Compose Specification (found at https://github.com/compose-spec/compose-spec) has become the standard. Instead of requiring a specific version number, Docker Compose (v2 and later) interprets the file using the latest specification.
https://docs.docker.com/compose/compose-file/compose-file-v3/
Here is the content of our docker.compose.yml. Can you make sense of this file based on the documentation?
Note: By default, Docker Compose creates a network for these services. Each service can be reached by its service name (e.g., "vote", "redis", "db").
services:
 redis:
   image: redis
 db:
   image: postgres:9.4
   environment:
    POSTGRES_PASSWORD: "postgres"
 vote:
   image: voting-app
   ports:
    - "8080:80" # Expose the vote service on port 8080 (http://<EC2_IP>:8080)
   depends_on:
    - redis
 worker:
image: worker-app
depends_on:
- db
- redis
result:
image: result-app
ports:
- "8081:80" # Expose the result service on port 8081 (http://<EC2_IP>:8081)
depends_on:
- db[Explanation] This Compose file sets up a group of connected services. Each service runs in its own container: Redis provides a database cache, Postgres is a database storing data, a " vote " web app is accessible on port 8080, a " worker " service processes background jobs using both Redis and Postgres, and a " result " web app shows the results on port 8081. The depends_on lines ensure some services start before others, and all services can communicate with each other by their names on a shared network.
To run the
docker-compose.yml, we just need to run the command:
docker-compose up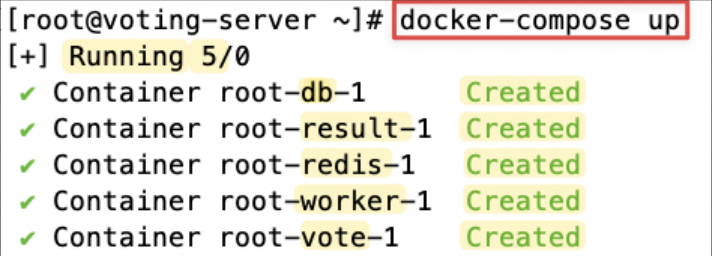
Let’s check the website via port 8080 and 8081 ! Everything should work like before! Yayyyyy!
To stop our Docker Compose from running then you can press Ctrl + C:
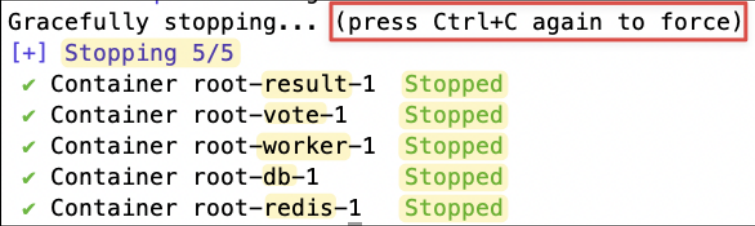
In case, you are interested in running this docker compose in the “detached” mode (With
-d, you immediately get back your shell prompt, and the containers keep running in the background), you can try:
docker-compose up -d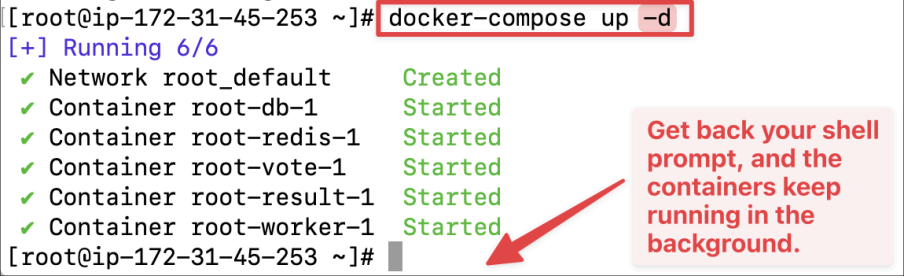
You can try to inspect the running containers due to that Docker compose:
docker ps
When you run with
-d(detached mode), the process is no longer tied to your terminal, so you can’t just stop it with Ctrl+C. Instead, you manage it through Docker Compose commands:
docker-compose down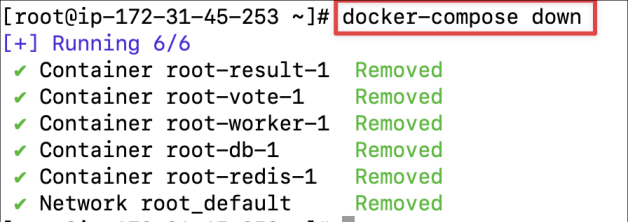
Congratulations for successfully deploying the voting application using Docker Compose! Amazing skills!
2. Docker Swarm
In this section, we will learn how to create a swarm cluster (master and workers)

2a. Create the Swarm manager and worker servers
In this experiment, we only need three EC2 instance to learn docker swarm:
Here are the settings of these three EC2 instances:
Name : “
docker-master”, “docker-worker-1” or “docker-worker-2”OS : default default Amazon Linux 2023 AMI (Free-tier)
Instance Type : t3.micro (Free-tier)
Key pair : select and reuse your old key in other labs (
devops_project_key)Storage : Default 8 GB is plenty enough!
Security Group:
Optional Name:
docker-swarm-security-groupSource Type: Anywhere
Open these ports:
22 for SSH
2376 : used for secure
Dockerclient communication. This port is required for Docker Machine to work. Docker Machine is used to orchestrate Docker hosts.2377 : used for communication between the nodes of a
Docker Swarmor cluster. It only needs to be opened on manager nodes.7946 : Used for communication among nodes (container network discovery).
4789 : overlay network traffic (container ingress networking).
8080-8090 for web application
Please create the security group “ docker-swarm-security-group ” once and let other instances reuse the existing security group.
2b. Install and configure Docker
Please choose either Option A - Manual Setup or Option B - Auto Setup with User Data Script:
Option A - Manual Setup:
Please SSH login to all of the EC2 instances.
Please change the host name for all EC2 instances accordingly so we can easily manage them like so:



Hint : for a reminder, you can use this command to change the hostname:
sudo su -
echo "new-host-name" > /etc/hostname
reboot
Don’t forget to login as the root user:
sudo su -Install docker on all EC2 instances:
yum install -y dockerStart docker service on all EC2 instances:
service docker startOption B - User Data Script:
Click on Advanced details

Upload or paste in the User data:
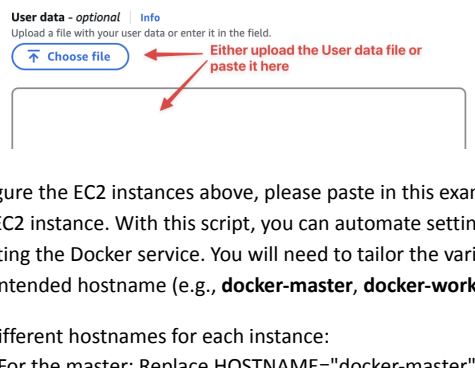
When you configure the EC2 instances above, please paste in this example EC2 User Data script when launching each EC2 instance. With this script, you can automate setting the hostname, installing Docker, and starting the Docker service. You will need to tailor the variable HOSTNAME to match each instance’s intended hostname (e.g., docker-master , docker-worker-1 , docker-worker-2 ).
To use different hostnames for each instance:
For the master: Replace
HOSTNAME="docker-master"For worker 1: Replace
HOSTNAME="docker-worker-1"For worker 2: Replace
HOSTNAME="docker-worker-2"
#!/bin/bash
# Set a variable for the hostname. Modify this value as needed.
HOSTNAME="docker-master"
# Set the hostname using the variable
hostnamectl set-hostname "$HOSTNAME"
# Update packages
yum update -y
# Install Docker
yum install -y docker
# Start Docker service
service docker start
# Enable Docker to start on boot
systemctl enable dockerAfter Option A and Option B, continue below here:
Check the status of docker service on all EC2 instances to make sure it is active (running):
service docker status2c. Practise Docker Swarm commands
On the master node , please start the swarm (by selecting it to be swarm master/manager):
docker swarm init
On the slave/worker node , please join the swarm by copying and pasting the above suggested command:
docker swarm join --token <long-token-string>

On the master node , you can list all nodes in the swarm.
docker node ls
* means the current server that you are on.
A node can leave the swarm by running the command so please switch to one of the workers and make it leave the swarm:
docker swarm leave
On the master node, you can list all nodes in the swarm again.
docker node ls
As you can see the docker-worker-1 is down and left the swarm already!
Let’s add the
docker-worker-1back to the swarm again!

On the master node, you can list all nodes in the swarm again. Note, you can see that the same node joining again will have a new ID instead of the old one.
docker node ls
Let's remove the node which is already down so our node list can be more organised:
docker node rm <node_id or node_hostname>
2d. Deploy services on the Swarm
On the master node , let's list all service commands of docker:
docker service --help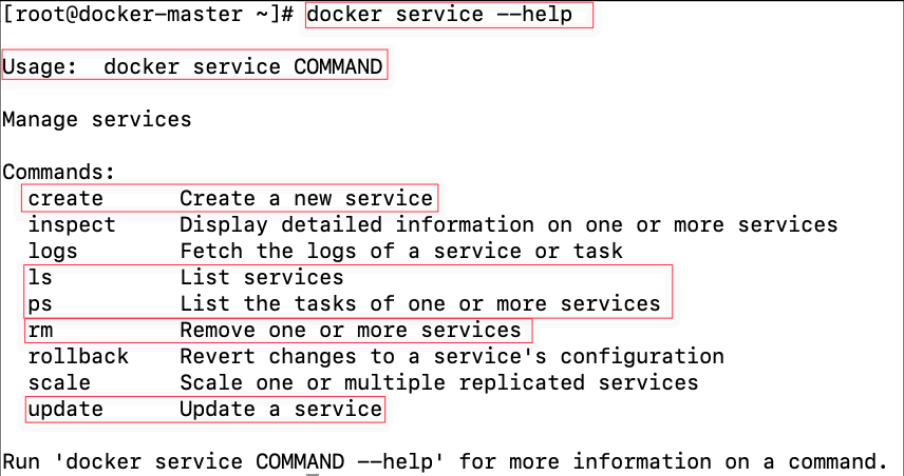
Let’s see Docker Swarm in action! An NGINX container is a Docker container that runs the NGINX high-performance web server. It is often used as a “hello world” example container because it’s simple, fast, and demonstrates many important container concepts without complexity. Read more here: https://hub.docker.com/_/nginx
In Docker Swarm, a service is the fundamental unit of deployment and scaling. It’s essentially a definition that tells the swarm what container image to run, how many replicas of it to maintain, and how to distribute them across the cluster.
On the master node , create a service of nginx web server:
docker service create nginx
On the master node , we can list services:
docker service ls
On the master node , we can list the task of that service by its id:
docker service ps <service-id>
Note that: the task is running on the “docker-master" node.
In Docker Swarm, a task is the atomic unit of scheduling in Docker Swarm. Each replica of a service corresponds to one task, and that task runs exactly one container.
👉 So in short:
Service = the definition and desired state (e.g., “run 3 replicas of nginx”).
Task = one running instance of that definition (e.g., one container, on one node).
However, we forgot to define which port number to expose for our nginx server, so let's update the service accordingly:
docker service update <service-id> --publish-add 8080:80
On the master node, we can list services:
Note: after updating the port number, the old container on
docker-masteris shutdown, the updated container is now running ondocker-worker-2in the screenshot (in your case, it could pick any random node in the cluster to run the container).
docker service ps <service-id>
Open the public ip address of the ec2 instance where the updated container is on (in our screenshot, it shows it runs on docker-worker-2) and you can check the website on the browser via the port 8080 as below:
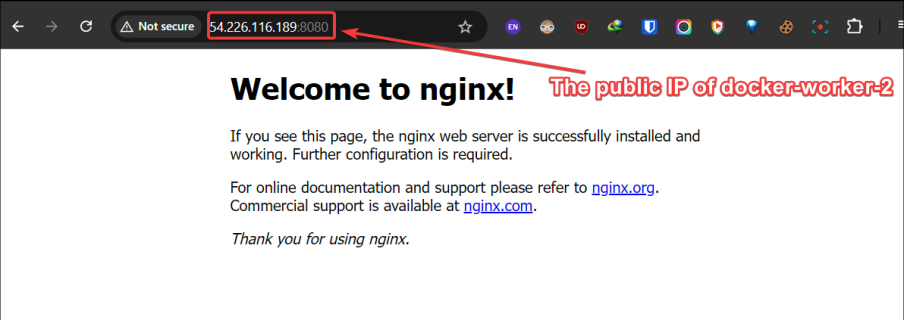
On the master node, let's remove that service:
docker service rm <service-id>
No more service is running so the container should be shutdowned and removed.

On the master node , let's create a new service with replicas parameters :
Replicas in Docker ensure high availability and scalability by running multiple instances of a service, as seen in this command, which creates an Nginx service with 2 replicas , exposing port 8080 to the target port 80 on each instance.
docker service create --name nginx –=--publish published=8080,target=80 nginx
Let’s check the information of our new service:
docker service ls
Note : The above screenshot shows that Docker confirms the nginx service with 2 replicas has been created and both containers are running successfully. With the --publish flag you mentioned, the service would also be accessible on port 8080 of the swarm nodes, routing traffic into container port
Let’s inspect inside the tasks in our service:
You don’t have to use the raw service ID like docker service ps
<service-id>. You can also use the service name.
docker service ps <service-name>
As you can see, one container is running at docker-worker-2 node and one container is running at docker-master node, showing proper swarm scheduling and service distribution
[Switching terminal to where first container runs (eg,
docker-worker-2)] You can confirm if the container is actually running in thedocker-worker-2node:
docker ps
[Switching terminal to where second container runs (eg,
docker-master)] You can also confirm if the container is actually running in thedocker-masternode:
docker ps
[Switching terminal to
docker-master] However, if you do not want thedocker-masternode to run any container, just to control the swarm to ensure the master node have little of burden then you can run the command on the master node:
docker node update --availability drain docker-master
After applying our previous command, the container of nginx in the master node is shut down, thus a new container of nginx in
docker-worker-1is launched to ensure the number of containers of nginx in the swarm is always 2 (the effect of replicas).
docker service ps nginx
Note : you should see that by draining docker-master, the container that was running there was stopped, and Swarm automatically launched a replacement container on another worker (docker-worker-1). This demonstrates Docker Swarm’s self-healing and load-balancing behavior: it keeps the service at the desired replica count, even when nodes are marked unavailable.
Good job so far!
Alright, hopefully now the docker-worker 1 and docker-worker 2 are listening to the port 8080 to serve the nginx websites. Please open the public IP address of docker-worker 1 and docker-worker 2 via the port 8080 to test if the homepage of nginx web server is showing. [Our Next Task] However, we want users to access the website via a common IP address or domain name so the incoming requests will be spread out for all of the docker-worker instances.
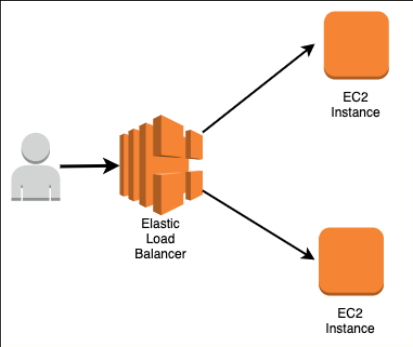
🏆
That's why we need to create a load balancer on AWS to do that!
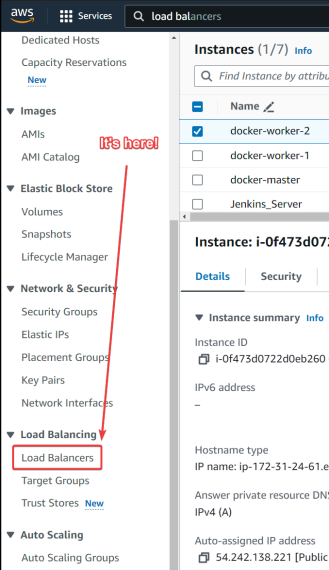
Let's go! On the AWS dashboard, select the load balancer:
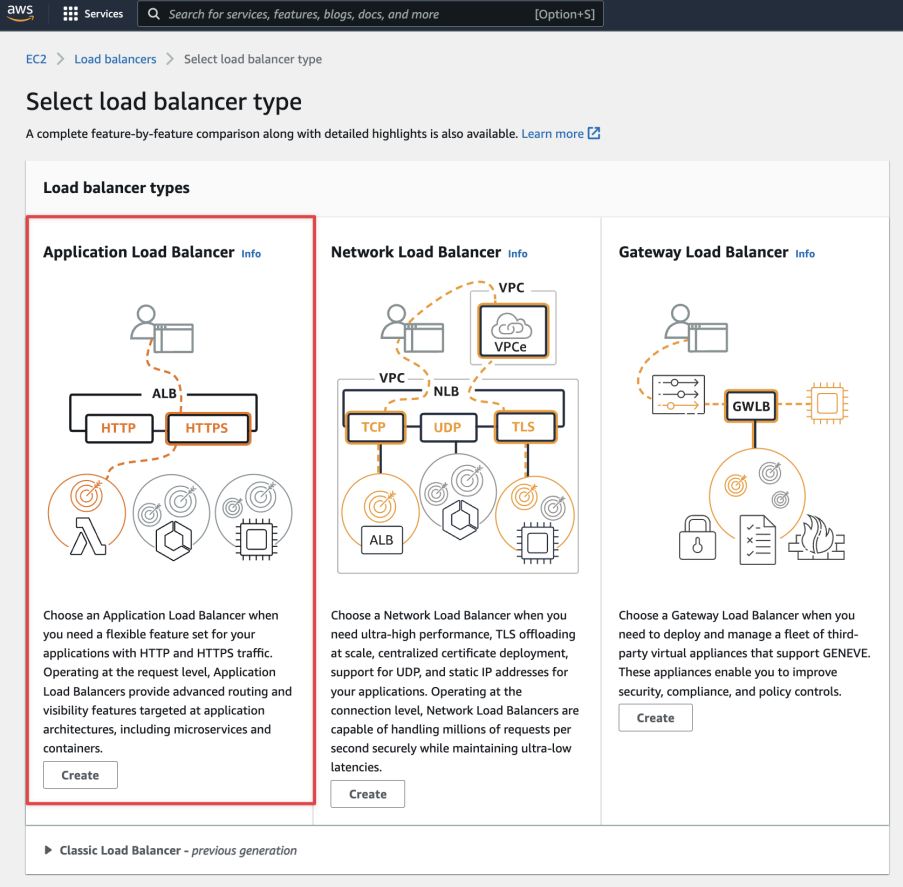
Choose Application Load Balancers as we want to redirect traffic from the balancer to our nginx application servers:
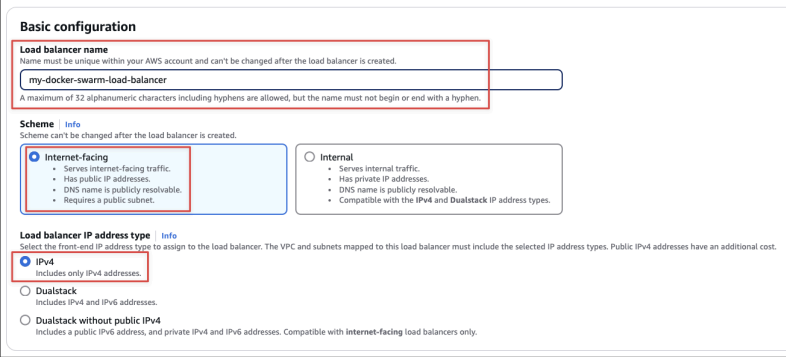
Enter basic information of your balancer:
Load balancer name :
my-docker-swarm-load-balancerA unique identifier for the load balancer within the AWS account.
Scheme: Internet-facing
This makes the load balancer accessible from the internet.
It gets public IP addresses.
Its DNS name is publicly resolvable.
Requires mapping to a public subnet.
Best when your Docker Swarm service should be accessible from outside (e.g., web apps).
IP address type: IPv4
Restricts the load balancer to only IPv4 addresses.
Suitable if your clients/users connect using IPv4 (most common scenario).
Simple and widely supported.
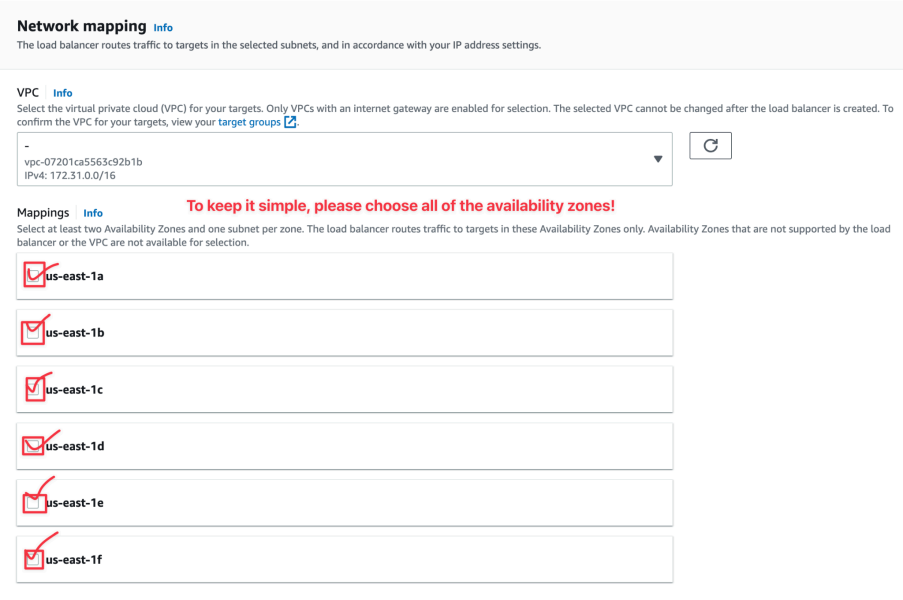
Availability Zone Mappings:
You can choose subnets in Availability Zones (AZs) within the
VPCwhere the load balancer will route traffic.Ideally, you should choose the specific availability zones which actually contain your EC2 instances. However, to keep to it simple, we can select all of them: us-east-1a, us-east-1b, us-east-1c, us-east-1d, us-east-1e, us-east-1f
High availability: Even if one AZ goes down, traffic can still be routed through others.
Better load distribution: The load balancer can spread traffic across multiple zones.
Resilience: Minimizes single points of failure.
We can select the same security groups of our docker security group to keep it simple (in theory, you only need to choose a group with the port you want to serve your clients, in our case, we can keep it simple by also choosing the
port 8080):
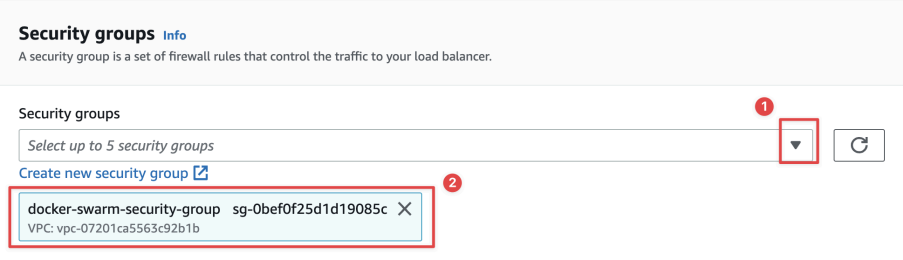
We need to create the target group first before we can route all traffics of balancer to it:
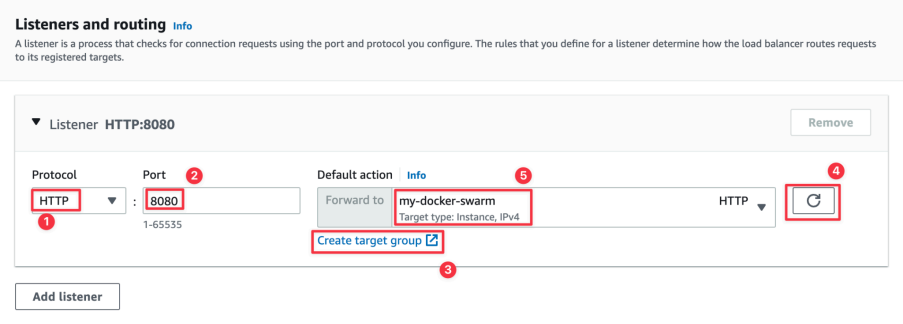
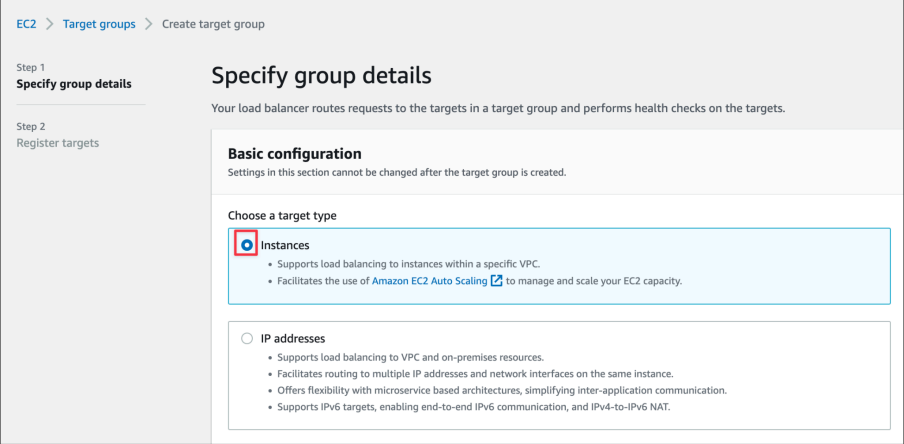
Create a target group of EC2 instances:
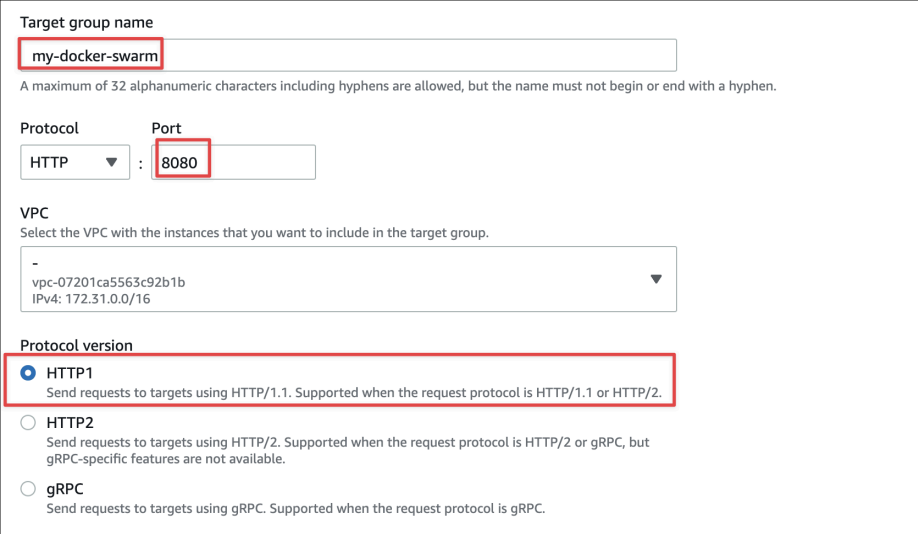
Let's enter the name of our target group of EC2 instances with the
port 8080:
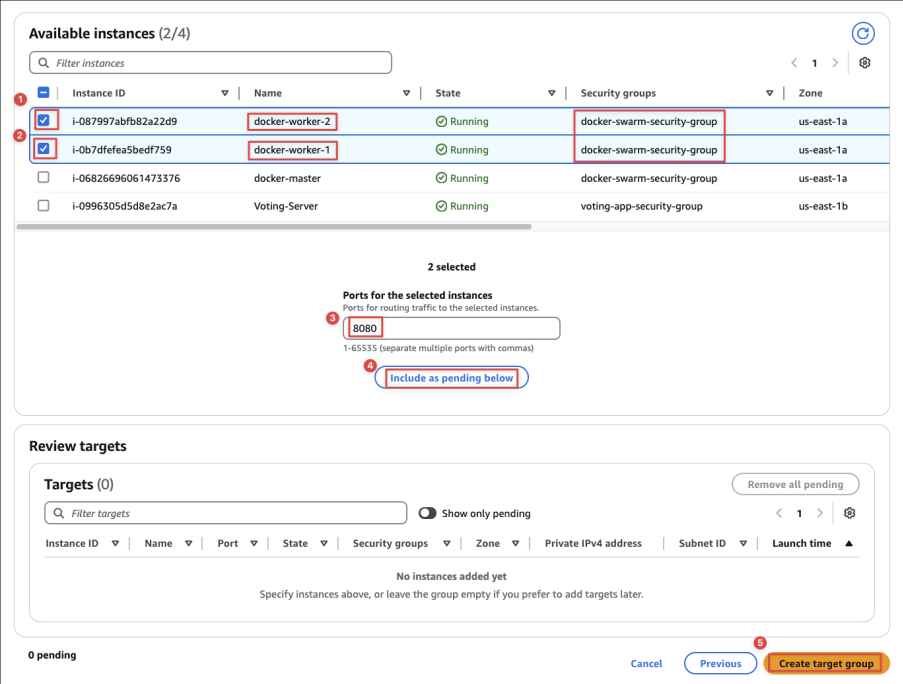
Go next page:

Add all the
docker-workerinstances (docker-worker-1anddocker-worker-2) to this group:
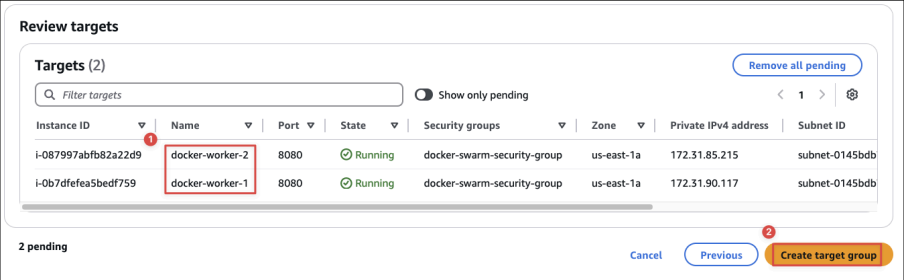
Confirm the group details and finish the group registration:
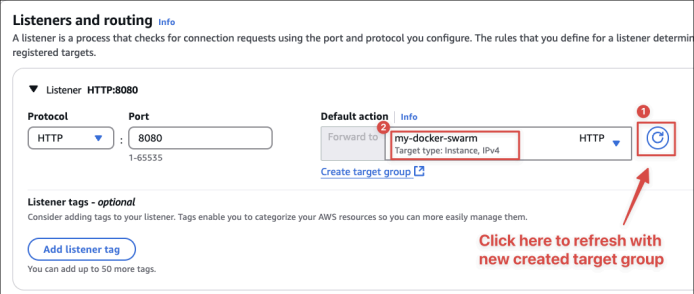
Now, we can go back to the balancer setting page and select the target group we just created:
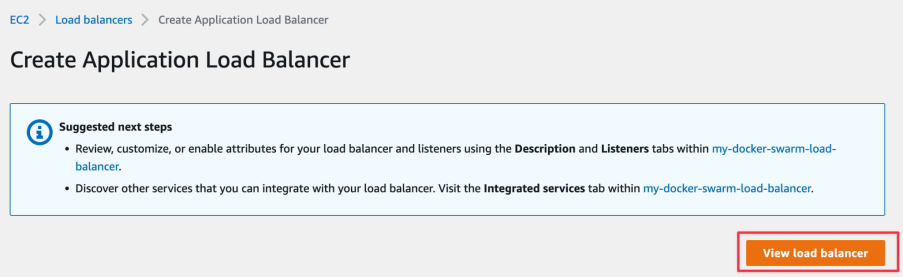
Confirm to create the balancer:

View your balancer after creating it:
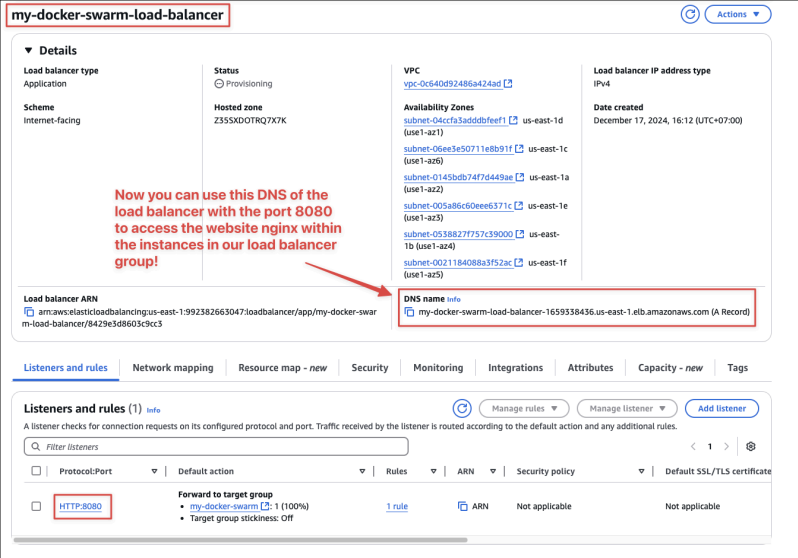
Now, you can see the DNS name of the balancer which will be the URL link you should give to your clients/customers to open the website:
You should see that the load balancer is now active, internet-facing, and listening on
port 8080. You can use the provided DNS name with theport 8080to access your Docker Swarm Nginx service running across multiple nodes, with AWSELBautomatically distributing the traffic.
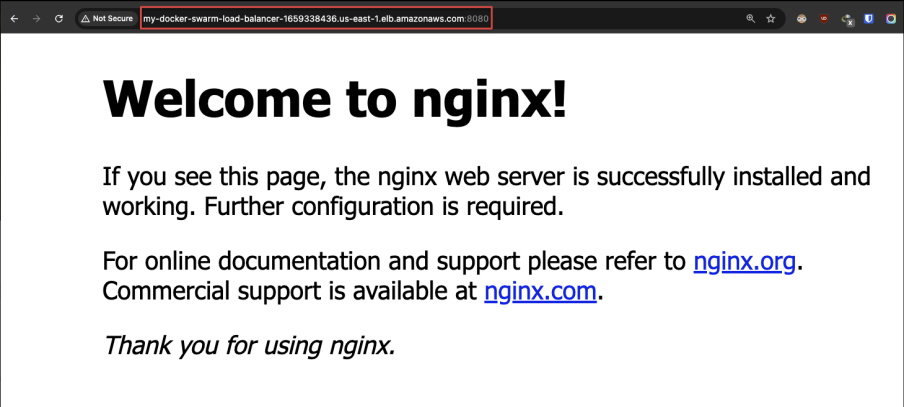
Note : it might take around two minutes for the load balancers to warm up enough to start directing the traffic so don’t panic if you don’t see the website right away using the DNS of the load balancer!
You can use the DNS Name to access the website running in the Docker Swarm service across multiple nodes being distributed in AWS ELB. Great success! Now you can see the website which is served by one of your many
docker-workerinstances within the load balancer!
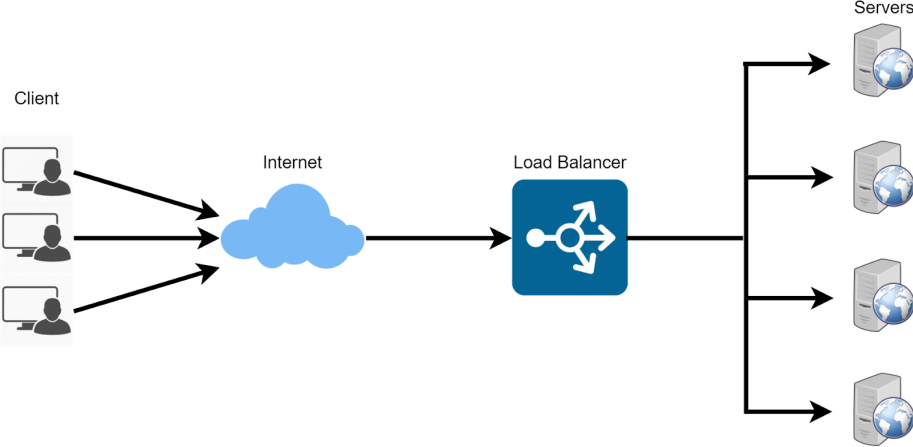
Super awesome! Imagine for a very complex and popular website which got hundreds of thousands of views everyday, with a load balancer and hundreds of instances, you can distribute all the incoming traffics from users across among all of instances to make sure the load for each
instance small enough and if there is any container crashing then a new container will be launched to replace the old crashed one to make sure the availability of the website is always high!
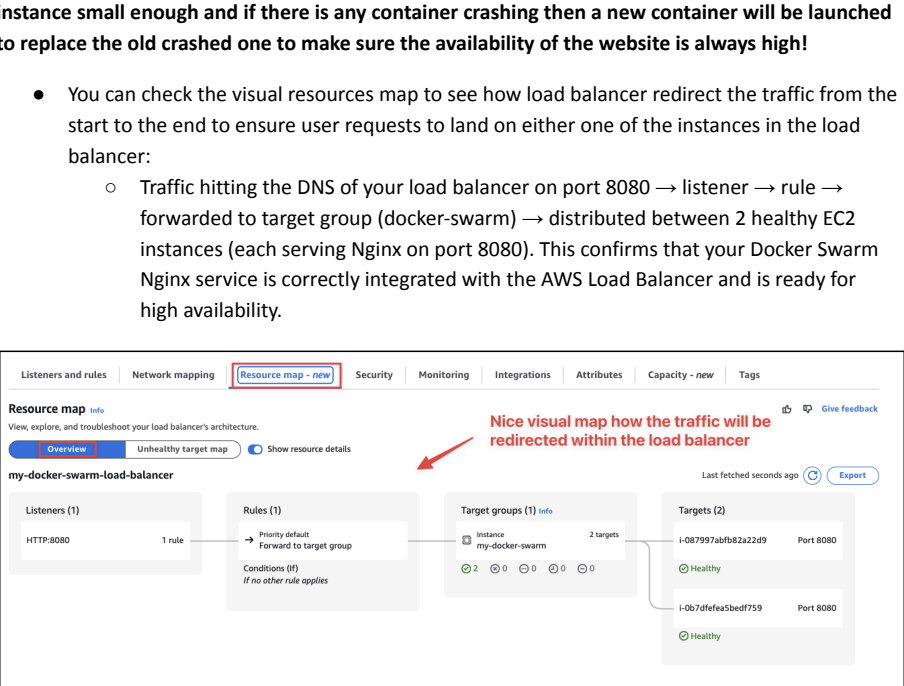
You can check the visual resources map to see how load balancer redirect the traffic from the start to the end to ensure user requests to land on either one of the instances in the load balancer:
Traffic hitting the DNS of your load balancer on
port 8080→ listener → rule → forwarded to target group (docker-swarm) → distributed between 2 healthy EC2 instances (each serving Nginx onport 8080). This confirms that your Docker Swarm Nginx service is correctly integrated with the AWS Load Balancer and is ready for high availability.
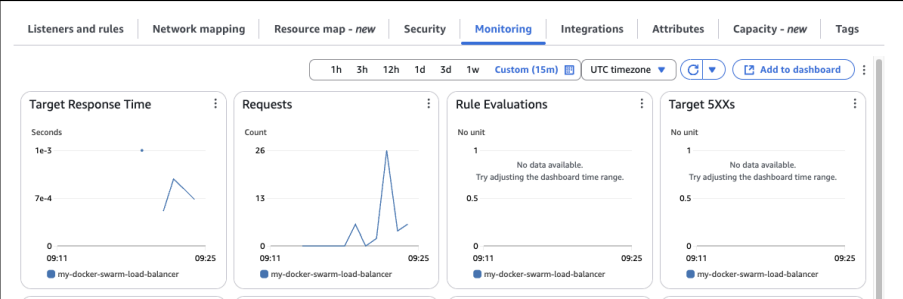
Also, you can manage the health and traffic of your load balancer using CloudWatch
metricsin the Monitoring tab as below:The most important metrics to continuously monitor in CloudWatch for ELB are:
Target Response Time (latency)
Requests Count (traffic volume)
Target 4XXs and 5XXs (client/server errors)
ELB 5XXs (502/503/504) (load balancer-level issues)
Connection Errors / Rejected Connections (connectivity & scaling issues)
These will tell you whether your Docker Swarm Nginx service is healthy, responsive, and reachable through the load balancer.
Alright! I hope that's enough for you to have a taste of Docker Compose, Docker Swarm and Load Balancer.
Congratulations on completing this lab! You’ve taken important steps into the world of container orchestration and DevOps practices.
What you’ve built here may be a simple voting application, but the skills you’ve practiced are the same ones used to power large-scale, production-grade systems. Each command and configuration you’ve written is another building block toward mastering containerized deployments.
Remember:
Docker Compose helps you quickly set up and manage services for development and testing.
Docker Swarm allows you to orchestrate containers across clusters with reliability and scalability.

🧪 Challenge: Add Prometheus monitoring with Docker Compose
Goal
Enhance your Docker Compose skills by extending the existing multi-container application to include a new service. You'll configure Prometheus to monitor key metrics of your deployed application.
Scenario and implementation steps
Imagine you’re running the voting application in a real-world production environment, where monitoring application health and performance is critical. You’ve been tasked to integrate Prometheus , a popular metrics monitoring tool, into the existing Docker Compose setup. This new service will track application metrics, such as vote counts, and provide insights into application behavior through real-time monitoring.
Step-by-step guide
For these exercises we will get back to work on the voting server.
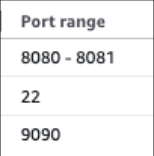
Open the new port 9090 for the security group for Prometheus.
SSH to your EC2
voting-serveras root again!
sudo su -Ensure your existing application is running by starting by confirming your original application is working correctly:
docker-compose up -d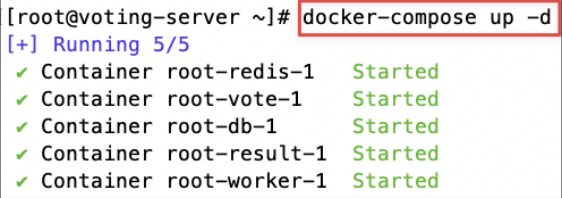
Check that all services (vote, worker, result, redis, db) are healthy:
docker ps
This is an example of how you can modify your Dockerfile to integrate Prometheus instrumentation for the Python (Flask) vote application. What we need to do:
Install the
prometheus_clientPython library inside the container so we can use it in theapp.py.In
app.py, we will add code to expose a /metrics endpoint and increment counters or other metrics. (This part is done in code, not in Dockerfile.)Let’s get started by changing working directory to the vote folder:
cd simple-voting-application/voteAdd prometheus library to
requirements.txt: if you add prometheus to your requirements file, you don’t need to change much in the Dockerfile. Yourrequirements.txtmight look like this:
FlaskRedis
gunicorn
prometheus_client[Optional] Alternatively, you can instead choose to install prometheus directly in the dockerfile like:
…
RUN pip install -r requirements.txt
# Additional line to install prometheus_client
RUN pip install prometheus_client==0.16.0
…
Next, you need modify the existing
app.pyto integrate Prometheus metrics. We will:Import the Prometheus client library.
Define a
metric(a Counter) to track votes.Increment the counter each time a vote is cast.
Expose a /
metrics endpointto allow Prometheus to scrape these metrics.
... import logging
# Import Prometheus client library from prometheus_client import Counter, generate_latest
option_a = os.getenv('OPTION_A', "Cats")
... app.logger.setLevel(logging.INFO)
# Define a counter metric to count the number of votes per choice vote_counter = Counter('app_votes_total', 'Total number of votes', ['choice'])
def get_redis(): ...
... app.logger.info('Received vote for %s', vote)
# Increment the Prometheus counter for the chosen option vote_counter.labels(choice=vote).inc()
data = json.dumps({'voter_id': voter_id, 'vote': vote}) ...
# Expose a /metrics endpoint for Prometheus scraping
@app.route("/metrics")
def metrics():
   return generate_latest(), 200, {'Content-Type': 'text/plain; charset=utf-8'}
if __name__ == "__main__":
   app.run(host='0.0.0.0', port=80, debug=True, threaded=True)
Rebuild your
Dockerimage (after ensuringprometheus_clientis installed viarequirements.txtor a pip install line in the Dockerfile). Make sure the image can be successfully built.
docker build . -t voting-appChange to the directory where your
docker-compose.ymlresides (likely /root if you followed the initial instructions).
cd ~Create the
prometheus.ymlfile to scrape the vote app’s /metrics endpoint:
global:
 scrape_interval: 2s
scrape_configs:
 - job_name: 'vote_app'
   static_configs:
    - targets: ['vote:80']
# Add more scrape_configs as needed once you have other services exposing
metrics.
[Explanation]
scrape_interval: Prometheus will scrape every 2 seconds, which is fine for testing.targets: ['vote:80'] : This means Prometheus will try to scrape metrics at http://vote:80/metrics. Since vote is the service name defined in
docker-compose.ymland all services share the same Docker network, this should work correctly. Your vote service runs onport 80internally (mapped to 8080 externally), so internally Prometheus can reach it at vote:80.
With these changes, Prometheus will be able to scrape the /metrics endpoint and display real-time voting data.
Edit your existing
docker-compose.ymlto add a new Prometheus service. You can add it at the bottom of the file.
services: redis: image: redis
db: image: postgres:9.4 environment: POSTGRES_PASSWORD: "postgres"
vote: image: voting-app ports:
"8080:80" # Expose the vote service on
port 8080(http://<EC2_IP>:8080)
depends_on:
redis
worker: image: worker-app depends_on:
db
redis
result: image: result-app ports:
"8081:80" # Expose the result service on
port 8081(http://<EC2_IP>:8081)
depends_on:
db
prometheus: image: prom/prometheus:latest volumes: # Mount your prometheus.yml configuration file into the container
./
prometheus.yml:/etc/prometheus/prometheus.yml
ports:
"9090:9090" # Expose the service on
port 9090(http://<EC2_IP>:9090)
depends_on:
- vote
- result
- db
- redis
- worker
[Explanation]
Exposure of Prometheus : Prometheus is exposed at 9090:9090 , so you can access the Prometheus UI at http://
<EC2_PUBLIC_IP>:9090.Mounting of
prometheus.yml: You’ve mounted ./prometheus.ymlinto/etc/prometheus/prometheus.ymlin the Prometheus container.Service Dependencies: You have
depends_onentries for each service. Whiledepends_onensures the order of starting containers, it doesn’t guarantee that a service is fully ready. However, since Prometheus continuously scrapes, it’s not a big issue.Now, we are ready! Let’s start the entire stack with docker compose:
docker-compose up -d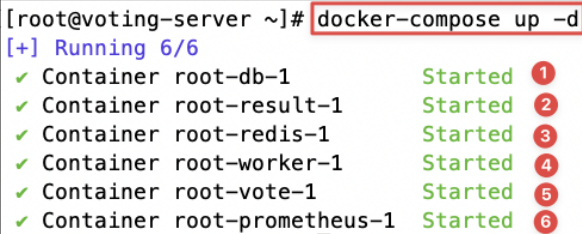
Now you can access:
Access the vote app at http://
<EC2_PUBLIC_IP>: 8080Access the result app at http://
<EC2_PUBLIC_IP>: 8081Access Prometheus dashboard at http://
<EC2_PUBLIC_IP>: 9090
If everything is configured correctly, Prometheus should start scraping the vote service’s metrics, and you’ll be able to see them in Prometheus under the “Status -> Targets” pages.
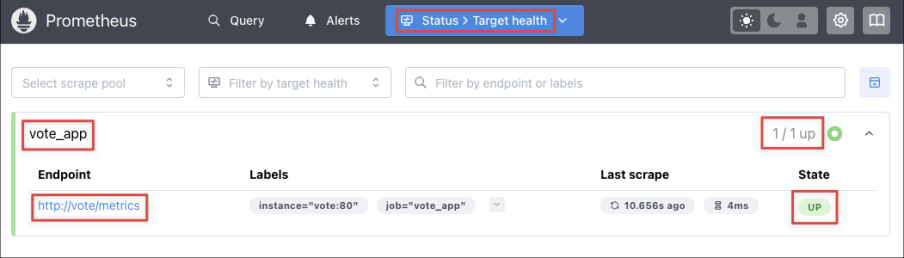
Time to test
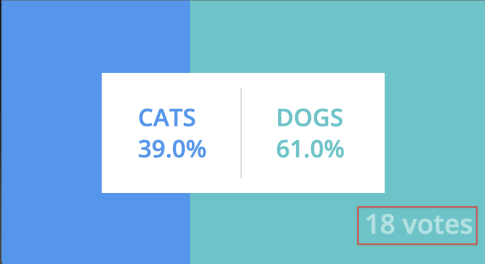
app_votes_totalmetric output!First, please open the browser incognito mode to allow you to make multiple votes to at least increase the count by one. Prometheus client libraries only start reporting counter metrics after they’ve been incremented at least once
In my example, I manually vote many times for testing:
Check the metrics endpoint directly from the terminal
curl http://<EC2_PUBLIC_IP>:8080/metrics | grep app_votes_totalReplace <EC2_PUBLIC_IP> with your actual server’s IP. You should see something like this (could be slightly different for you):
app_votes_total{choice="a"} x.0
app_votes_total{choice="b"} x.0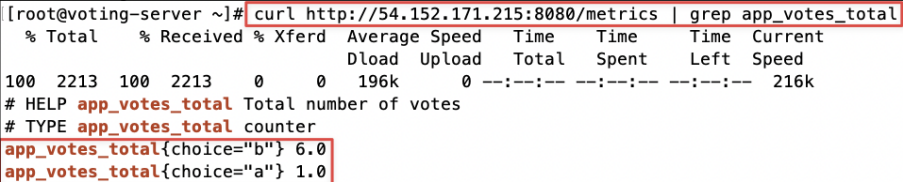
If you don’t see any lines for app_votes_total, it means the application hasn’t recorded any valid votes.
Query the Metric in Prometheus dashboard:
In the Query box, type
app_votes_totaland press Enter.You should see the graph for
app_votes_totalfor each option (Cat or Dog).
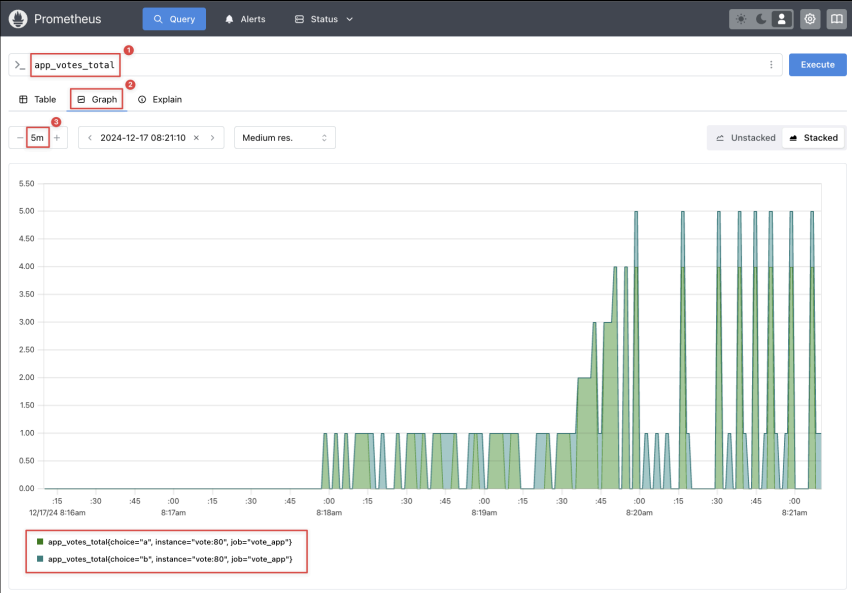
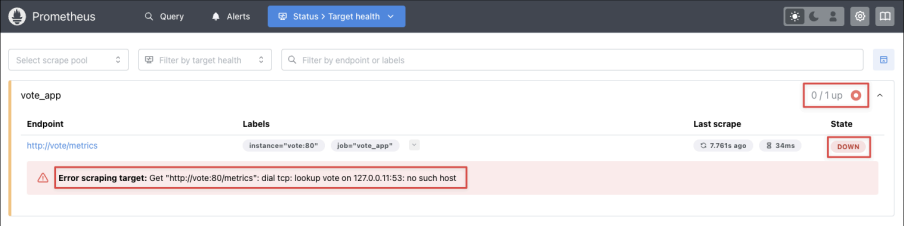
[Website Down Simulation] To simulate the vote website going down, you can simply stop or remove the container running the vote service.
Stop the Container: With Docker Compose, you can just stop that one service:
docker-compose stop voteWhat Happens in Prometheus:
Prometheus continuously scrapes targets at the configured interval.
Once the vote container is stopped/removed, Prometheus will fail to reach http://vote:80/metrics.
After one or two failed scrapes (depending on your configuration), Prometheus will mark the
vote_apptarget as “down.”In the Prometheus UI (http://
<EC2_PUBLIC_IP>:9090/targets), you’ll see thevote_appjob listed as “down”.
Great job completing this lab! You’ve learned how to deploy a multi-container app with Docker Compose and scale it with Docker Swarm. These tools make managing complex applications simpler and more efficient, whether for development or production. Keep practicing, and you’ll master these essential DevOps skills in no time!
🎮 Bonus: Practise Docker Swarm online
![Screenshot illustrating [Bonus] Learning Docker Swarm with Interactive Online Labs from Docker](../assets/tutorials/week-9/page-052-image-02.png)
In case you want to revise and work on your docker swarm skills, please follow this very short fun learning labs for Docker swarm from Docker:
Open this link: https://training.play-with-docker.com/ops-s1-swarm-intro/
Have fun! Always be learning!