
🎯 Objective

For the lab this week, we will get some hands-on experience for learning
Docker.It is important to get familiar with the basic concepts of Docker.
Also, practice different Docker commands to pull a Docker image from
DockerHub, build aDockerfilefrom that image which can be used to create a Docker image. Eventually we will run a container based on that Docker image.
🧭 Docker CI/CD pipeline overview
In this week lab, we will setup this CI/CD pipeline as below:
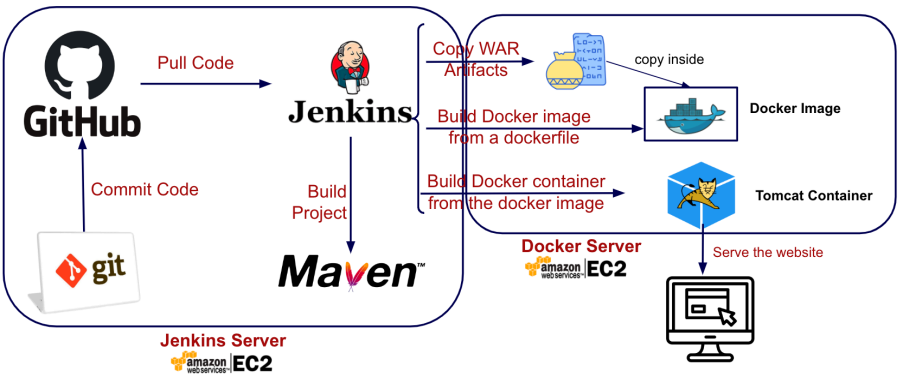
As you can see, we are dealing with two different EC2 instances which are very similar to the previous lab. However, we reuse the Jenkins Server from last week, and replace the old Tomcat Server with our new Docker Server.
✅ Lab requirements
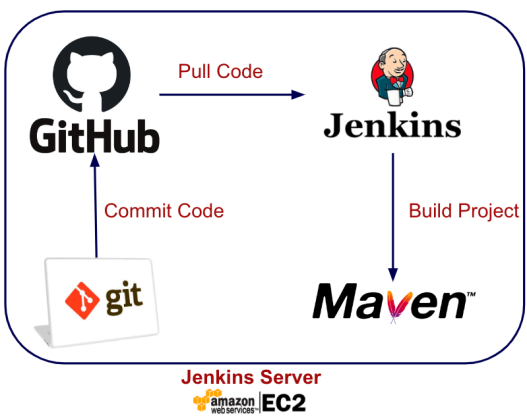
Make sure you still keep the
Jenkinsserver in the previous lab as we continue to create a new Jenkins item to create a new pipeline which is integrated withDocker.However, if you accidentally delete or terminate the Jenkins server, just setup a Jenkins server again but only need to create the last Jenkins job item “BuildAndDeployJob” from the previous lab.

Alright, let’s get started!
🐳 Docker server overview
The outline for this section:
Setup a Linux EC2 instance “
Docker"Install docker
Start docker services
Go through docker commands
☁️ Create the Docker server on EC2
Let’s setup the EC2 instance for “Docker" Server like so:

Here are the settings of the Docker Server for EC2:
Name:
Docker_ServerOS: default Amazon Linux 2023 AMI
Instance Type: t3.micro
Key pair: select and reuse your old key in other labs (
devops_project_key)Storage: Default 8 GB is plenty enough!
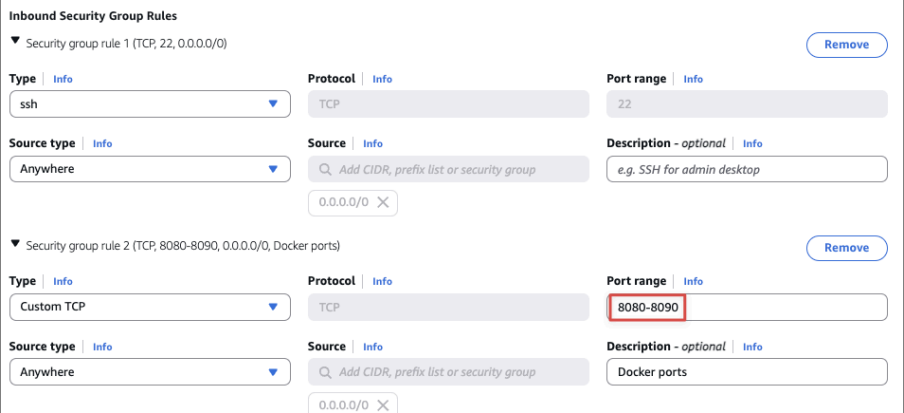
Security Group:
Optional Name:
Docker_Security_GroupSource Type: Anywhere
Open two ports:
22 for
SSH8080-8090 for Docker (as we want to create many containers and each exposes to different ports from the range 8080 to 8090)
After launching the instance then, in the EC2 dashboard you should see the
Docker_ServerEC2 running:

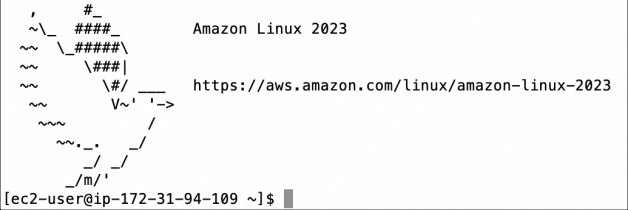
After that, let’s SSH to the Docker Server on EC2:
🐳 Install and start Docker
To keep things simple without dealing with permission, let’s login as a root user and change our current directory to /root:
sudo su -Now, you are now a root user with the highest permission privilege to install anything you want. You can check your current directory, which should tell you that you are at root directory:

Since we will work on multiple EC2 servers (
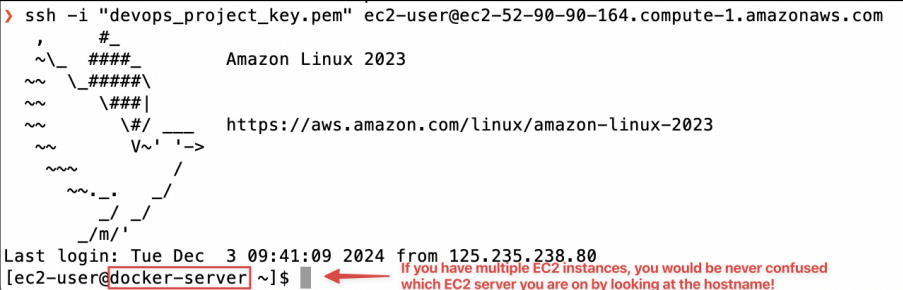
Dockerand Jenkin servers), it would be helpful to rename the hostname of each EC2 server to a meaningful name instead of the ugly internal private IP address of the EC2 so that you can easily know which EC2 server you are working just based on the host name. For example, if your instance has a private IP of172.31.93.50, the hostname becomes ip-172-31-93-50.Let’s set a custom hostname in the instance by modifying the
/etc/hostname
nano /etc/hostname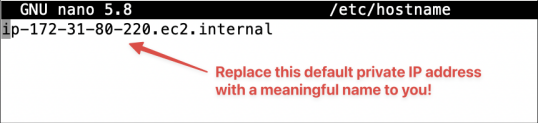

Save the hostname file and reboot the server by typing “reboot":
reboot
Now, wait for a few minutes and let's
SSHinto theDocker_Serveragain then you will see the hostname has changed like so:
Let’s login as a root user and install docker (with -y option, yum will install a specific package along with its dependent package without asking for confirmation):
yum install docker -y
Check the current status of our docker daemon (docker background process):
service docker status
You will see that docker is inactive after just installed, which is normal!
Let’s start the docker daemon:
service docker startCheck the current status of our docker daemon again:
service docker status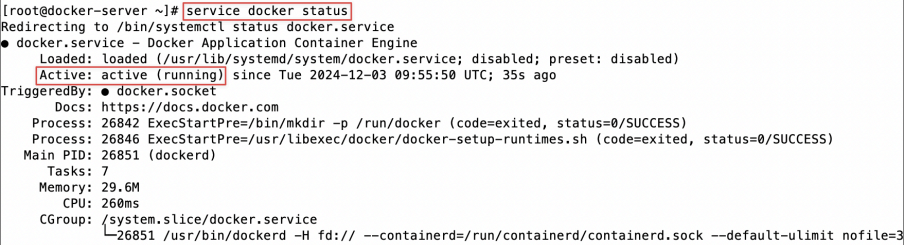
⌨️ Practise Docker basics with hello-world
Let’s run a few commands of docker to introduce them to you:
Let’s list all docker images. There should be no images available like below screenshot:
docker images
Let’s list all docker running containers:
There should be no running containers yet.
docker ps
Let’s list all docker containers regardless of their status (running or stopped or terminated, … ):
docker ps -a
At this moment, there is no image, or container yet so nothing is listed with above commands!
You can test if you docker installation is correct by running a default “
hello-world” container:
docker run hello-world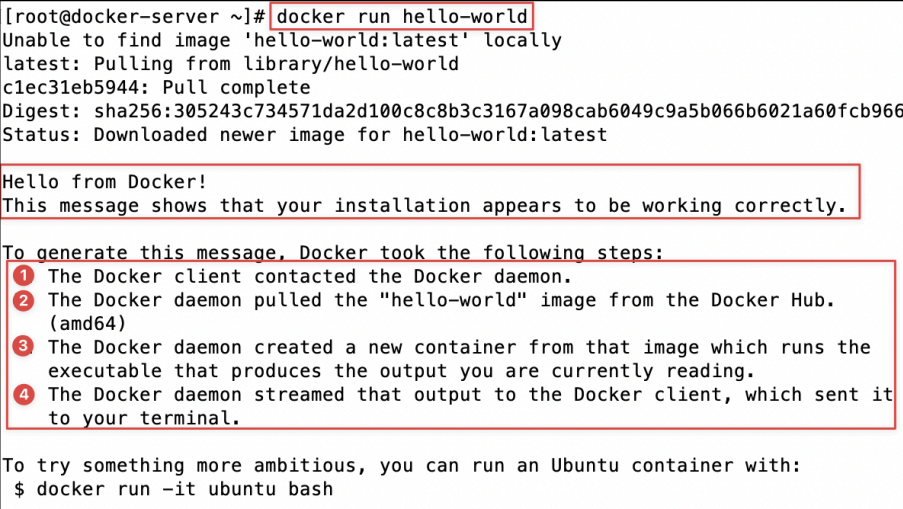
Congrats, you have created a new container hello-world from the “hello-world” image on the Docker Hub. You can read more about that “hello-world” image on Docker Hub here: https://hub.docker.com/_/hello-world
Let’s run these docker commands again:
Let’s list all docker images:
docker images
You should now see the image “hello-world” which was pulled from the Docker Hub.
Let’s list all docker running containers:
docker ps
Explanation: there is still no container running as the “hello-world” container only runs to print out the message then it stops after printing out the message.
Let’s list all docker containers regardless of their status (running or stopped or terminated, … ):
docker ps -a
Explanation: As you can see, that “hello-world” container was run and exited.
Let’s clean up everything by removing/deleting the “hello-world” container and its image:
To remove a container by its ID:
docker rm <container_id>
Alternatively , you can remove all containers by running this command:
docker container prune
Next, let’s remove the “
hello-world” image:
docker rmi <image_id>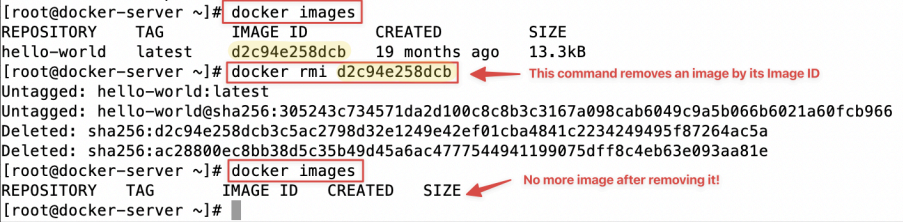
To list all docker commands, you can ask for help:
docker --helpDon’t worry, the list is long but we only need to use a few of them!
Alright, hopefully, you are warmed up to witness Docker in action!
🐈 Run Tomcat from Docker Hub
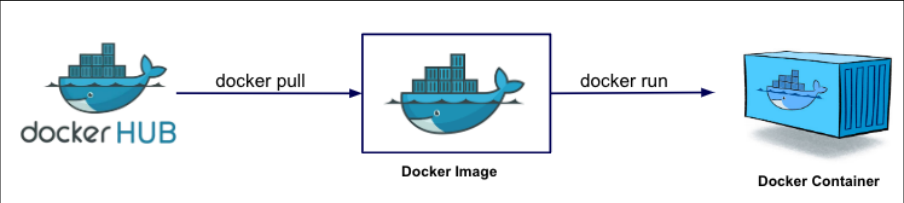
Browsing
Docker Hub(https://hub.docker.com/) and search forTomcatimage (DockerOfficial Image):
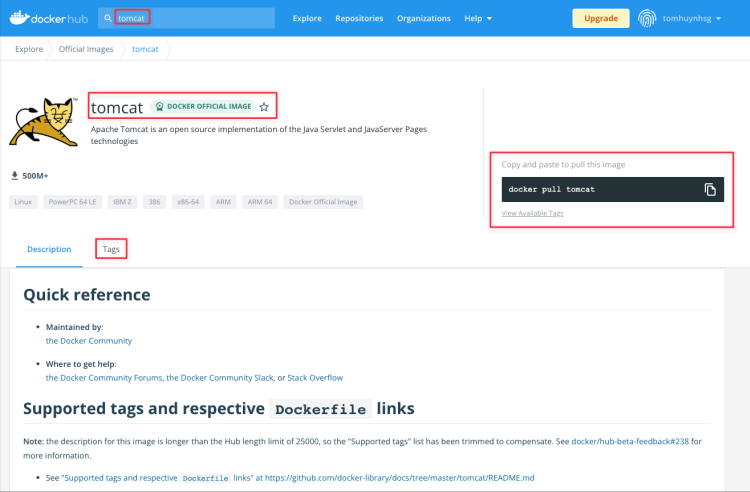
In the description of the Tomcat, please read the section “How to use this image”. In short, it mentions that:
When you use the official Tomcat Docker image, it comes with some built-in example web applications (called " webapps "). These are sample applications that demonstrate how Tomcat works.
For security reasons, these example webapps are no longer enabled (or active) by default in the image. This is because leaving unnecessary apps running can create security risks.
Even though they're not active, the example webapps haven't been completely removed. They're stored in a folder called webapps.dist inside the Docker image.
If you want to use these examples, you can manually move them from webapps.dist to the webapps folder to activate them.
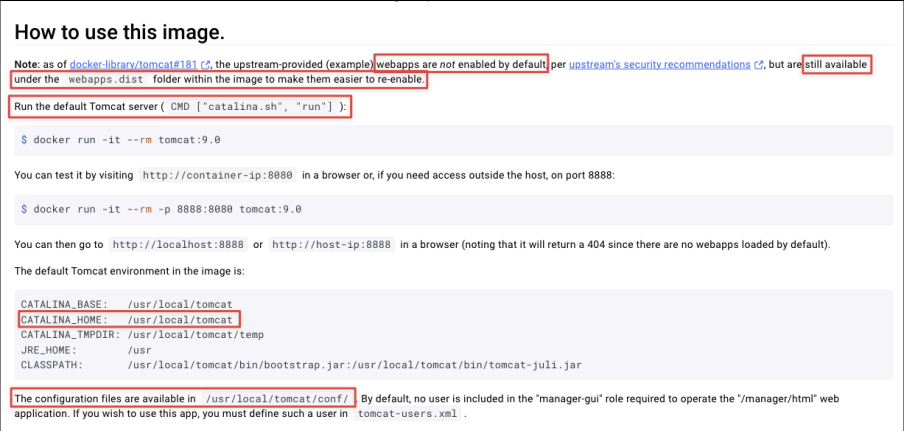
I have highlighted some important information to keep in mind for this Tomcat image from Docker Hub! Let’s go!
Let’s pull the tomcat image from Docker Hub:
docker pull tomcat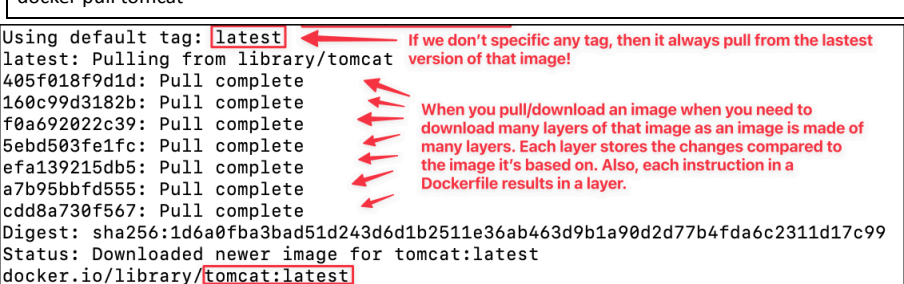
Let’s list all docker images:
docker images
Let’s run a container built based on this tomcat image:
docker run -d --name <container_name> -p <outside_port_number>:<container_port_number> <image_name>
In short, we run a container created by the tomcat image. This container got the name “tomcat-container” which is a meaningful name we choose (you can choose a different name). The outside port number is 8081 and the port inside the container is 8080 . These two port numbers allow the inside container and outside container to be communicated.
List all running containers:
docker ps

Note: Docker shows both 0.0.0.0:8081 and :::8081 to indicate the container port is exposed on all IPv4 and IPv6 interfaces, respectively. This means the service is accessible via both IP versions on port 8081.
Let’s open the browser via the public IP address of Docker Server EC2 with the
port 8081. Make sure the browser use http instead of https (http://[public-ip-of-ec2]:8081):
![Screenshot illustrating Make sure the browser use http instead of https (http://[public-ip-of-ec2]:8081):](../assets/tutorials/week-6/page-012-image-04.png)
![Screenshot illustrating Make sure the browser use http instead of https (http://[public-ip-of-ec2]:8081):](../assets/tutorials/week-6/page-012-image-05.png)
We can access the tomcat server inside the container of our EC2 Docker server. However, we got a 404 error as there is no website (no WAR files or folders) inside the webapps folder. This has been explained by the official document on Docker Hub documentation:
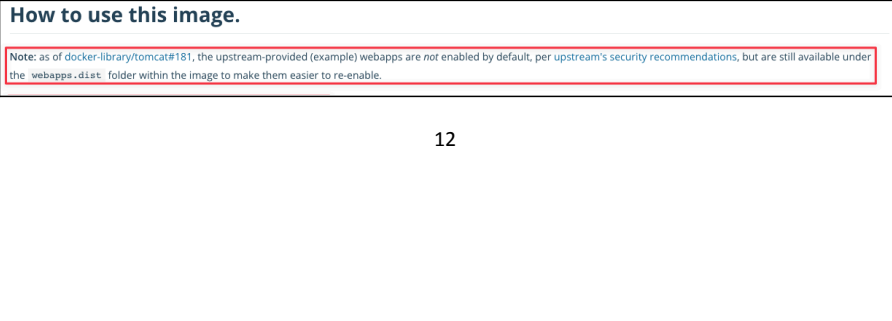
So we need to copy whatever is inside the webapps.dist directory to webapps directory if we want to see the tomcat homepage dashboard.
Let’s open the container using an interactive bash shell inside a running container. It lets you execute commands directly within the container’s environment:
docker exec -it tomcat-container /bin/bash
Let’s list files of current directory:
ls -la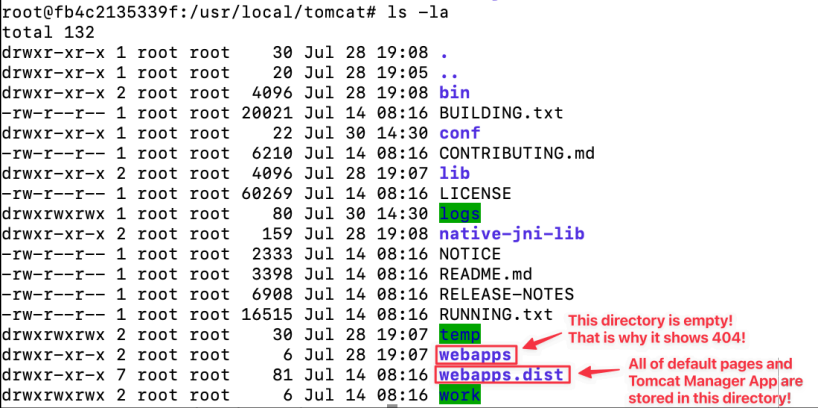

Alright, let’s copy everything inside the webapps.dist into webapps directory so we have the tomcat manager app and some default examples like in the previous lab:
cp -R webapps.dist/* webappsAfter that, change your working directory to webapps and list all files there to make sure the webapps directory now contains folders like so:

Now, please refresh the browser again to access to the tomcat manager application:
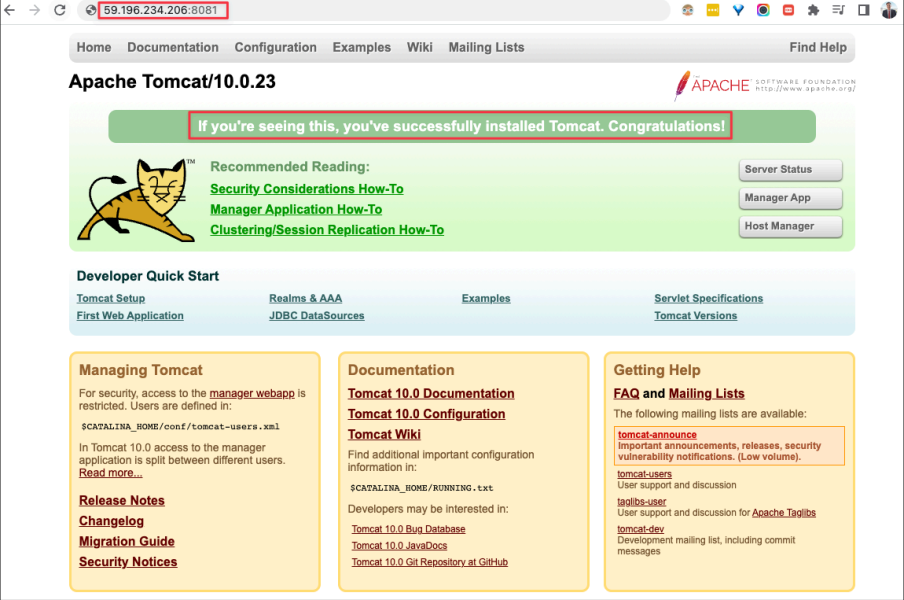
This is exactly what we remember the Tomcat homepage dashboard page looks like! Great job!
However, whatever we do in this container is temporary and does not affect the Tomcat image . So imagine we remove this container and create another container from the Tomcat image then we will have this same issue again! As images and containers are independent of each other after creation!
Let’s exit interacting with the container and go back to EC2 terminal:
exit
Let’s test this theory! Let’s stop this container for now!
docker stop tomcat-container
How can you check this container status (running or stopped)?
Let’s create another tomcat container! We will choose a different container name (“
tomcat-container-2) and outside port number 8082 since 8081 port is used by the first container.
docker run -d --name <container_name> -p <outside_port_number>:<container_port_number> <image_name>
Let's check the browser again with the
port 8082:
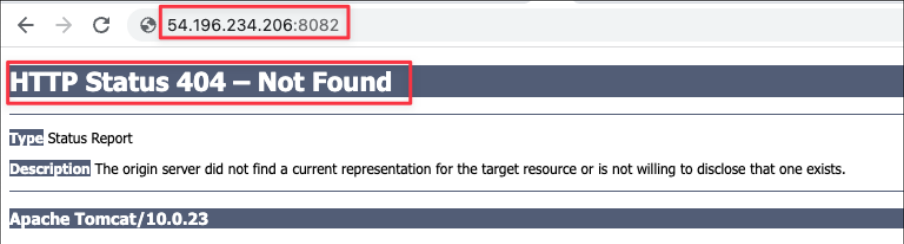
We had the same problem before! It means that whatever we do or modify for a container, which won't apply to the original image so the future containers created by that image won't be changed at all.
That's why we need to create a Dockerfile which allows us to build an image based on that Dockerfile!
🏗️ Build an image from a Fedora Dockerfile
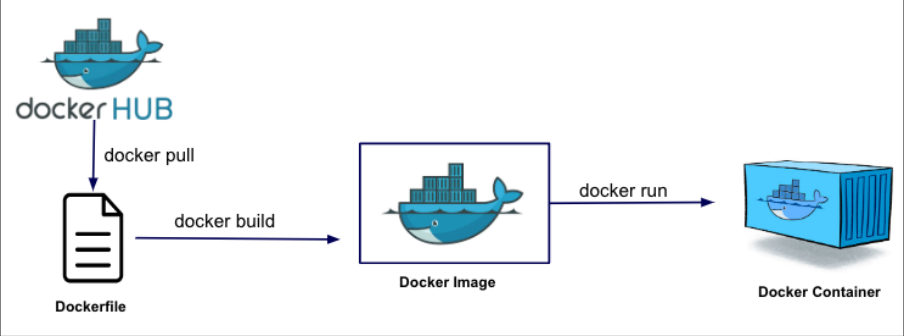
Let's practice your first dockerfile! Let's create a dockerfile which contains instructions to build an image for
Tomcatserver from a base Fedora image fromDockerhub. Create a file “Dockerfile" and use nano to edit it:
nano DockerfileHere is the content of the Dockerfile to build an image of Tomcat server from the base image Fedora. I hope you recognized these commands are very similar to what we have done for the previous lab:
Below is just an example as you might need to change the version of Tomcat
v9.0.97to the latest version of Tomcat on the Tomcat website!The bold strings could be changed based on the current Tomcat version.
FROM fedora:latest
RUN yum install java -y
RUN mkdir /opt/tomcat/
WORKDIR /opt/tomcat
ADD https://dlcdn.apache.org/tomcat/tomcat-9/v 9.x.xx /bin/apache-tomcat- 9.x.xx .tar.gz /opt/tomcat
RUN tar xvfz apache*.tar.gz
RUN mv apache-tomcat-*/* /opt/tomcat
EXPOSE 8080
CMD ["/opt/tomcat/bin/catalina.sh", "run"]
[Question] Can you make sense of all of the commands in this Dockerfile?
Also, we use “fedora:latest” as it is the Redhat Linux distro we use to play around with Virtualbox in the lab.
The last command is even suggested by the Docker Hub documentation for Tomcat:

Alright, let's build a
Dockerimage with a name “my-tomcat-image” from this Dockerfile:The -t flag stands for "tag" and is used to name the built image. It allows you to refer to the image later using that name, like when running or pushing it.
docker build -t <image_name> <dockerfile_location>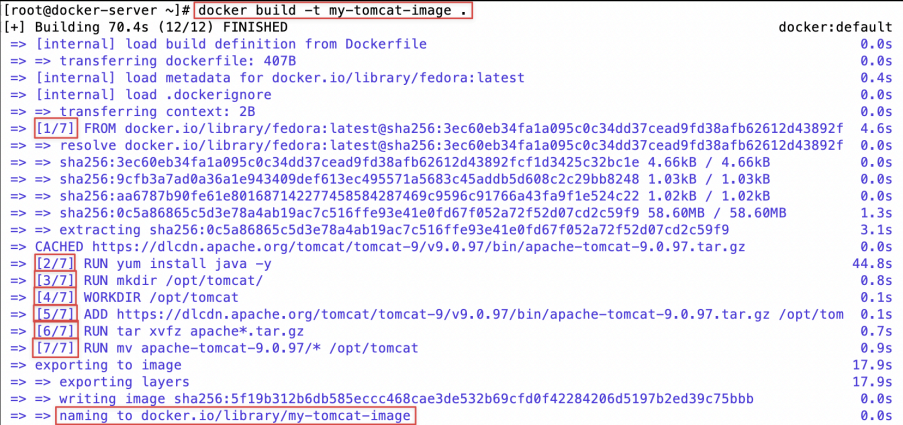
As you can see, there are 7 steps in building our “my-tomcat-image" with these steps being exact commands from your Dockerfile.
Let's list all images:
docker images
Let's list all containers running so far:
docker ps
So far, we have two containers running and they used up the port 8081, and 8082!
Let's create a container using the new “
my-tomcat-image" image!
docker run -d --name <container_name> -p <outside_port_number>:<container_port_number> <image_name>
Let's list all containers running so far:
docker ps
Let's check the browser again with the
port 8083:
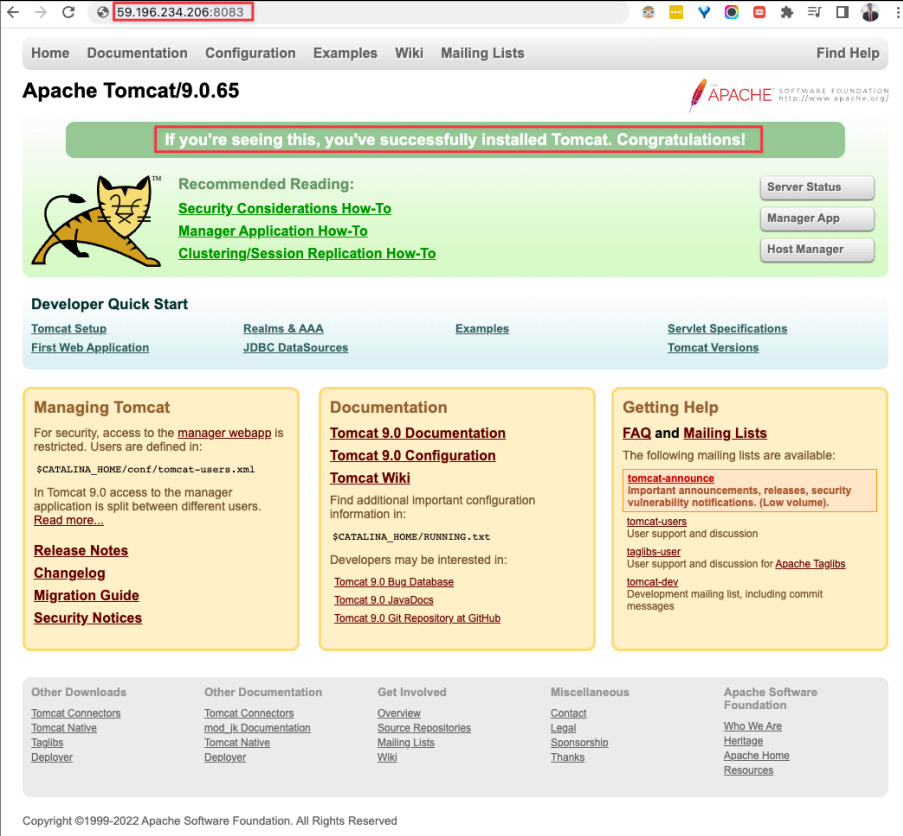
Very nice! You have successfully learned how to create a Dockerfile which allows you to build a custom Docker image which is used to create a Tomcat container!
🏗️ Build an image from a Tomcat Dockerfile
It is a good practice to build from a base OS like Fedora image from scratch to understand the building layers of a
Dockercontainer. However, it is much more efficient and more convenient to start with the actual tomcat image from Docker Hub so we can skip all of the setup steps we have done so far in theDockerfile.
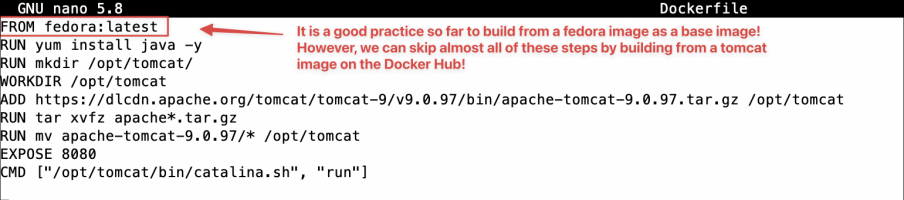
Let's remove the Dockerfile and start a new Dockerfile!
rm Dockerfile
nano Dockerfile
The Dockerfile now is way simpler as following:
FROM tomcat:latest
RUN cp -R /usr/local/tomcat/webapps.dist/* /usr/local/tomcat/webapps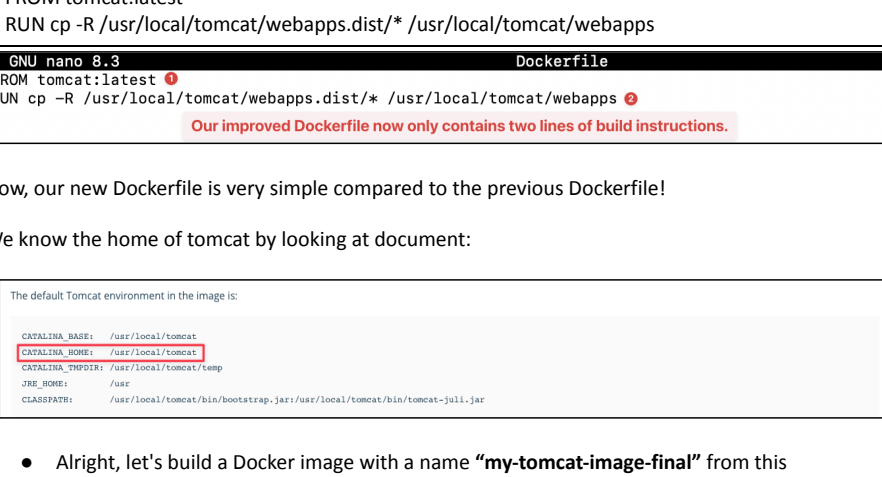

Now, our new Dockerfile is very simple compared to the previous Dockerfile!
We know the home of tomcat by looking at document:
Alright, let's build a Docker image with a name “
my-tomcat-image-final” from this Dockerfile:
docker build -t <image_name> <dockerfile_location>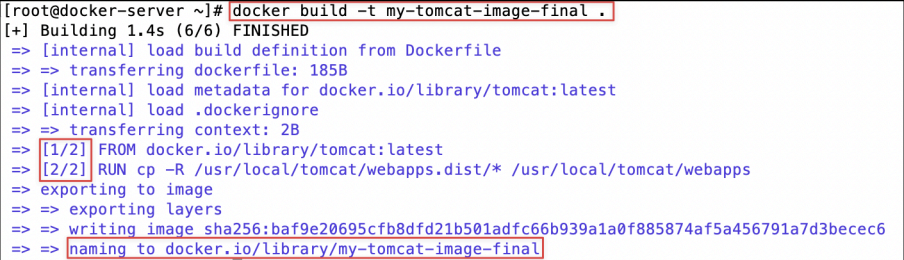
Note: This image is built very fast as it only needs to build two layers for the container instead of multiple layers like before!
Let's list all images:
docker images
Note: There is a large difference in Docker image size between my-tomcat-image-final (built from tomcat base image) and my-tomcat-image (built from fedora base image). The fedora-based Dockerfile produces a larger image (~1.15 GB) because it installs Java and Tomcat manually, adding system overhead and extra layers, while the tomcat image is preconfigured and optimized (~472 MB).
There is a slight difference in size between my-tomcat-image-final and tomcat (472MB vs 467MB) because we copy default webapps.dist to copy the webapps folder in our my-tomcat-image-final image.
This is the very basics of Docker image optimization foundation in terms of image size.
Now, let's create a tomcat container from this image!
docker run -d --name <container_name> -p <outside_port_number>:<container_port_number> <image_name>
Open the browser with the
port 8084and check it out:
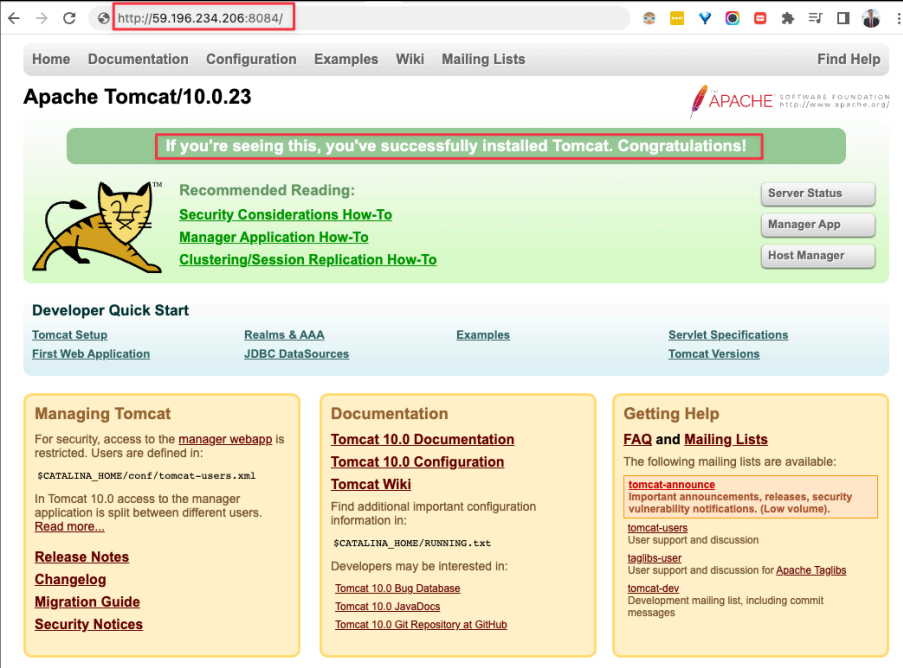
So we have managed to run a container from an image which is created by a very simple dockerfile! As you can see, the whole step of installing and setting up Java and Tomcat can be eliminated using Docker and Dockerfile!
🔁 Integrate Docker with Jenkins
Outline:
Create a dockeradmin user and add that user to the docker group on the
DockerServer EC2.Install “Publish Over
SSH” pluginAdd Docker Server to
Jenkins’s configure systems (so Jenkins can communicate with Docker Server)
Let’s go!
[Still on EC2 Docker instance] First, let’s print out all information of user accounts:
cat /etc/passwd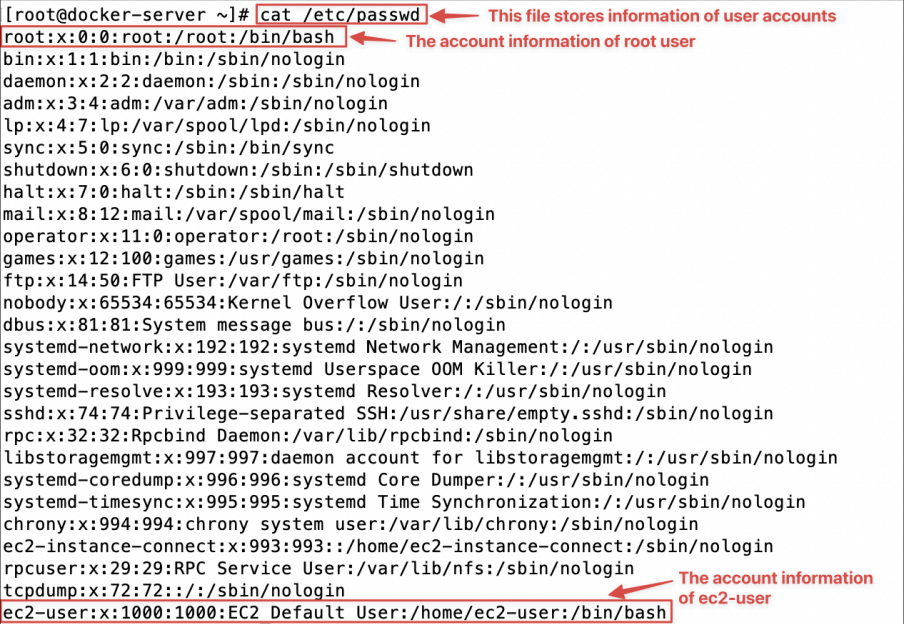
In general, you can understand each row contains information about each user of your EC2 server, for example:

Username: It is used when a user logs in.
Password: An x character indicates that encrypted password is stored in
/etc/shadowfile. Please note that you need to use the passwd command to computes the hash of a password typed at the CLI or to store/update the hash of the password in/etc/shadowfile.User ID (
UID): Each user must be assigned a user ID (UID).UID0 (zero) is reserved for root and UIDs 1-99 are reserved for other predefined accounts. FurtherUID100-999 are reserved by system for administrative and system accounts/groups.Group ID (
GID): The primary group ID (stored in/etc/groupfile)User ID Info (
GECOS): The comment field. It allows you to add extra information about the users such as the user's full name, phone number etc.Home directory: The absolute path to the directory the user will be in when they log in. If this directory does not exists then users directory becomes /
Command/shell: The absolute path of a command or shell (/bin/bash). Typically, this is a shell.
I hope you understood /etc/passwd file format to keep track of every registered user that has access to a system.
Next, let's print out information of groups:
cat /etc/group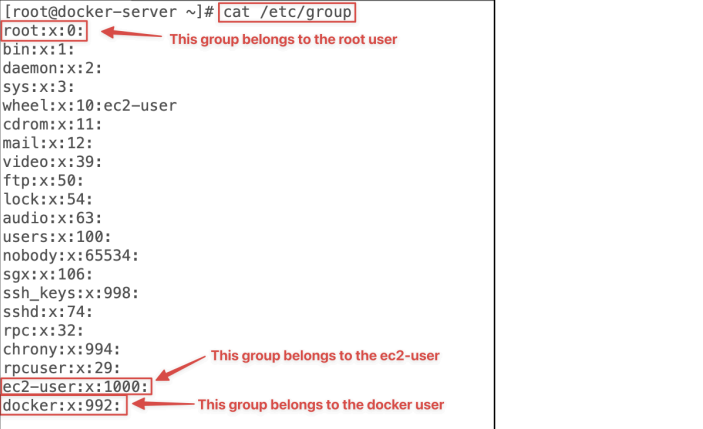
We need to create a new dockeradmin user and add that user to the docker group so that user can perform the activities with docker on this EC2 server:
useradd dockeradmin[Question] How can you check if you have created a new user correctly? Also, how can you check which is the default group that this user belongs to?
Next, let’s add a password for this dockeradmin user. Please choose something easy to remember:
passwd dockeradmin
Let’s check which group the user “dockeradmin” belongs to:
id dockeradmin
Right here, I hope you realize the new dockeradmin right now belongs to the default dockeradmin group , but you want to add that new dockeradmin user to docker group .
Let’s add the dockeradmin user to the docker group:
-a: append the user to the group(s) (used with -G).
-G: specifies the group(s) to add the user to.
usermod -aG docker dockeradmin
However, up to this stage, by default, EC2 server will not allow users to login with the password so we need to enable to allow users can login to EC2 server with password that:
nano /etc/ssh/sshd_config
Enable Password Authentication like so, then save and exit from nano:

Alright, let’s restart the ssh service for our change to take effective:
service sshd reloadLet’s logout from the EC2 Docker server to try to login again using the dockeradmin user with the password:
exit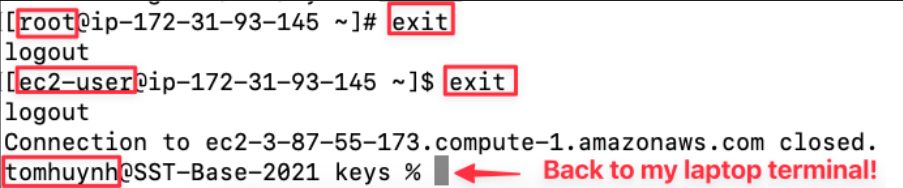
You might have to do it twice to exit from the root user to ec2-user to logout from the EC2 server.
Let’s login to the EC2 Docker server again using the dockeradmin user with the password you have set up. So create a new terminal tab and ssh into Docker-Server as a dockeradmin user :
ssh dockeradmin @EC2-public-IP-address-or-public-DNSNote: we can SSH to the EC2 without providing any pem key at all as now we can provide just the username and password.
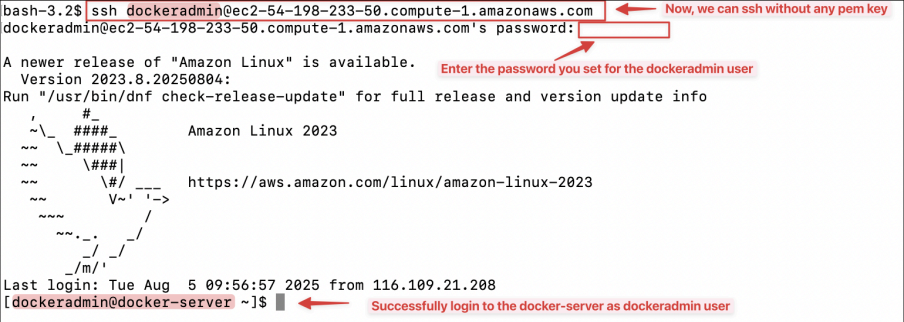
Now, we can integrate this dockeradmin user into Jenkins in the other server for authentication and let jenkins control docker in this EC2 docker server!
Important Note: For now, we are done with the docker server, please switch back to our Jenkins server from last week.
[Back to the EC2 Jenkins instance] We are talking about the Jenkins server (Jenkins-Server) from last week's tutorial! So if you accidentally deleted the Jenkins server from last week, please please take your time to setup the Jenkins server again 🙁
To keep things organized, let’s rename the hostname of the Jenkins server as well:
sudo su -
echo “jenkins-server” > /etc/hostname
reboot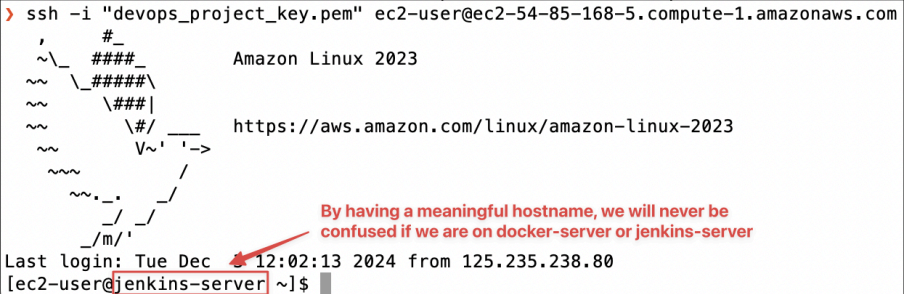
Now, let’s launch the existing Jenkins server, start the Jenkins service and open the Jenkins Dashboard page in the EC2 Jenkins-Server:
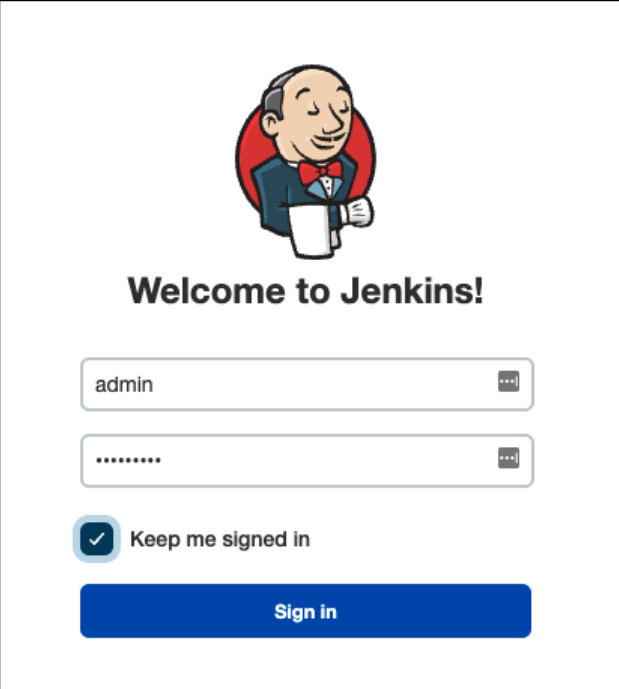
If you start the Jenkins-Server from stopped status then you need to start the Jenkins service again!
sudo su -service jenkins startThis is the Jenkins Dashboard page looks like where we left off from the previous lab:
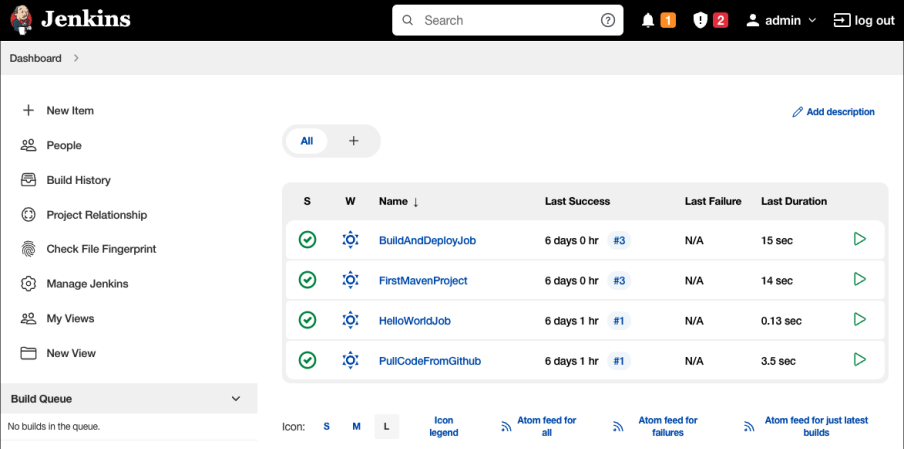
The most important thing is that we have the “BuildAndDeployJob” job item so we can create a new Jenkins job by copying the details from that job!
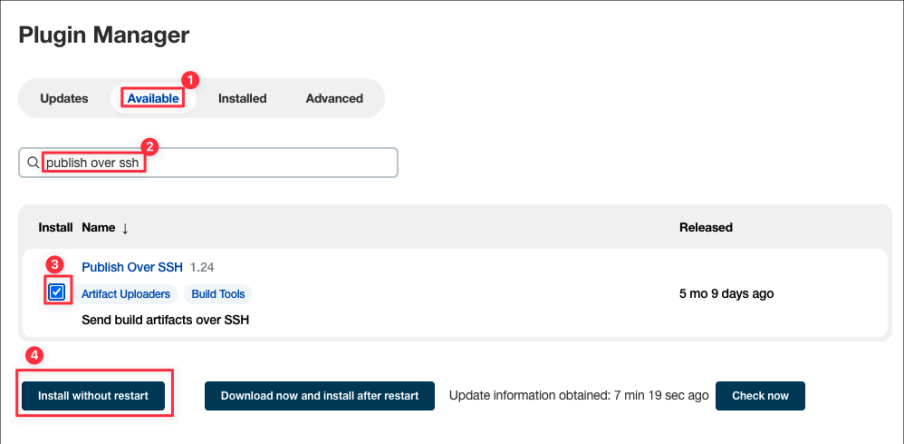
Before that, let’s install the “publish over SSH” plugin for Jenkins, so let’s go to manage plugins in Jenkins:

Search “ Publish Over SSH " plugins in the available plugins to install:
Its purpose is for general-purpose remote deployment using SSH . It helps to send files (e.g.,
.war,.jar,.zip, etc.) from Jenkins to a remote server over SSH/SCP. It also can also execute remote shell commands over SSH (e.g., to restart a service, run a script, etc.).Specifically, in this tutorial, we use this plugin to help us to send the war file from Jenkins server to Docker server and run the Linux commands to build the new Docker image with that new war file, then run the new Docker container with that image in one go. Thus, the users now can see the website with new changes right away in that Docker container.
Let’s configure the system to add the authentication of Docker using the dockeradmin user:

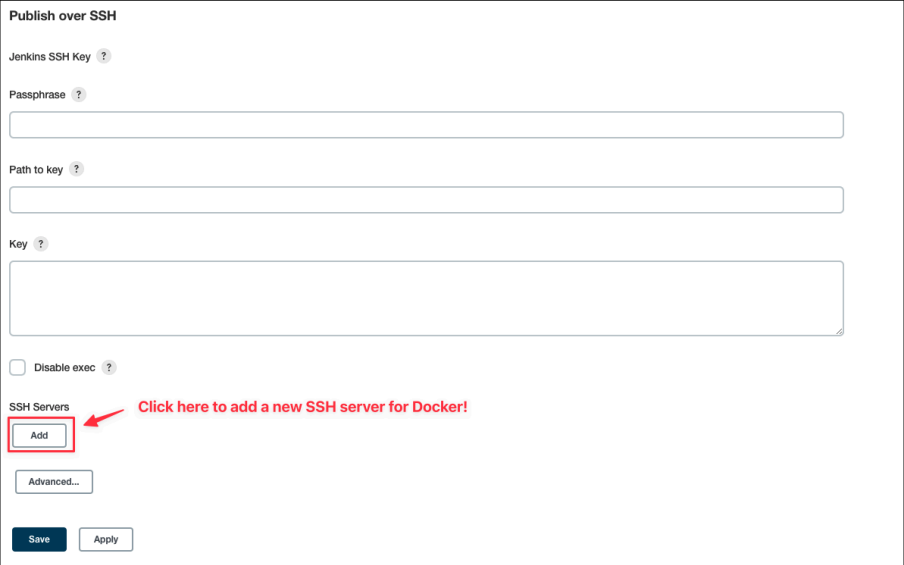
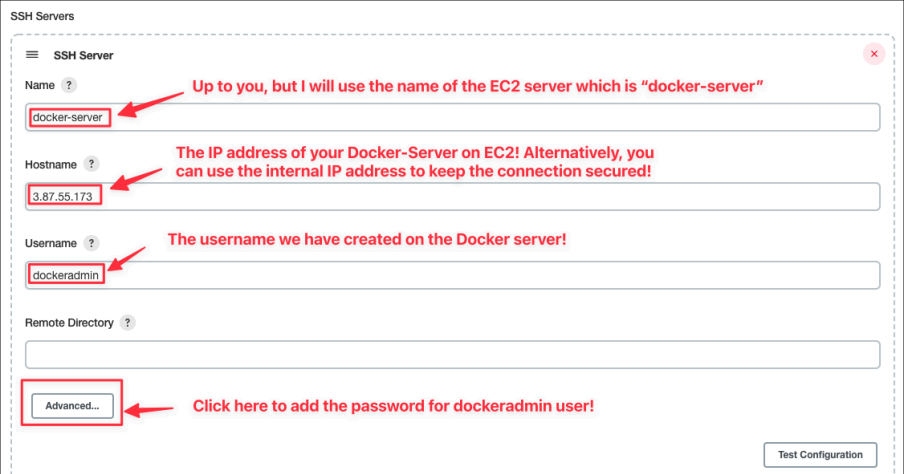

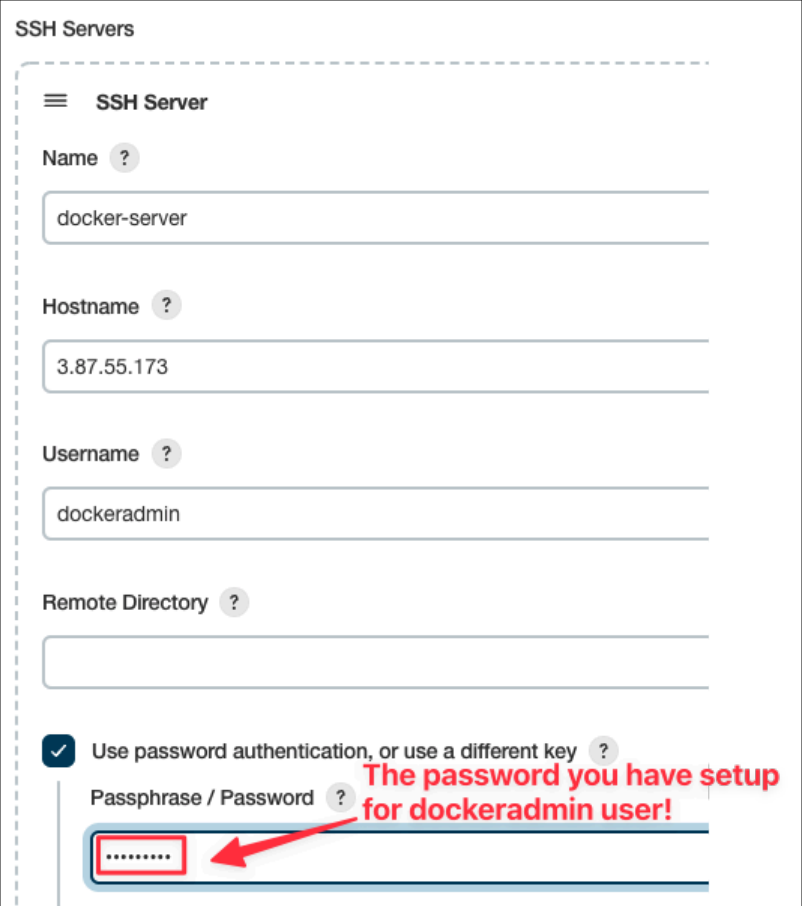
Scroll to the bottom and click on “Test Configuration” button to ensure Jenkins can connect to the Docker server using the dockeradmin user and its password:
If you see “Success”, then it’s all good!

It means you can authenticate from the Jekins-Server to Docker-Server! Very nice! Now, you can apply and save this authentication configuration!

Now, let’s create a new job item:
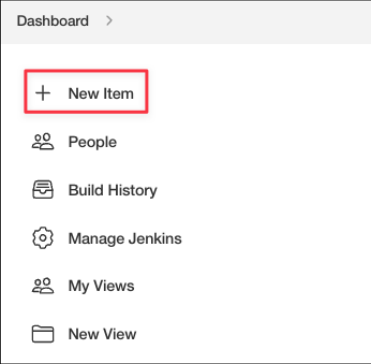
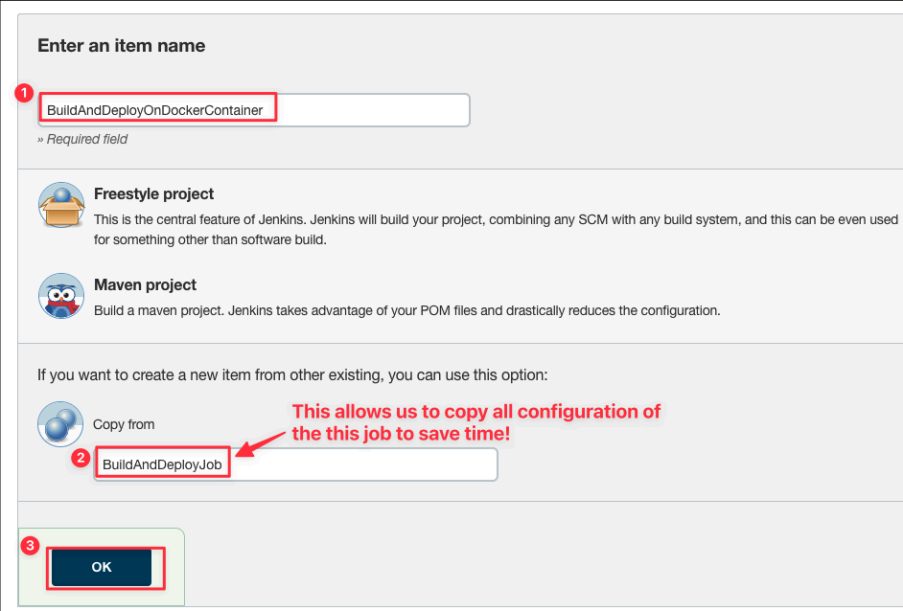
Because we have copied all configurations from the other jobs, so we only need to change a few section only:

Everything else should have been configured correctly (Maven, Git, … ) Note: We don't want to deploy directly on the Tomcat server anymore so delete it!
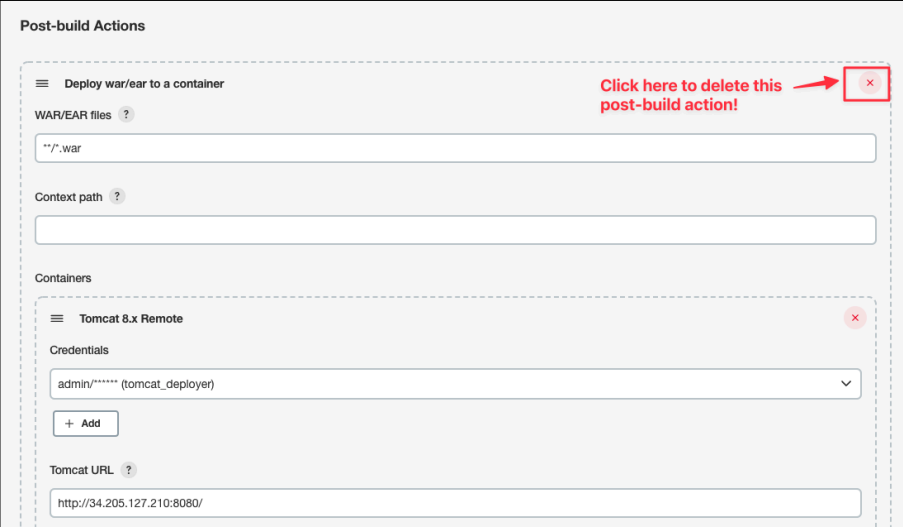
We will add a new post-build action for our Docker server:
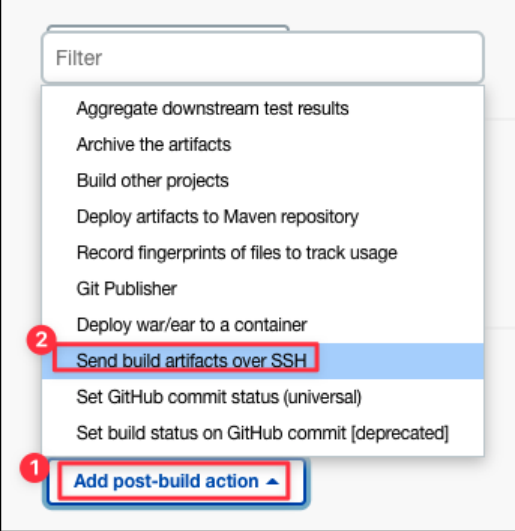
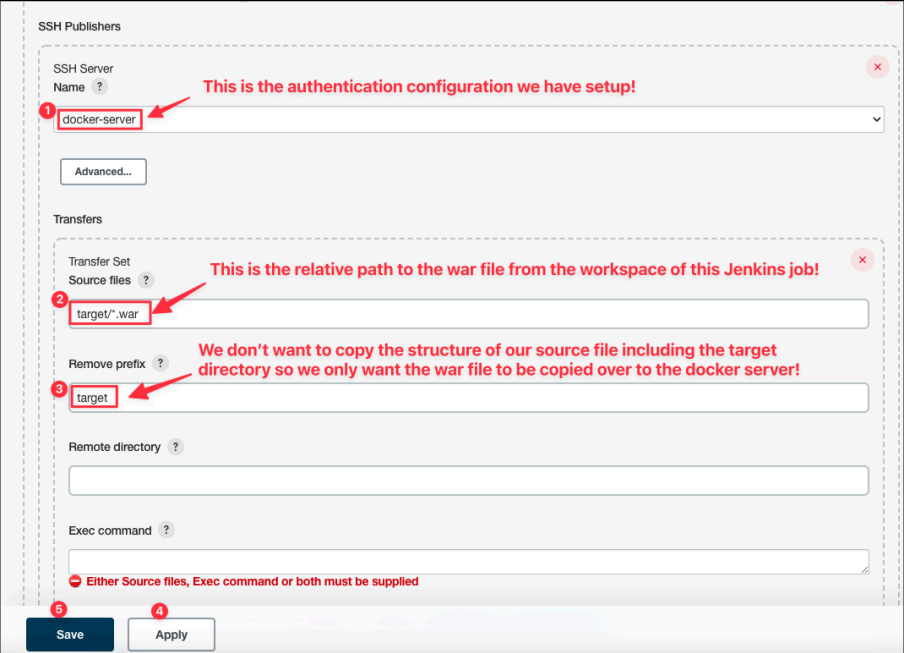
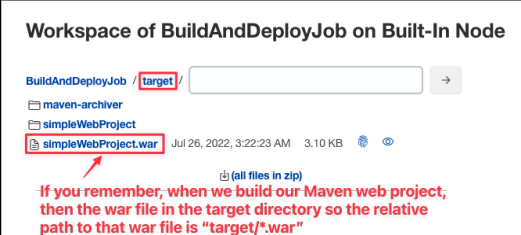
Note : here is the explanation why our relative path to the war file is “target/*.war" as the war file is built inside the folder “target” by default.
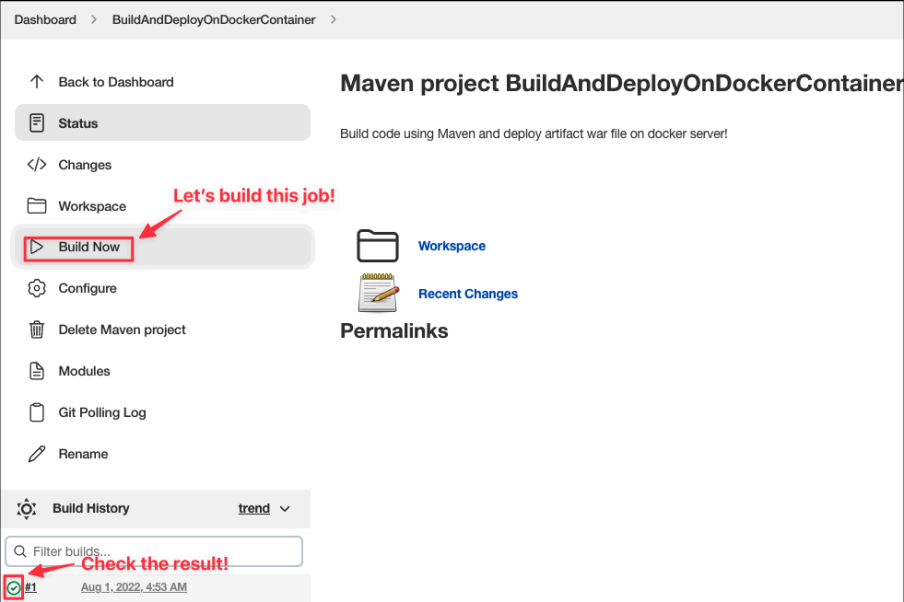
Alright, let's build this job!
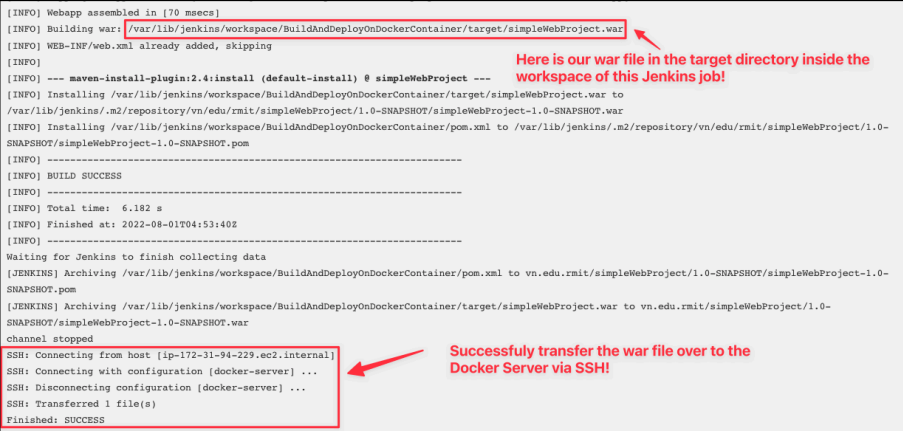
[Back to the Docker server] Cool, let's check if the war file is actually transferred over to the Docker Server!
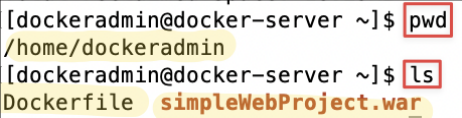
You should see the “
simpleWebProject.war” file is in the home directory of your dockeradmin user.


Note: However, the war file is useless as the tomcat container has no idea about the existence of this war file.
Thus, let's update the
Dockerfileso every newly created Tomcat container can copy this file inside its container and serve that war file as a website!
nano DockerfileFROM tomcat:latest
RUN cp -R /usr/local/tomcat/webapps.dist/* /usr/local/tomcat/webapps
COPY ./*.war /usr/local/tomcat/webapps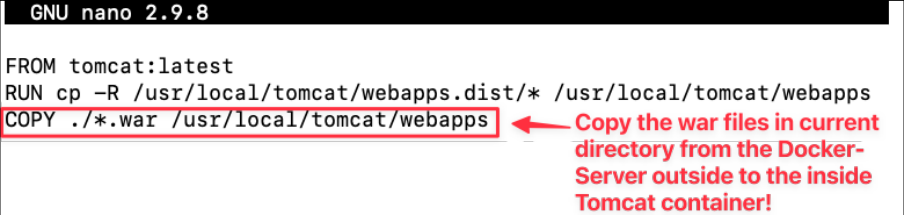

Let’s clean up any resources — images, containers, volumes, and networks — that are dangling (not tagged or associated with a container) so we can keep it neat for our big job. So let's run this command:
docker kill $(docker ps -q)
docker system prune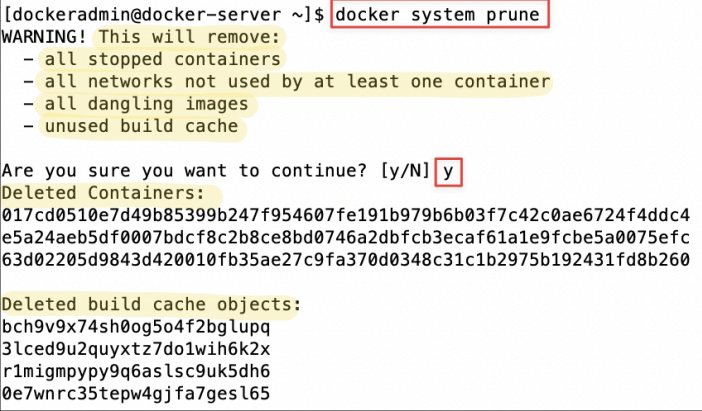
Make sure your current working directory is
/home/dockeradminto test the Dockerfile to build a new tomcat image from it:
Alright, let's build the new Tomcat image from the new Dockerfile:
To distinguish from the first tomcat image we created for learning purposes, we add a new tag for this tomcat image “v2” meaning version 2 , which means this version of Tomcat image is more mature and serious!
docker build -t tomcat:v2 .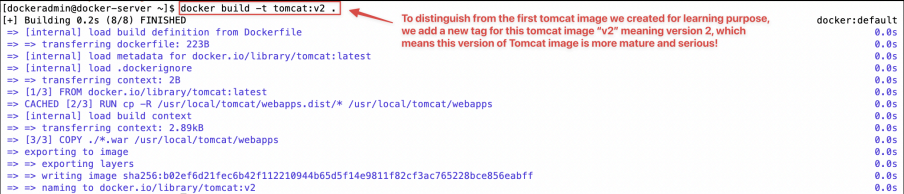
Let's create new container named “
tomcat-v2” from that new image “tomcat:v2":
docker run -d --name tomcat-v2 -p 8081:8080 tomcat:v2
As you can see, we reuse the port 8081 as we have removed old containers using that port!
So let's check out the website via that port 8081:
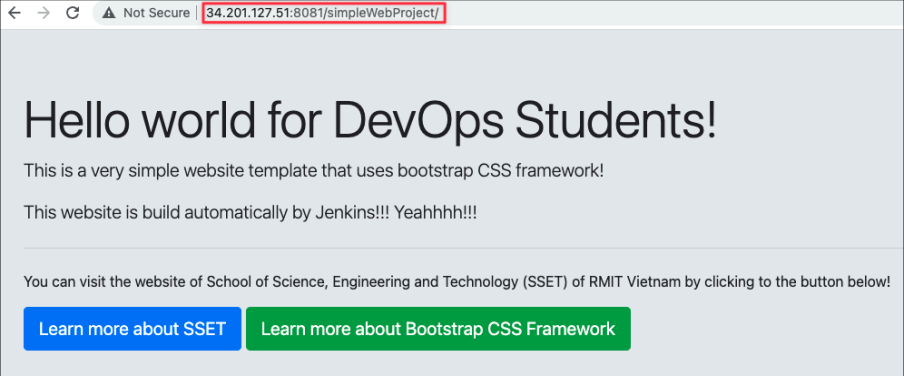
Now, we have known that our image and container should work like expected! Let's clean up and delete the testing container created from the image “tomcat:v2"
docker stop <container_id>
docker container prune
[Back to Jenkins server] Let's go back to the configuration of Jenkins job and modify:
![Screenshot illustrating [Back to Jenkins server] Let's go back to the configuration of Jenkins job and modify:](../assets/tutorials/week-6/page-039-image-01.png)
cd /home/dockeradmin
docker build -t tomcat:v2 .
docker stop tomcat-container-final
docker rm tomcat-container-final
docker run -d --name tomcat-container-final -p 8087:8080 tomcat:v2
As you can see,
To be sure, we change the working directory to the home directory of the dockeradmin user.
We stop the existing container “
tomcat-container-final”We remove that existing container “
tomcat-container-final”Then we create a new container “
tomcat-container-final” from the image “tomcat:v2” via port number 8087.Note: you can change the port number to be any port number you want that is available like 8080 or 8081. The reason I choose 8087 is to ensure this port is available so far as we have not created any container using this port number. Having said that, after you clean up all the containers, you can choose any port you like.
Let’s test our job:
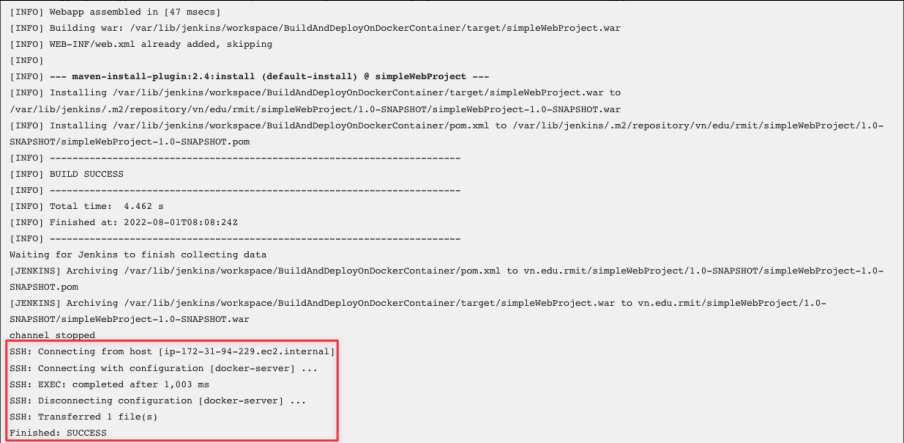
You can check out the website as following via the public IP address of Docker-Server and the
port 8087:
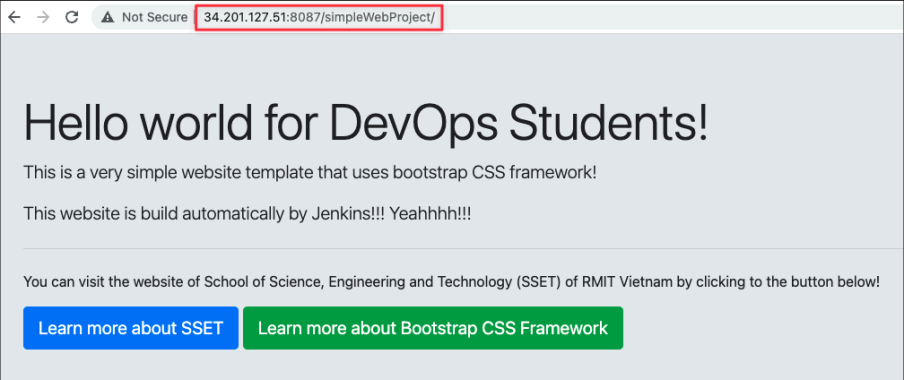
Now, your task:
Can you make a change in the website and push it to github?
Test if the SCM polling works by automatically pull
Modify the
index.jspfile to add some lines.Then check the build history of BuildAndDeployOnDockerContainer job to see if there is any build trigger automatically whenever you push a new change to your Github repo.
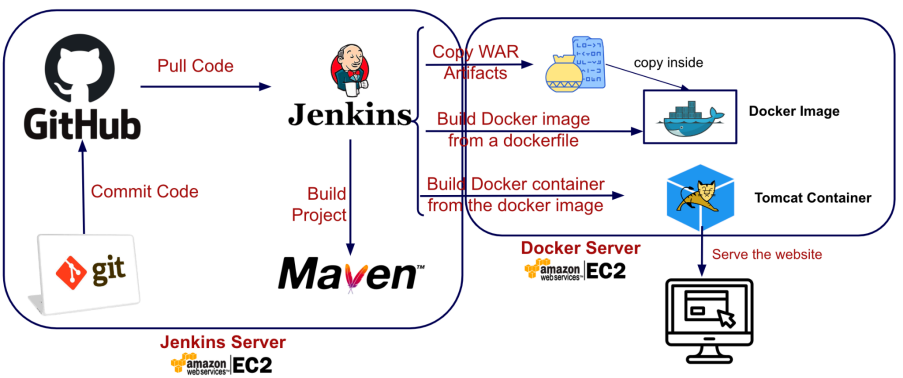
Alright! That’s pretty cool for a nice automation from Development ➜ Commit and Push to Github ➜ Jenkins pulls the new version of your code on Github ➜ Jenkins build the new artifacts of the project using Maven ➜ Jenkins deploy that artifacts on Docker server ➜ Docker server build a new container to serve that war artifacts via a port to make that website live ➜ Customers can see the new features of the website immediately with no downtime!
The nice thing is that you do not have to deal with any of the installation and configuration for environments like we did in the previous lab! Congratulations on completing the main lab! You've successfully built a CI/CD pipeline that automates building and deploying a web application using Jenkins and Docker.
🧪 Challenge 1: Persist data with Docker volumes
This bonus challenge tackles a fundamental problem: containers are ephemeral (temporary and non-persistent) . When you remove a container, any data created inside it (like logs, user uploads, or database files) is lost forever. The solution is Docker Volumes , which are the preferred way to persist data generated by and used by Docker containers.
Step 1: Modify the Application to Generate Logs
First, we need our application to actually create some data that we want to save. We'll edit the index.jsp file in our local project repository to write a log entry every time the page is loaded.
Open
index.jsp: On your local machine (not the EC2 instance), navigate to your simpleWebProject directory and open the filesrc/main/webapp/index.jsp.Add Logging Code : Add the following Java code snippet inside the
<body>tag. This code will create a directory for our logs if it doesn't exist and then append a timestamped message toapp.log.
<%-- Add this logging code --%> <%@ page import="java.io.*, java.util.Date, java.text.SimpleDateFormat" %> <% try { // Define the path for the log file inside the container String logDirPath = "/usr/local/tomcat/logs"; String logFilePath = logDirPath + "/app.log";
// Ensure the log directory exists File logDir = new File(logDirPath); if (!logDir.exists()) { logDir.mkdirs(); }
// Open the log file in append mode (the 'true' flag) PrintWriter outLog = new PrintWriter(new FileWriter(logFilePath, true));
// Create a timestamp String timestamp = new SimpleDateFormat("yyyy-MM-dd HH:mm:ss").format(new Date());
// Write the log entry outLog.println(timestamp + " - Page accessed by a user.");
// IMPORTANT: Close the writer to save the changes outLog.close(); } catch (IOException e) { // Basic error handling e.printStackTrace(); } %>
<p style="color: green;"><b>A new log entry was just added to
/usr/local/tomcat/logs/app.log!</b></p>
Commit and Push the Changes: Your
Jenkinspipeline is triggered by changes in your GitHub repository. Let's commit and push our updated code (either via git commands or Github WebUI)
Step 2: Update the Jenkins Job for Volumes
Now, we'll modify our Jenkins job to build a new version of our image and, most importantly, run the container using a Docker Volume.
Navigate to your Jenkins Job : Open your Jenkins dashboard and go to the BuildAndDeployOnDockerContainer job configuration page.
Update the "Exec command" : Scroll down to the Post-build Actions section where you configured "Send build artifacts over
SSH". Find the Exec command box.We need to modify the script to:
Create a
named volumecalledmy-app-logs. We add || true so the command doesn't fail if the volume already exists from a previous buildBuild a new image tagged as tomcat:v3.
Run the new container with a new name (
tomcat-container-final-v3) and on a new port (8088) to avoid conflicts.Mount our volume using the
-vflag:-vmy-app-logs:/usr/local/tomcat/logs. This maps themy-app-logsvolume on the host to the/usr/local/tomcat/logsdirectory inside the container.Replace the old script in the Exec command box with this new one:
# Change to the dockeradmin user's home directory where the Dockerfile and .war file are
cd /home/dockeradmin
# Create a named volume for persistent logs. The '|| true' prevents an error if it already exists.
docker volume create my-app-logs || true
# Build a new version of the image
docker build -t tomcat:v3 .
# Stop and remove the old container if it exists, to free up the name
docker stop tomcat-container-final-v3 || true
docker rm tomcat-container-final-v3 || true
# Run the new container, mapping the volume to the logs directory
# We use port 8088 for this version
docker run -d --name tomcat-container-final-v3 -p 8088 :8080 \
 -v my-app-logs:/usr/local/tomcat/logs \
 tomcat:v3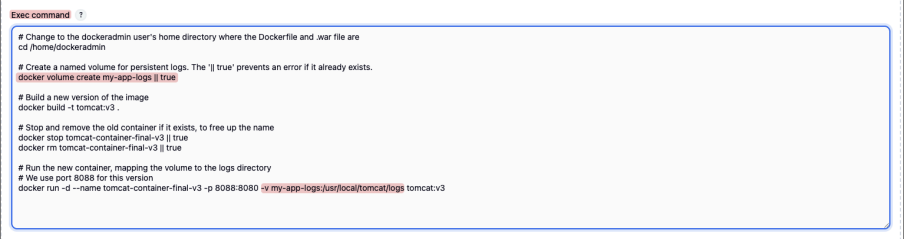
Save the Jenkins job configuration.
Step 3: Run the Build and Test the Application
Trigger the Build: Go to your BuildAndDeployOnDockerContainer job page and click "Build Now".
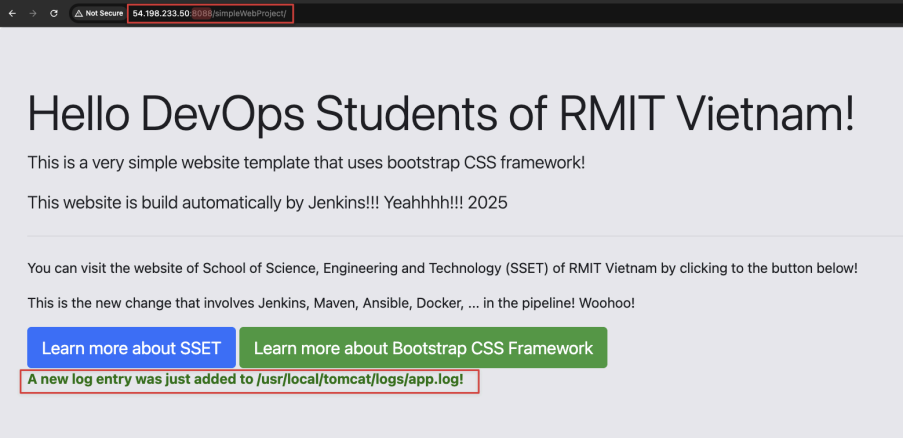
Access the Application: Once the build is successful, open your browser and go to your application, noting the new port number:
http://
<Your-Docker-Server-IP>: 8088 /simpleWebProject/
Generate Logs : Refresh the page 5-6 times. Each time you refresh, a new line is added to the log file.
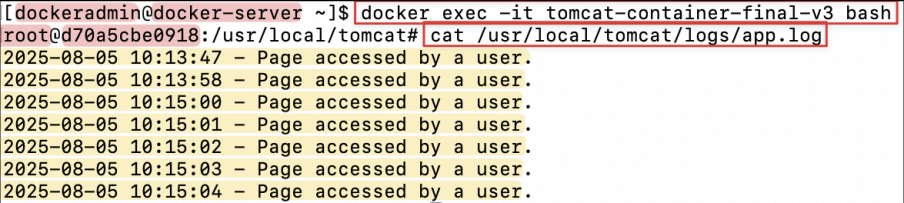
Check the Logs Inside the Container:
SSHinto yourDockerServer as the dockeradmin user.Execute a shell inside your running container:
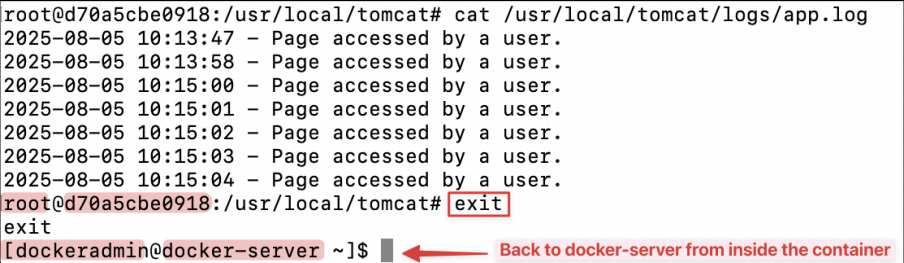
docker exec -it tomcat-container-final-v3 bashNow, inside the container, view the log file. You should see your log entries!
Type exit to leave the container shell.
Step 4: Test Persistence - The Magic of Volumes
This is the moment of truth. We will now completely destroy the container and create a new one to see if our logs survive.
Stop and Remove the Container: On your
DockerServer, run:At this point, without a volume, your log data would be gone forever.
docker stop tomcat-container-final-v3
docker rm tomcat-container-final-v3
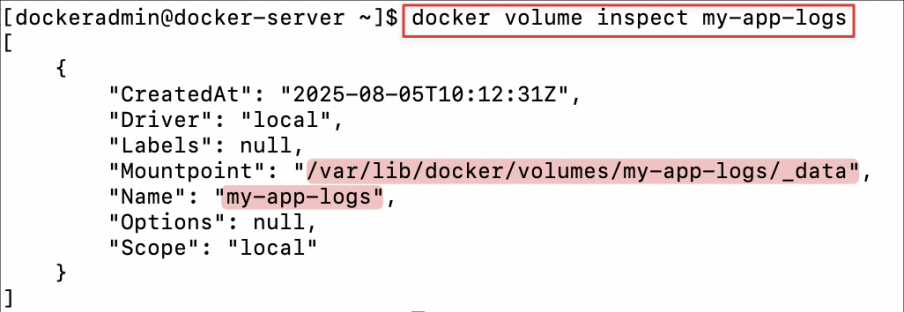
Inspect the Volume: Verify that the volume still exists and holds your data. The Mountpoint shows you where on the host machine the data is actually stored.
Re-run the
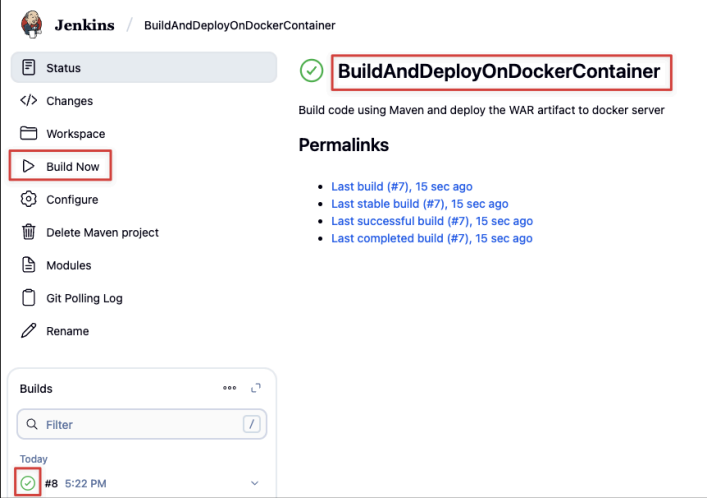
JenkinsJob: Go back to Jenkins and click "Build Now" again. This will create a brand new container from the tomcat:v3 image.
Check the Logs in the NEW Container:
Once the build is done,
SSHback into your Docker Server.Execute a shell inside the new container (it has the same name because our script re-creates it):
docker exec -it tomcat-container-final-v3 bashView the log file again inside the new container:
cat /usr/local/tomcat/logs/app.log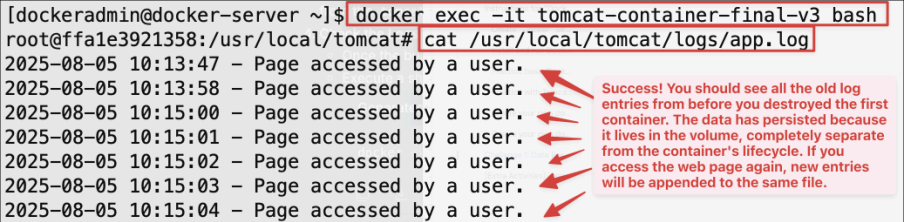
Success! You should see all the old log entries from before you destroyed the first container. The data has persisted because it lives in the volume, completely separate from the container's lifecycle. If you access the web page again, new entries will be appended to the same file.
🧪 Challenge 2: Scale with Docker Swarm
You've mastered running single containers and even persisting their data with volumes. But what happens when you need to run multiple copies of your application for high availability and to handle more traffic? And what if one of those containers crashes?
This is where an orchestrator comes in. An orchestrator manages the lifecycle of your containers across one or more machines. Docker Swarm is Docker's built-in, user-friendly orchestrator.
Objective: Deploy our web application as a replicated, fault-tolerant, and load-balanced service using Docker Swarm.
Normally, a multi-node Swarm cluster requires a central registry (like Docker Hub ) so that all "worker" nodes can pull the same image.
However, for this lab, we are running a single-node swarm. This means the "manager" node is also the only "worker" node. Because the node that will run the containers is the same one where we built the image, we can skip pushing to Docker Hub and use our local image directly.
Verify the Local Image Exists: On your Docker Server, make sure the tomcat:v3 image you created in the previous challenge is available.
You should see tomcat with the tag v3 in the list.
docker images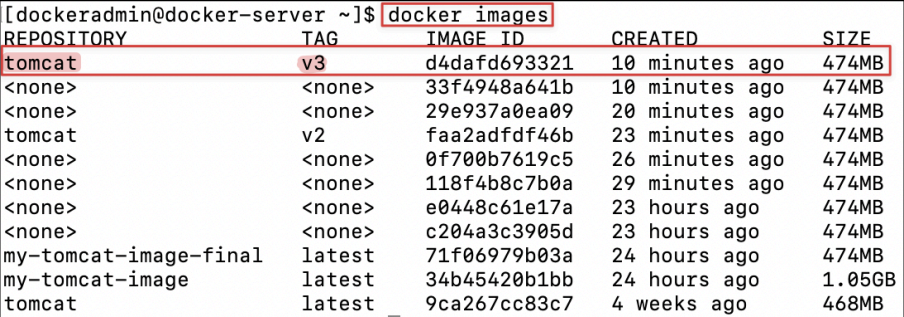
Step 1: Initialize the Swarm
First, we need to switch our Docker engine from its standard mode to "Swarm mode". This command turns our Docker Server into a Swarm "Manager" node.
docker swarm init
Your server is now a single-node Swarm cluster!
Step 2: Deploy the Application as a Service
In Swarm, you don't use docker run. Instead, you declare a service, which defines the desired state of your application (e.g., "I want 3 copies of this image running at all times").
Run the docker service create command: We will tell Swarm to create a service named
my-webapp, run 3 replicas of it using our local tomcat:v3 image , and expose it on port 8090 . We will also mount our persistent log volume!--replicas3 : This is the key! We are telling Swarm we want exactly 3 instances (tasks) of our container running.-p8090:8080 : This creates a port mapping on Swarm's ingress routing mesh. It means any request toport 8090will be automatically load-balanced to one of the 3 running containers.tomcat:v3 : We are referencing our locally built image directly.
docker service create \
 --name my-webapp \
 --replicas 3 \
 -p 8090:8080 \
 --mount type=volume,source=my-app-logs,destination=/usr/local/tomcat/logs \
tomcat:v3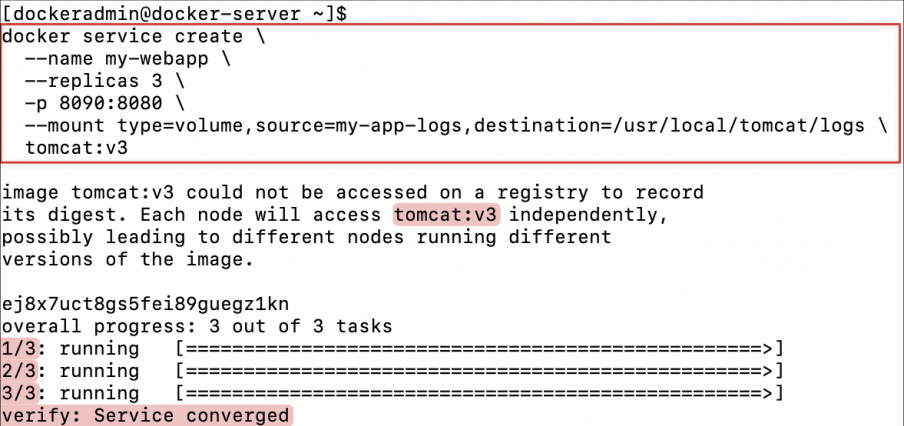
Step 3: Inspect the Service
Let's see what Swarm has done.
List the Services: This gives a high-level overview.
The
REPLICAScolumn shows 3/3, meaning our desired state (3) matches the current state (3).
docker service ls
Inspect the Service Tasks : To see the individual containers that make up the service, use docker service ps.
You can see three distinct tasks, all in a Running state.
docker service ps my-webapp
Step 4: Test Load Balancing and Self-Healing
This is where the power of orchestration becomes clear.
Test Load Balancing:
Open your browser and navigate to http://
<Your-Docker-Server-IP>: 8090 /simpleWebProject/.
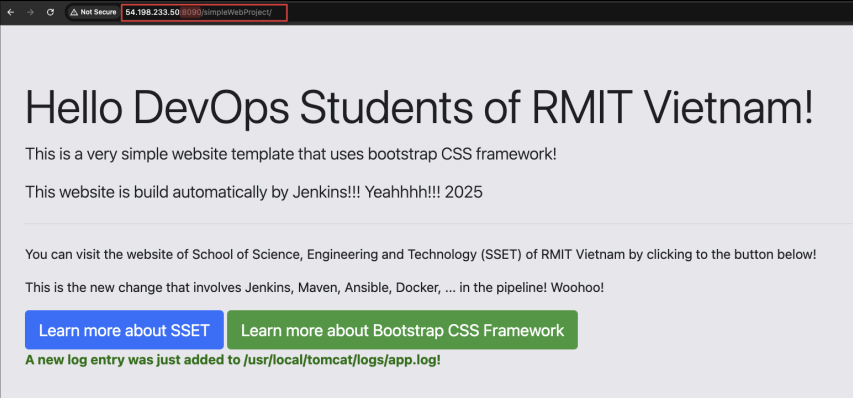
Refresh the page several times. It will work every time. Behind the scenes,
Swarmis distributing your requests among the three running containers.Test Self-Healing:
First, list the running containers to get one of their IDs.
docker ps
Pick one of the container IDs from the list.
For example, I picked “1d1bde22679e” which is my third container (
my-webapp.3) in theDocker Swarm.Now, ruthlessly kill that container.
The
-fflag forces its removal.
docker rm -f <container_id>
Quickly run docker service ps
my-webappagain.
docker service ps my-webappObserve the magic! You will see an output similar to this:
Swarm detected that a task failed. It immediately scheduled a new container (um9...) to replace the one we killed, automatically bringing the service back to the desired state of 3 replicas.

Your website via the port 8090 should work like usual with a strong cluster of 3 containers running in the Docker Swarm!
Incredible! You have just deployed your application like a pro using an orchestrator. You've seen firsthand how Docker Swarm provides:
Scaling : Easily running multiple copies of your app with
--replicas.Load Balancing : Automatically distributing traffic across all replicas.
Self-Healing : Automatically detecting failures and replacing containers to maintain the desired state.
This is the foundation of building resilient, scalable, and highly available applications with Docker.
🎮 Extra: Practise Docker in an interactive lab
In case you want to practice more on your docker skills, please follow this short fun learning labs for Docker from Docker:
Open these lesson links:
Docker for Beginners - Linux (Recommended)
Application Containerization and Microservice Orchestration (Recommended)
Deploying a Multi-Service App in
Docker SwarmMode (Optional)
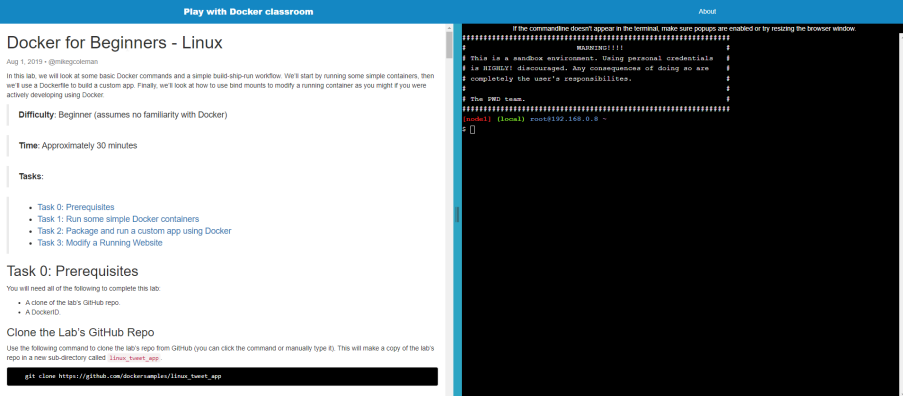
Have fun! Always be learning!