🎯 Learning outcomes
Work through the sections in order. Complete each instruction and confirm the expected result before moving on.
- Explain why the course uses both
UbuntuandFedoraLinux environments. - Create, install, and verify Ubuntu and Fedora virtual machines in
VirtualBox. - Enable
SSHand connect to eachVMfrom the host computer. - Choose compatible
ARMimages when working onApple Silicon. - Start, monitor, and safely stop an
AWS Academy Learner Labsession.
🎯 Lab objectives
In the lecture, we discussed the concepts and importance of virtualization.
This week, we will go through this together to set up different Linux environments by using virtualization tools.
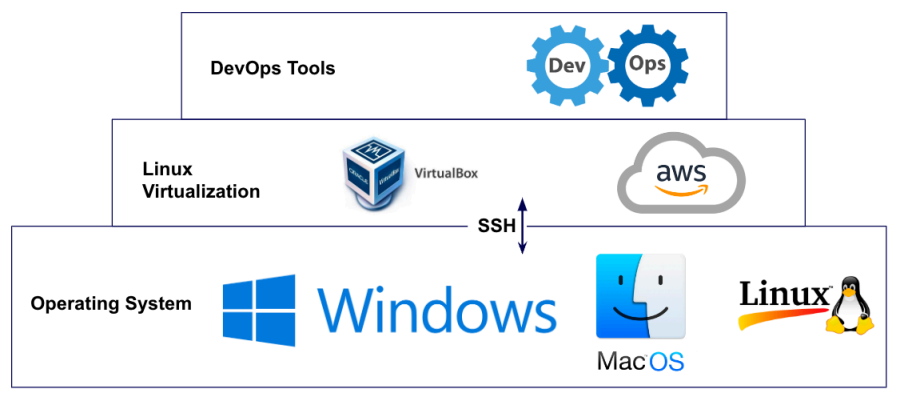
These environments will have the same base environment for us to learn and practise different DevOps tools and build CI/CD pipelines.
In fact, there are two main tasks for today’s lab:
Setup Linux Virtual Machines (
Ubuntu&Fedora) onVirtualBox.Setup your Amazon Web Services (
AWS)Learner Labaccount.
There are two sections of the instructions to setup VMs - section A and section B. If you use any new Macbooks with M-chips then please read both of section A and B. However, if you use Windows laptop or Lab computers with Intel CPU then ignore section B and only read section A.
🟠 Ubuntu Server on VirtualBox (Windows and Intel Macs)
Plan the Ubuntu virtual machine

We will setup as following:
UbuntuVMmanually onVirtualBoxFedoraVM manually on VirtualBox
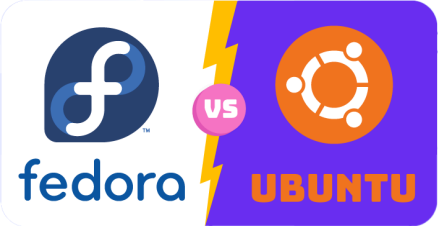
Here’s a comparison between Ubuntu and Fedora across some important aspects:
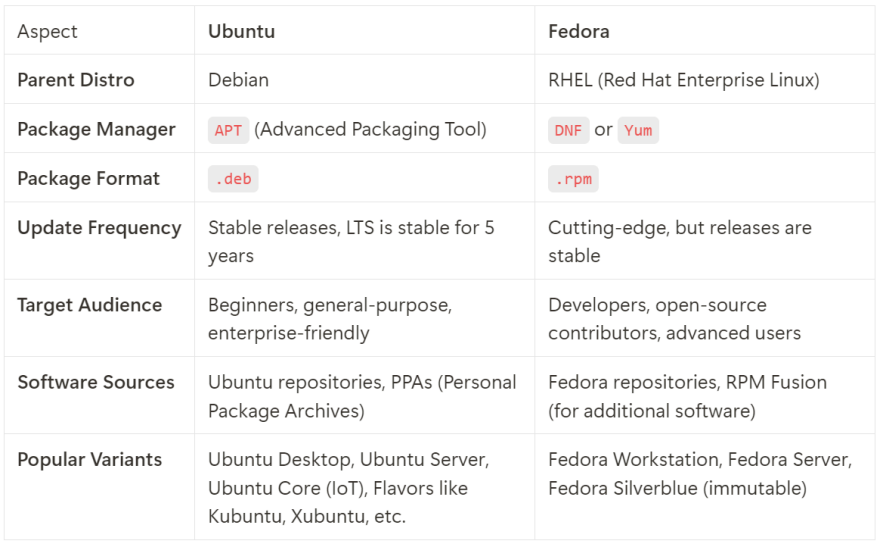
When embarking on the journey to learn DevOps, setting up Ubuntu and Fedora as Virtual Machines (VMs) in VirtualBox is an important step.
- Ubuntu, being the most popular
Debian-based Linux distribution, provides a user-friendly environment, thus serving as a great starting point for learners to get acquainted with Linux systems, which are widely used in DevOps practices. On the other hand, Fedora, a derivative of
Red Hat, mirrors the functionality and features ofRed Hat Enterprise Linux(RHEL), thereby providing a platform to delve deeper into enterprise-level system configurations. Moreover, honing your skills on Fedora is beneficial as it facilitates the practice of command line operations onAWSEC2instances, which often run on Red Hat-based distributions.
This hands-on experience with two distinct Linux distributions through VirtualBox not only broadens your understanding, but also equips you with practical skills essential for managing and automating various infrastructure setups in a DevOps culture.
We will set up these virtual OSes manually first because if you want to automate anything and you do not know how to do it manually, then you will struggle a lot. Therefore, you need to learn how to do it manually first before automating anything.
Before anything else, we need to download and install VirtualBox. However, if you use the RMIT computer lab then the computer should already have the VirtualBox installed so you can skip these installation steps:
Download and install VirtualBox (https://www.virtualbox.org/wiki/Downloads) based on your Operating Systems (Windows, MacOS, Linux):
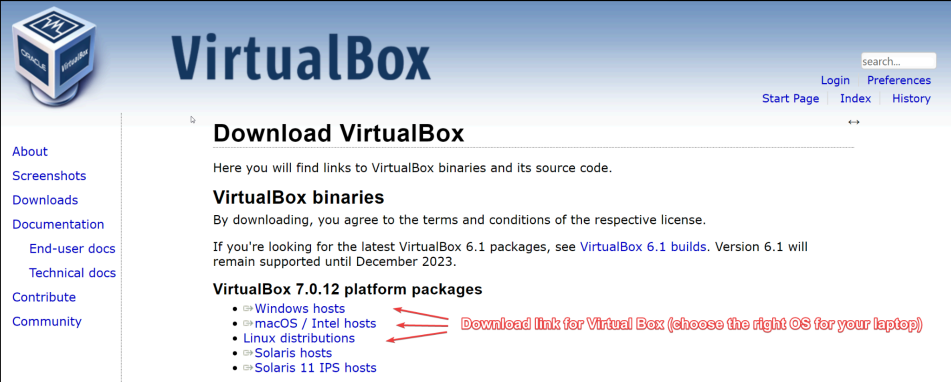
Go through all installation steps with default settings to get that installed!
After the installation, you can open Virtualbox and check its current version as following:
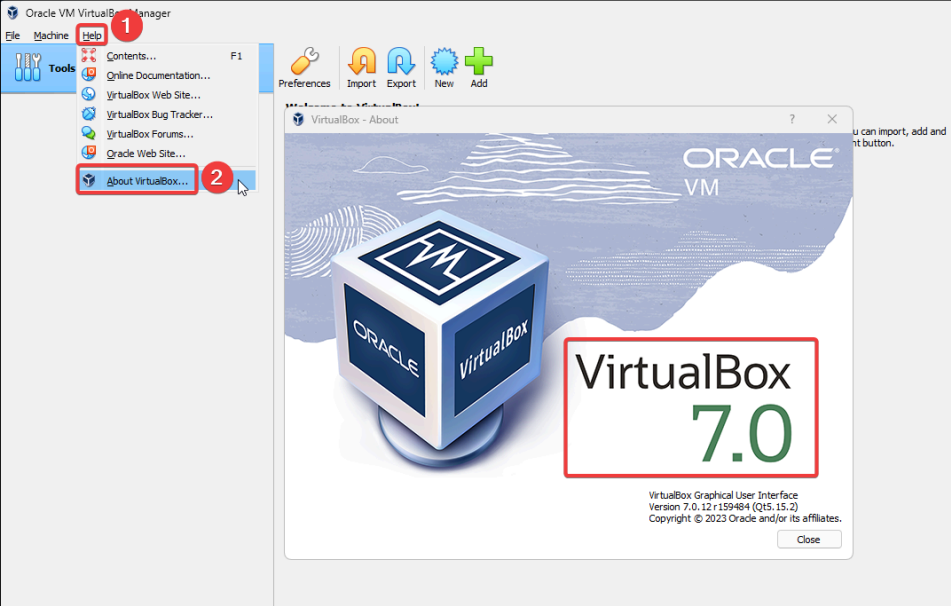
Install Ubuntu Server in VirtualBox
Keep in mind that these virtual machines above are empty and not yet functional as we need to install the actual operating systems from an
ISOimage on them! Let’s do that!Next, you need to download the
Ubuntu18 Server ISO image (https://releases.ubuntu.com/18.04/):
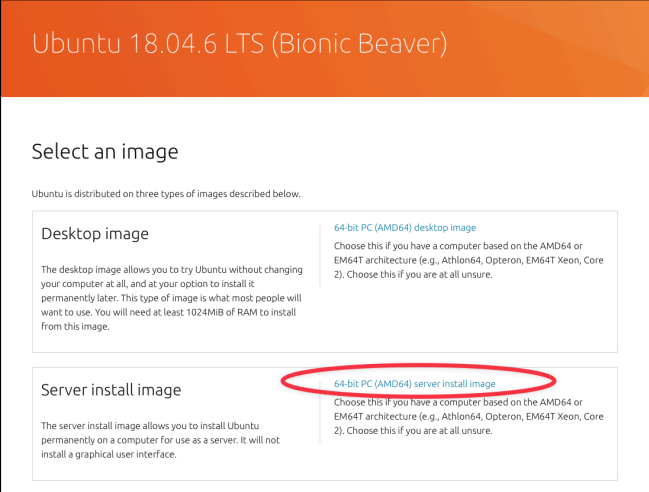
This will download an Ubuntu server ISO file to your laptop:
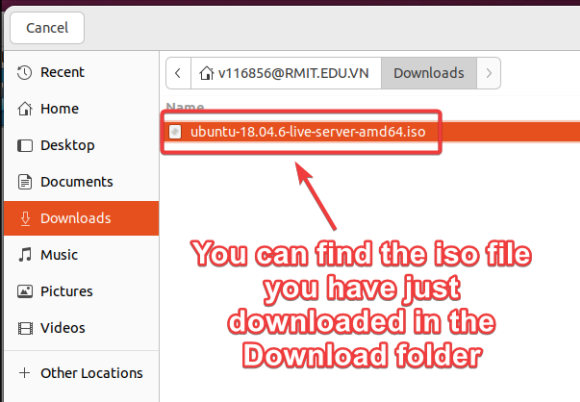
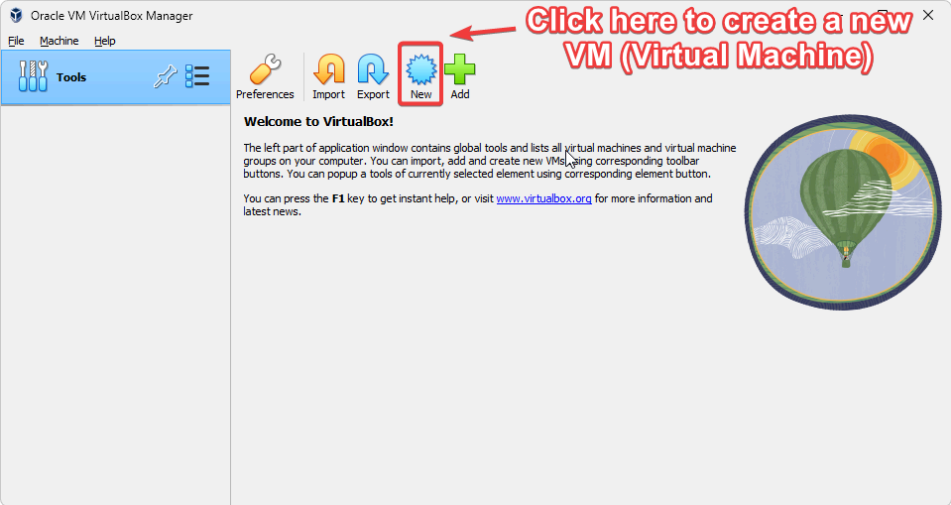
Now, with your Virtualbox installed, let’s virtualize! Open the
VirtualBox:
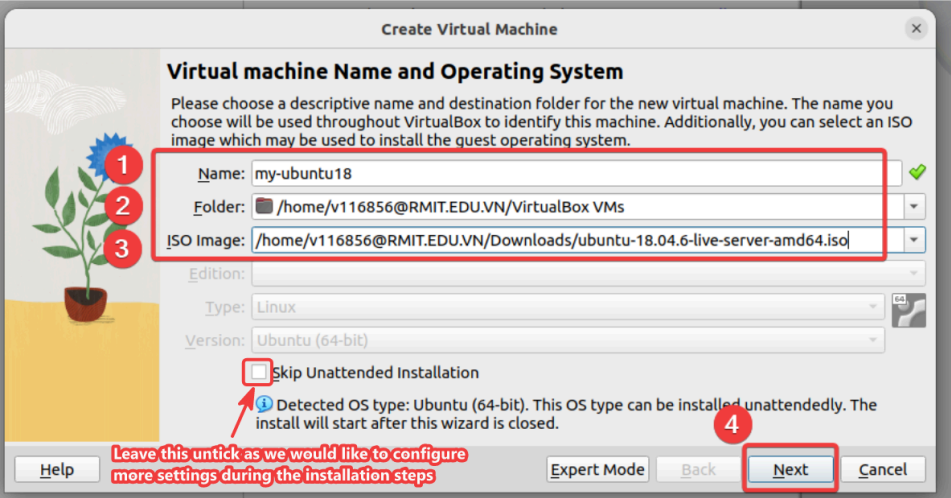
Enter a new information of the Ubuntu Virtual OS as following:
Name: name of your
VM(up to you) or you can name it “my-ubuntu-18”Folder: where your VM location is (best to leave it default)
ISO Image: select the Ubuntu ISO file to use it to install Ubuntu on our VM.
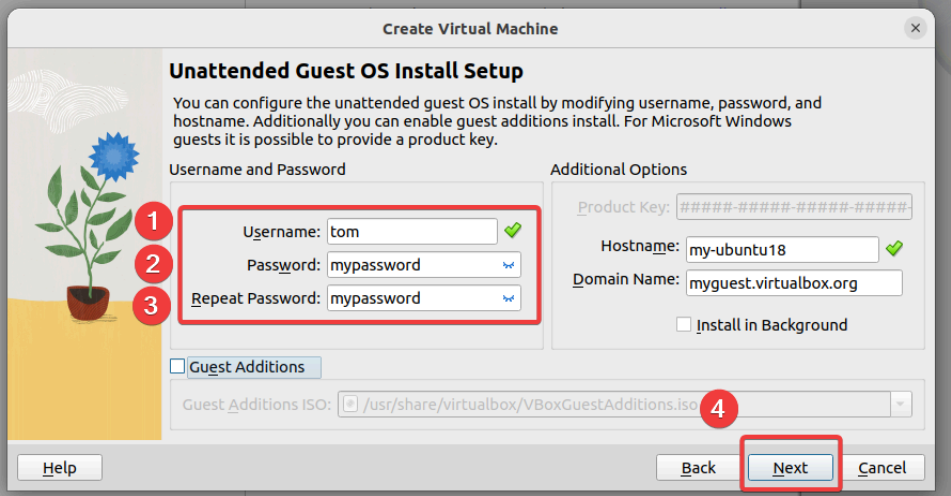
Set your username and password for the Ubuntu:
Username: something short and easy to type fast and remember.
Password: something short and easy to type fast and remember.
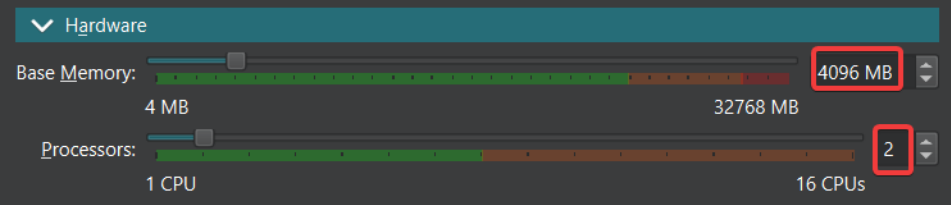
Set the amount of RAM and CPU threads you will allocate to your VM:
In our case, 4 GB of RAM and 2 CPUs are very plenty for
Ubuntu Server.
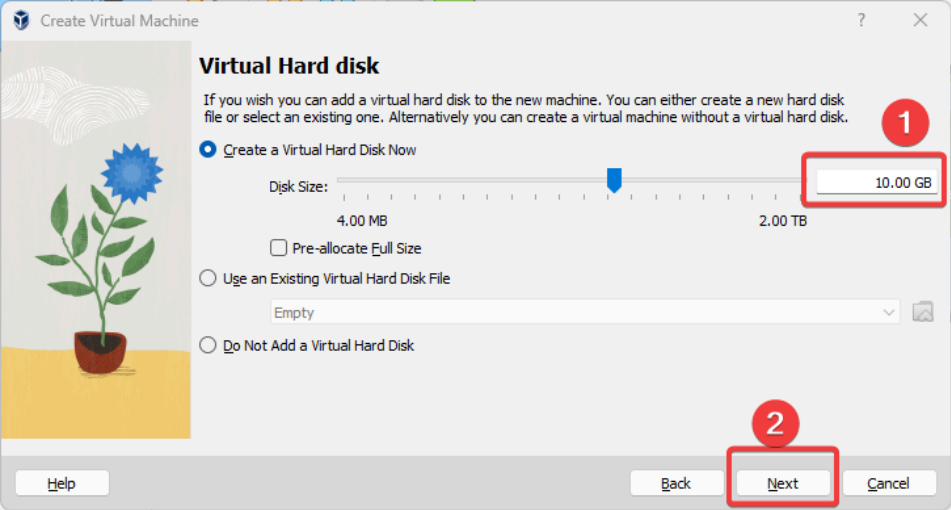
Create a new virtual hard disk for the VM and allocate an good size for it (10GB is plenty):
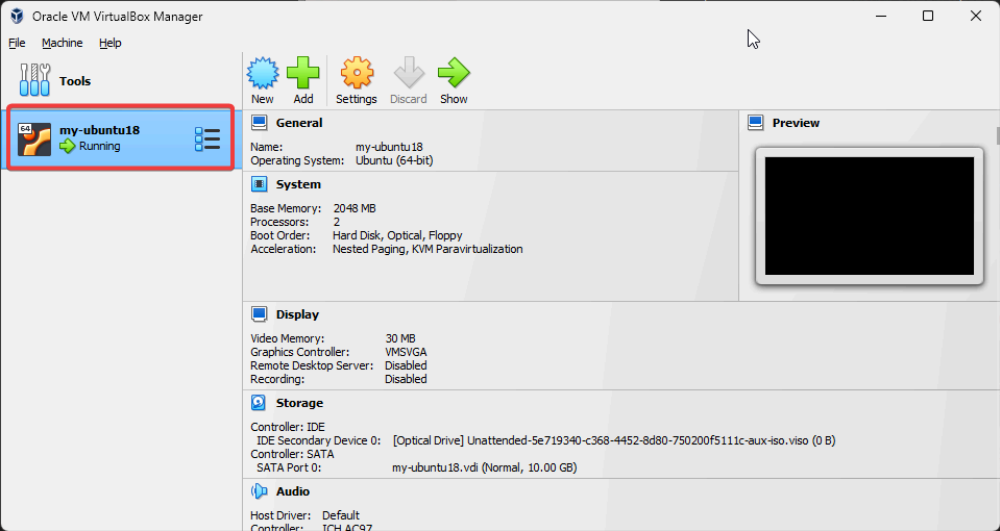
That’s it! you have create a VM for Ubuntu Server:
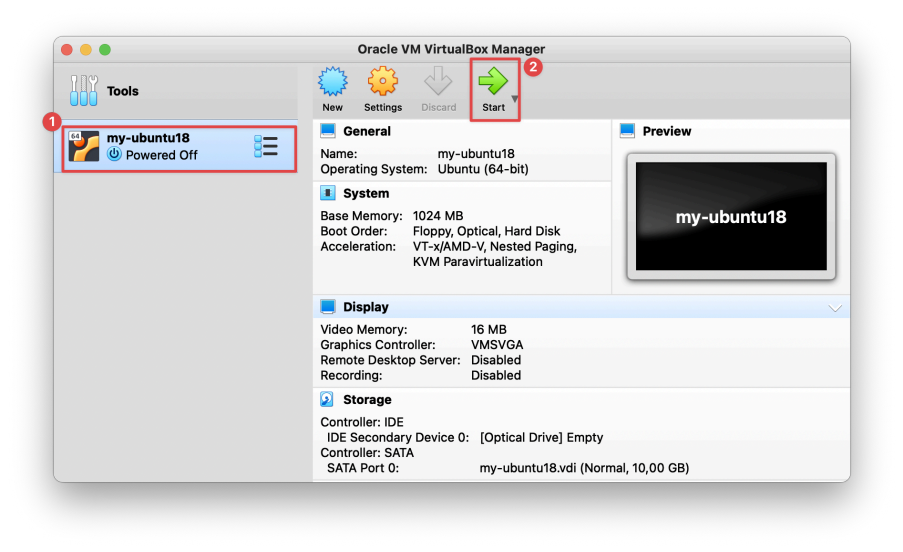
That’s it! Now, we can start the Ubuntu VM to start VM for the initial OS installation:
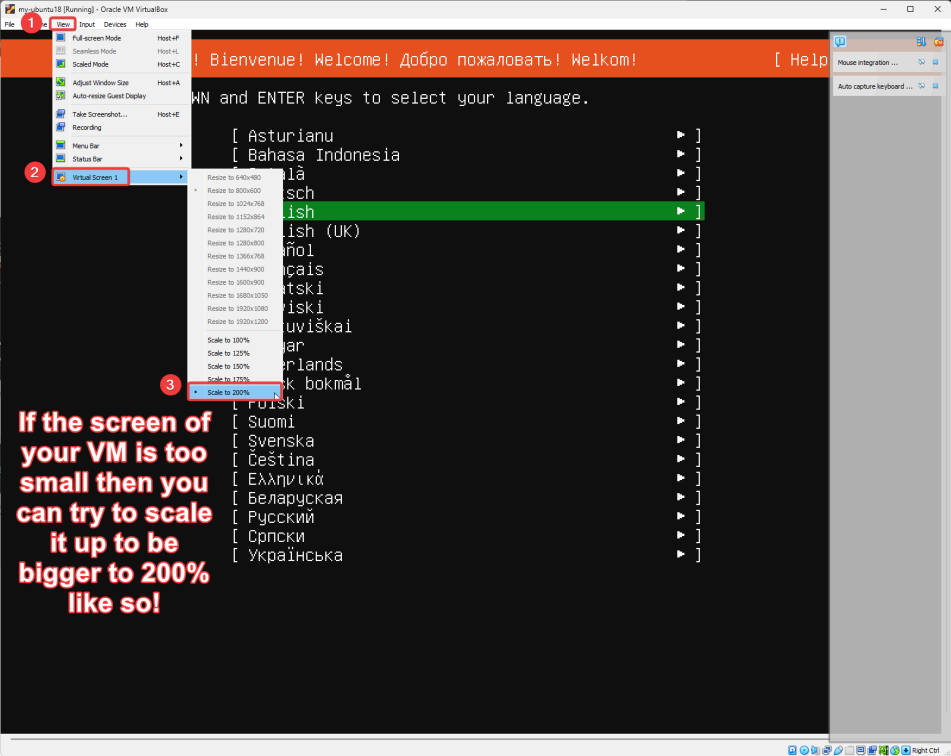
At first, on a very high resolution monitors like our monitors in the lab, the virtual OS of VirtualBox is quite small so you can scale it up to be bigger:
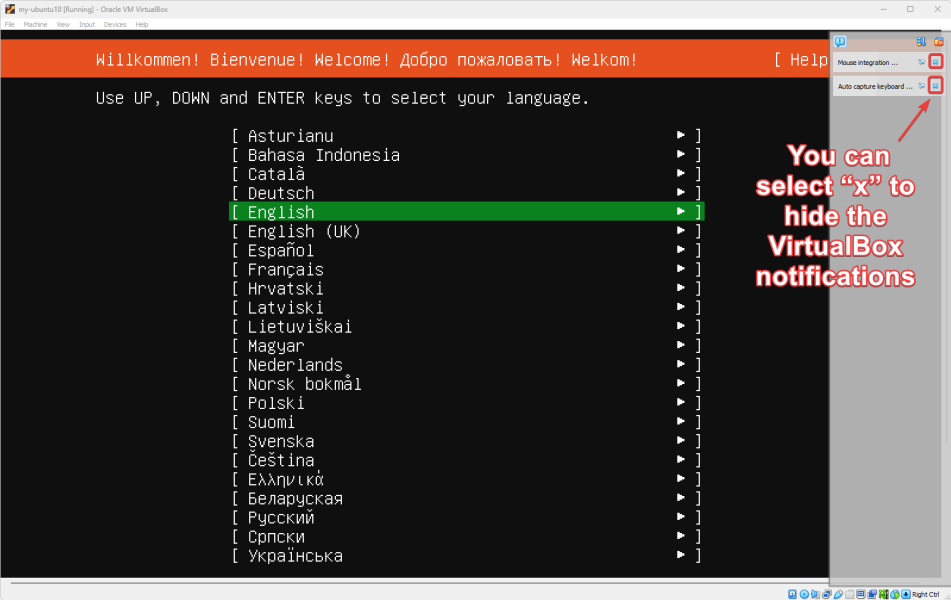
the VM will prepare to start up, you can select “x” to hide the VirtualBox notifications:
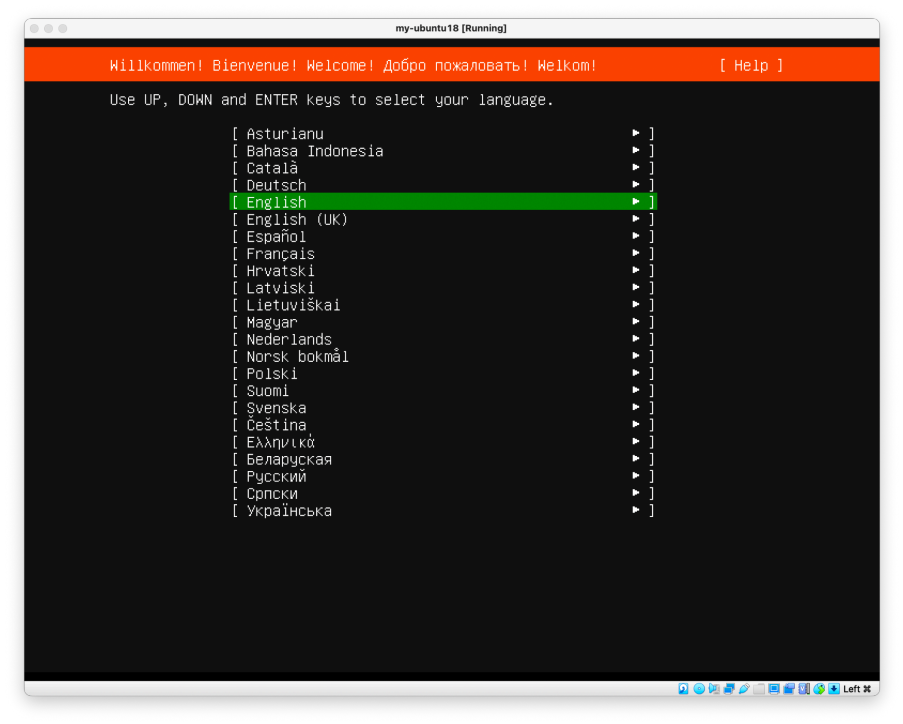
You should see the welcome screen for Ubuntu like this, press Enter to continue:
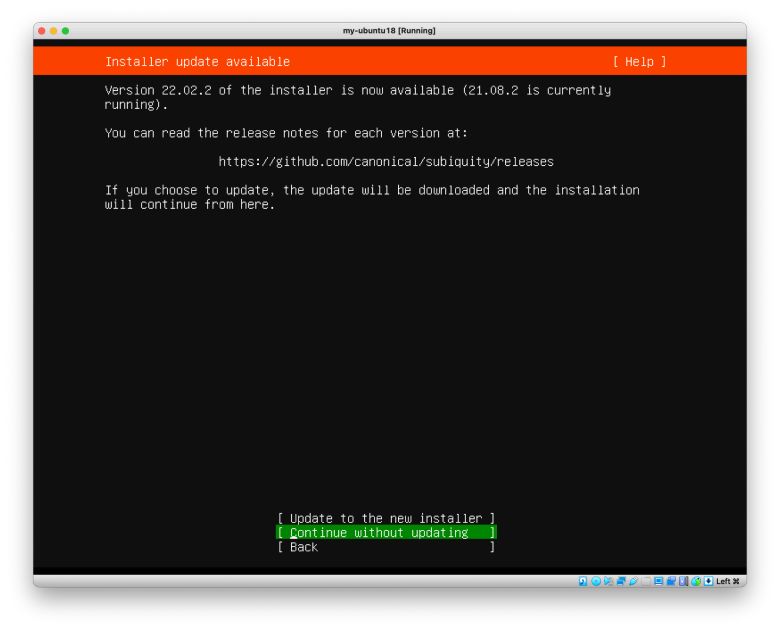
Press Enter to continue without any update:
Press Enter to select the default English keyboard layout:
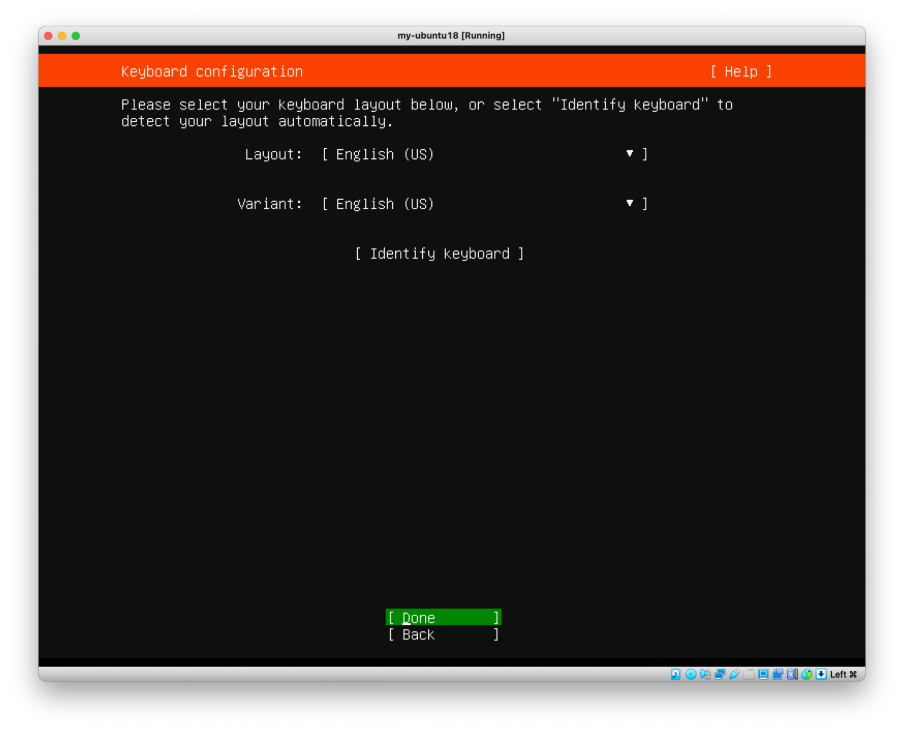
[ … ] press Enter to continue:
![Visual showing [ … ] press Enter to continue:](../assets/tutorials/week-1/page-011-image-02.png)
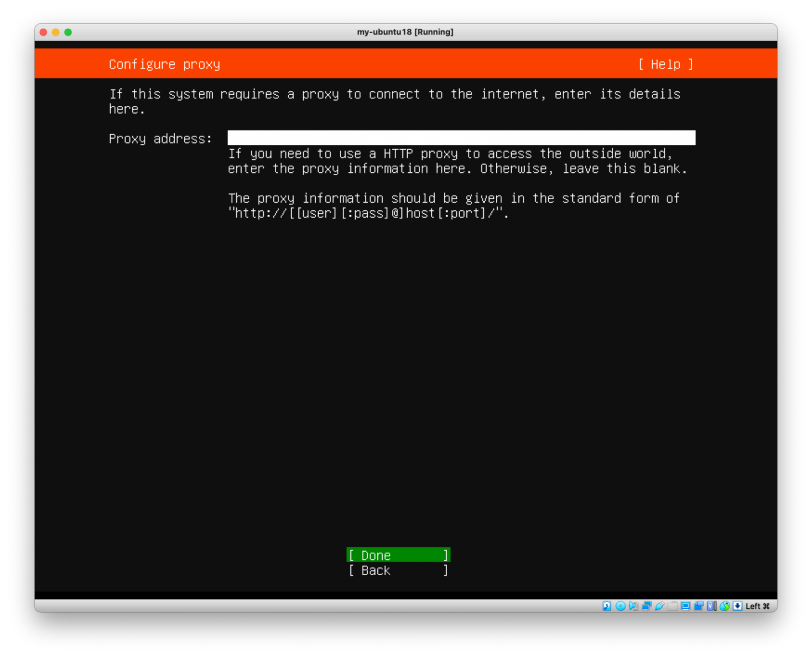
We don’t need to setup any proxy, press Enter to skip it:
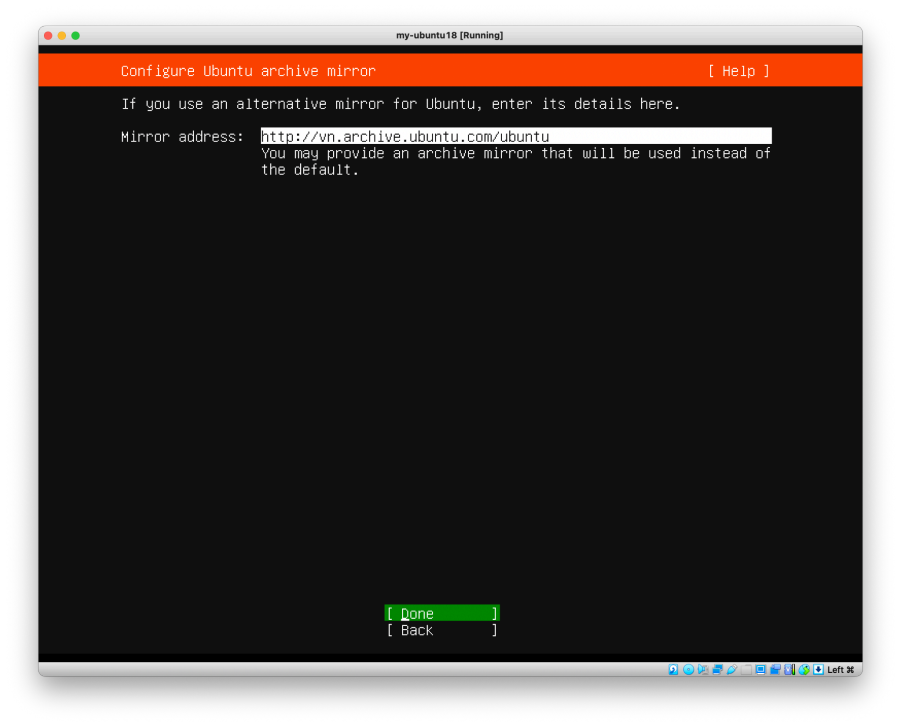
We will use the default mirror so press Enter to skip it:
We will let the VM to install on the given space we give it at the beginning, just press Done:
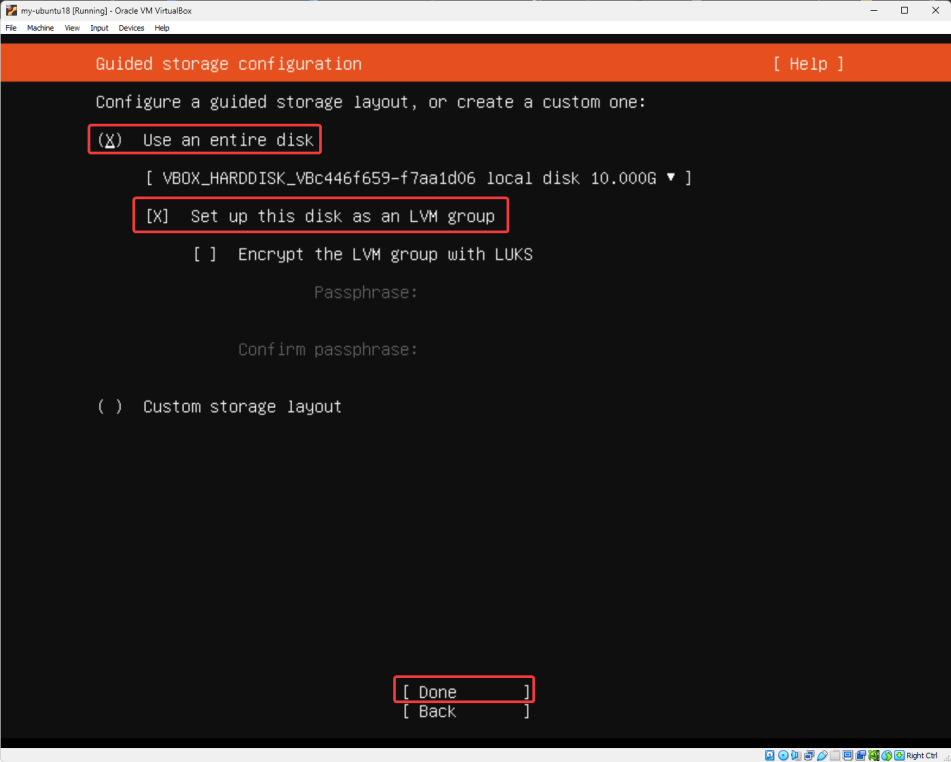
We let Ubuntu decide how to partition the disk for us. press Done:
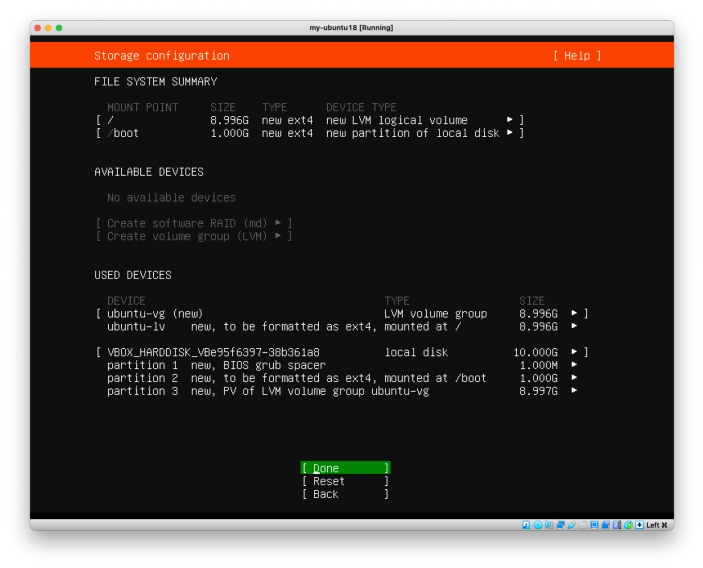
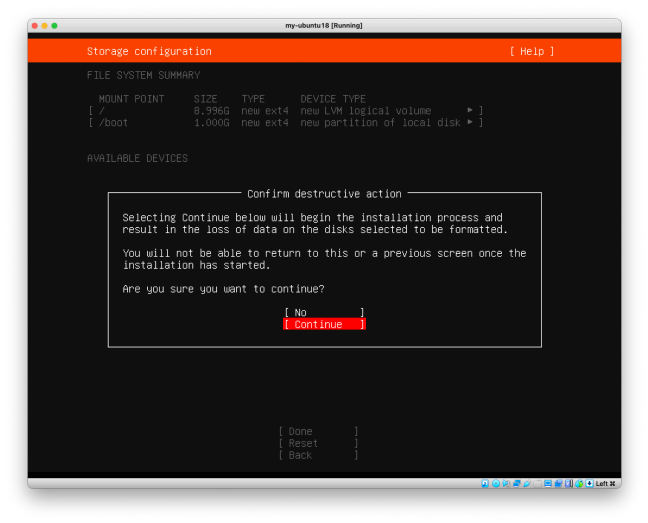
Click on Continue to swipe the space inside VM to install the Ubuntu on it:
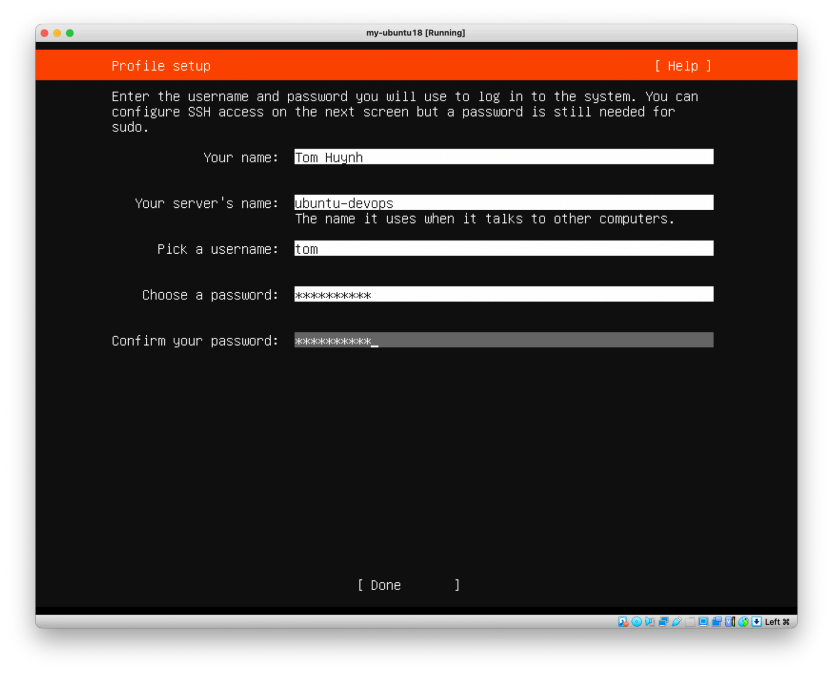
Lastly, let’s enter your username and password; please remember your username and password which is important to login later. In my case, I have:
Your name: your long name.
Your server’s name: the unique name for your VM.
Pick a username: keep it short as you will use this to login.
Password: keep it simple and short to be easily remembered.
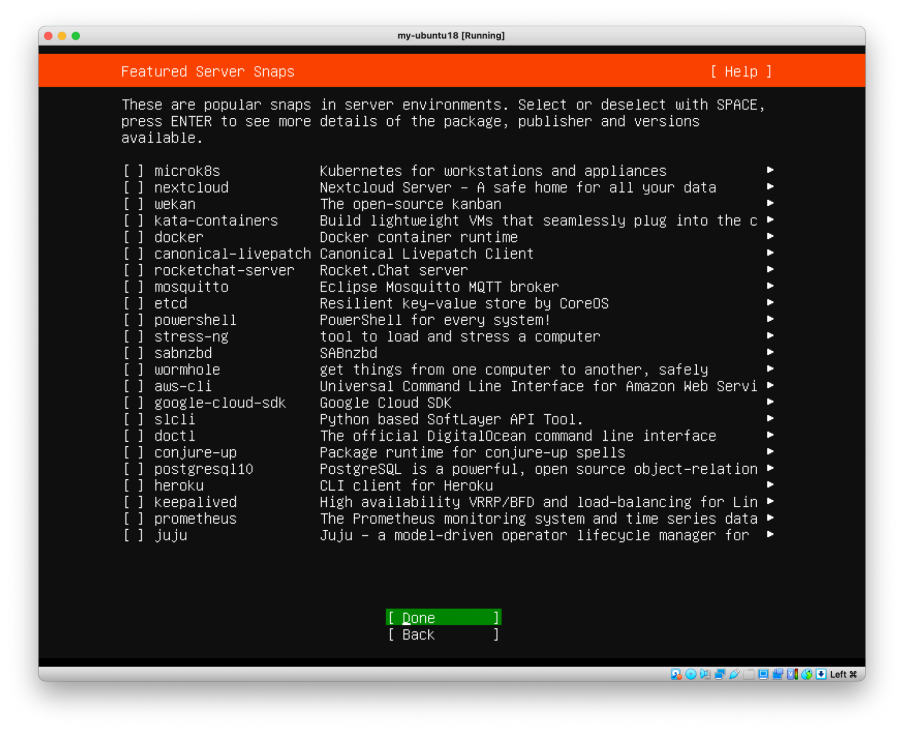
- [Important] Please check the option to install
openSSHso our computer can later login to the VM:
![Visual showing [Important] Please check the option to install openSSH so our computer can later login to the VM:](../assets/tutorials/week-1/page-015-image-01.png)
No need to install any software for now, choose Done to continue:
After this, the installation is happening! It will takes around a few minutes to complete:
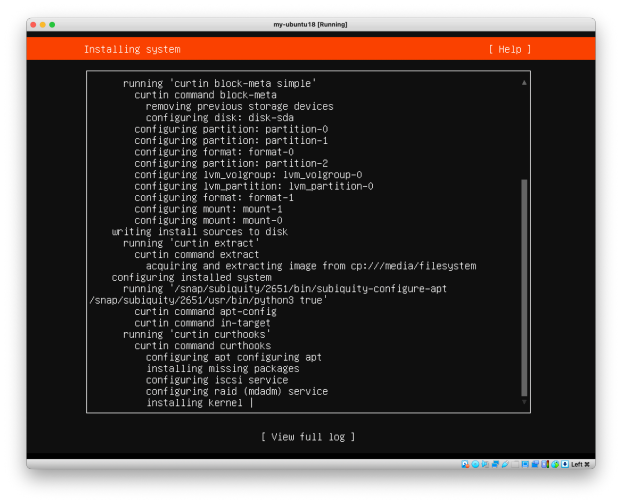
After installation completion, you should see the option to reboot the VM:
- Let’s wait for it as it is trying “downloading and installing all updates”, it might take some time (~10 minutes).
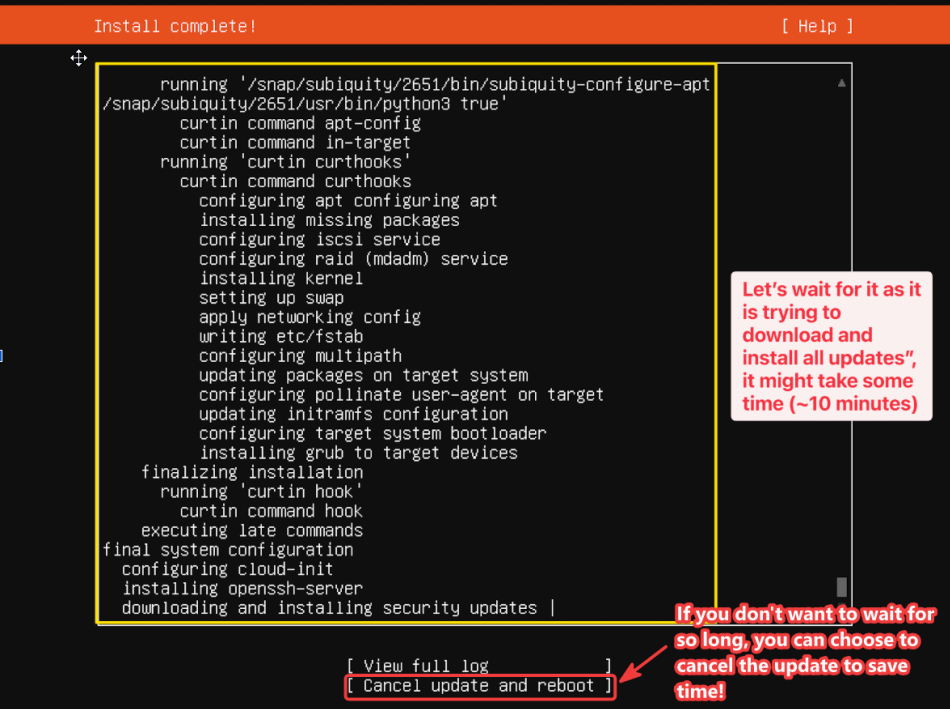
After the installation, it will restart the VM.
Important: Remove the Ubuntu ISO before rebooting again
- Common Issue: After Ubuntu finishes installing and the VM restarts, VirtualBox may still keep the Ubuntu ISO file attached to the VM. If the ISO is still attached, the VM may boot back into the Ubuntu installer instead of booting into the installed Ubuntu system.
If you see the Ubuntu installation screen again after rebooting, do the following:
Shut down the Ubuntu VM.
In VirtualBox, select your Ubuntu VM.
Click Settings.
Go to Storage.
Under Controller: IDE, click the attached Ubuntu ISO file.
Click the small disc icon or remove option, then choose Remove disk from virtual drive.
Click OK to save the settings.
Start the Ubuntu VM again.
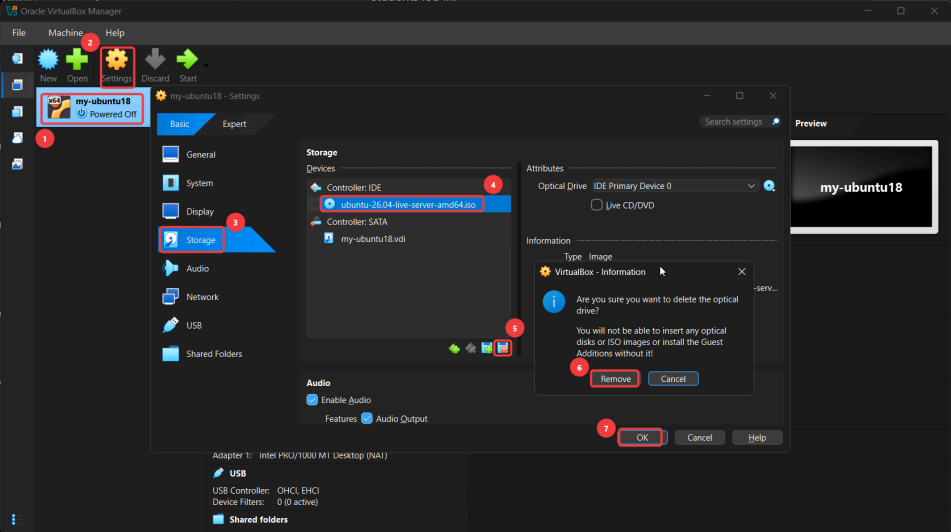
Now the VM should boot from the virtual hard disk instead of the Ubuntu ISO.
Please launch your VM, then you should see the Ubuntu login screen and can enter your username and password. If everything corrects then you should see the screen like this:
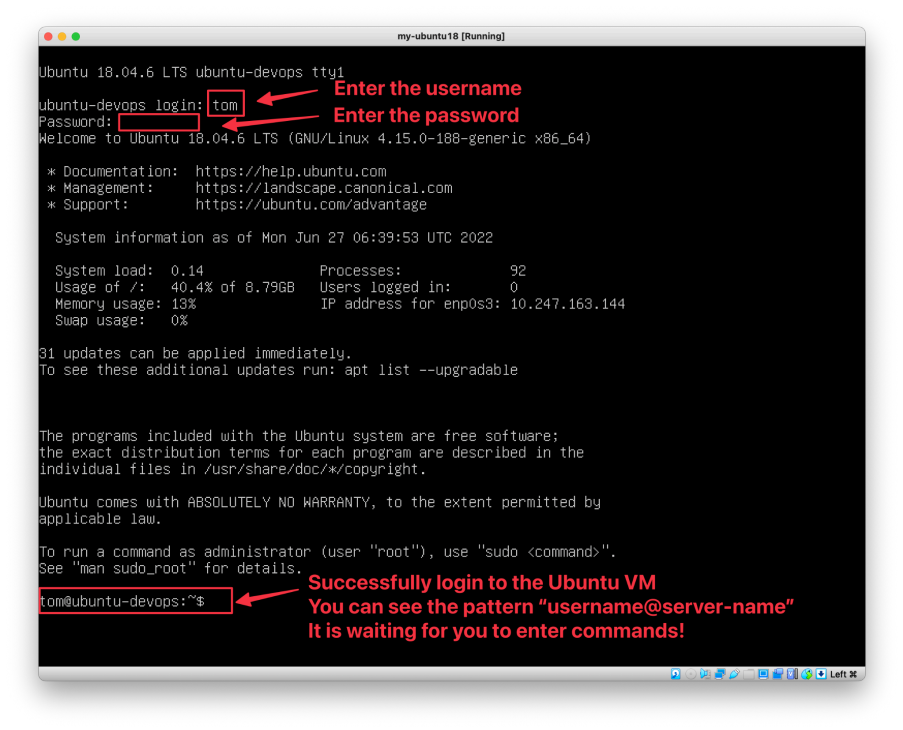
Congratulations! You have successfully created an Ubuntu VM in the Virtual Box!
Configure SSH access
It's a common and useful task to
SSHinto yourVirtualBoxVM(in this case,UbuntuVM) from your host machine. With the default "NAT" network, direct SSH access is not possible out-of-the-box because the VM is on a separate, private network created by VirtualBox. However, you can easily enable this by usingPort Forwarding.- Port forwarding creates a tunnel through the VirtualBox NAT network, redirecting traffic from a specific port on your host machine to a specific port on your guest VM.
- Step 1: Ensure an SSH Server is Running on Your Linux VM
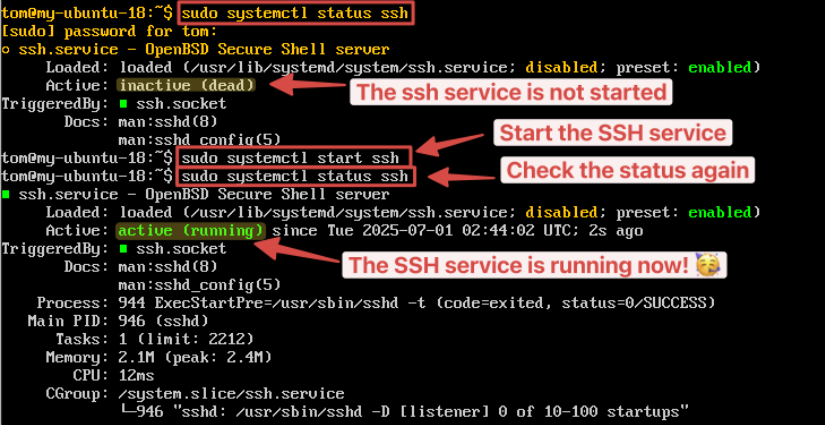
Check if the SSH service is running:
The screenshot below shows that it is running.
sudo systemctl status ssh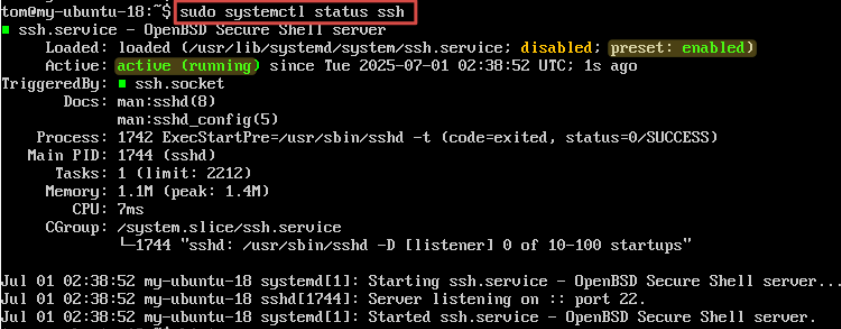
However, If it's not installed, you can install it:
sudo apt install openssh-server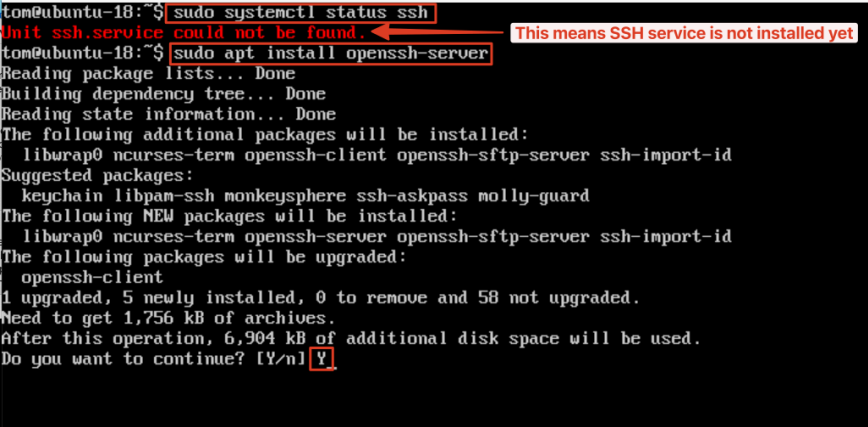
Then start the SSH service:
sudo systemctl start ssh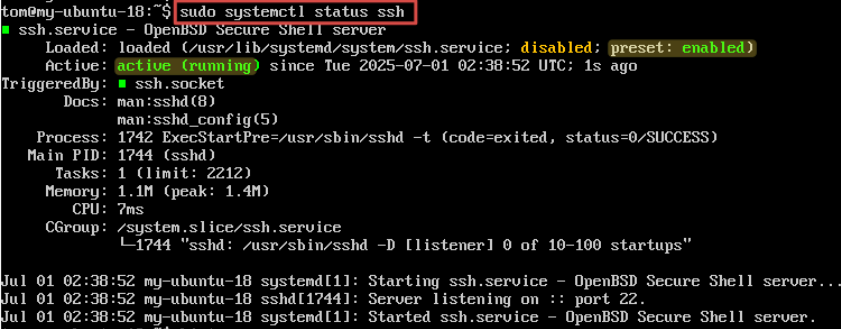
- Step 2: Configure Port Forwarding in VirtualBox
- Shut down your VM. While some settings can be changed while the VM is running, it's best practice to do this when it's powered off.
- Open VirtualBox and select your Linux VM.
Go to Settings>Network.
Ensure the "Attached to" dropdown is set to "NAT".
Expand the " Advanced " section and click on the "Port Forwarding" button.
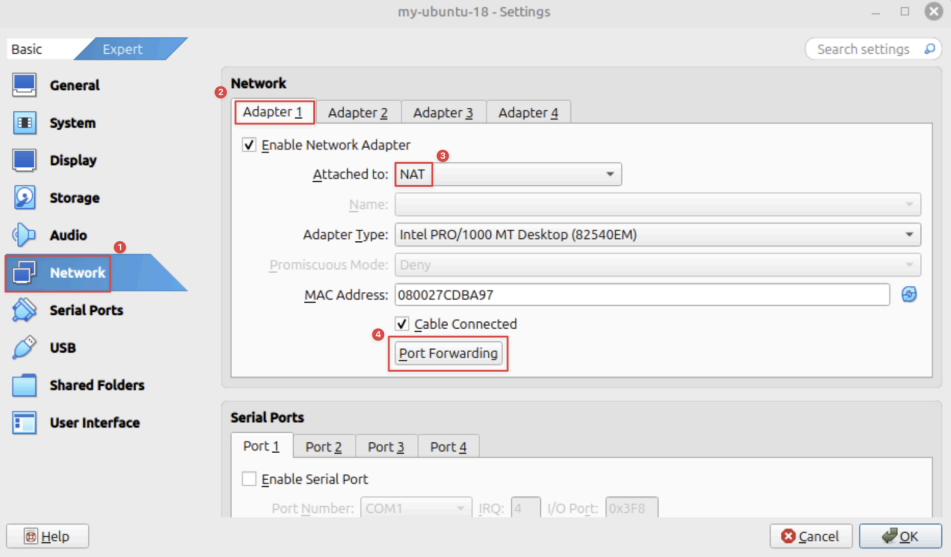
In the Port Forwarding Rules window, click the green '+' icon to add a new rule.
Fill in the fields for the new rule as follows:
- Name: Give the rule a descriptive name (e.g., "SSH-VM" or "Ubuntu-SSH-VM").
- Protocol: TCP
- Host IP: Leave this as
127.0.0.1which is generally safe as it only allows connections from your host machine. - Host Port: Choose a port on your host machine that you'll connect to. A common choice is 2222 to avoid conflicts with any services running on the standard SSH
port 22on your host. - Guest IP: You can generally leave this blank, as VirtualBox will automatically use the VM's IP address.
- Guest Port: This should be the port the SSH server is listening on inside your VM, which is 22 by default.
Your rule should look something like this:

Click OK to save the rule and OK again to close the VM settings.
- Step 3: SSH from Your Host to the VM
Start your Linux VM.
Ensure to check the status and start the SSH Server if needed
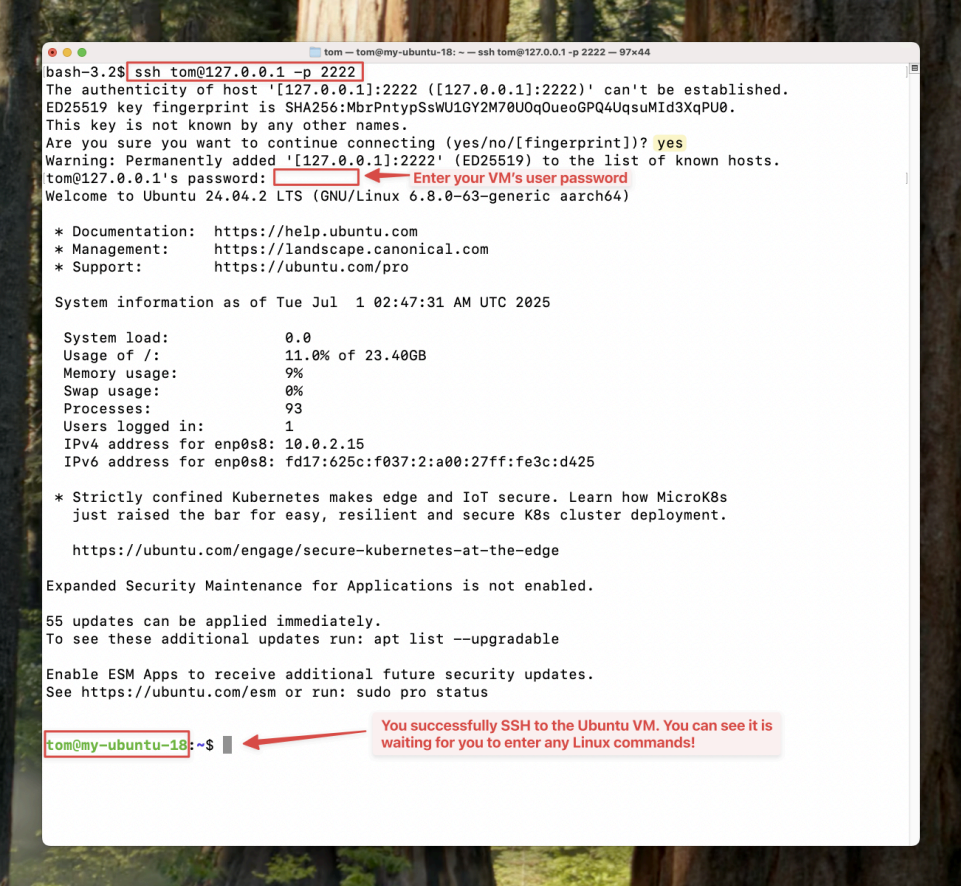
On your host machine (your main OS), open a terminal (on macOS or Linux) or a command prompt/PowerShell (on Windows).
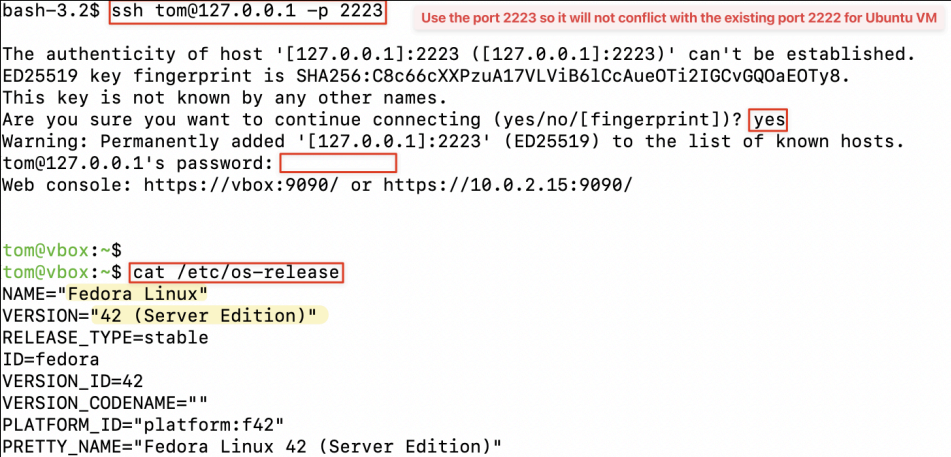
Use the following command to connect. You are connecting to localhost (your own machine) on the Host Port you specified (2222 in our example).
Replace
your_vm_usernamewith your actual username on the Linux VM.-p2222 specifies the port you set as the "Host Port".
ssh your_vm_username@127.0.0.1 -p 2222You should now be prompted for your VM user's password, and upon entering it, you will have an SSH session running in your virtual machine.
Practise Linux commands in the VM
Now, you can play around with the
UbuntuVMserver by typing this command to check the version number of Ubuntu:
cat /etc/os-release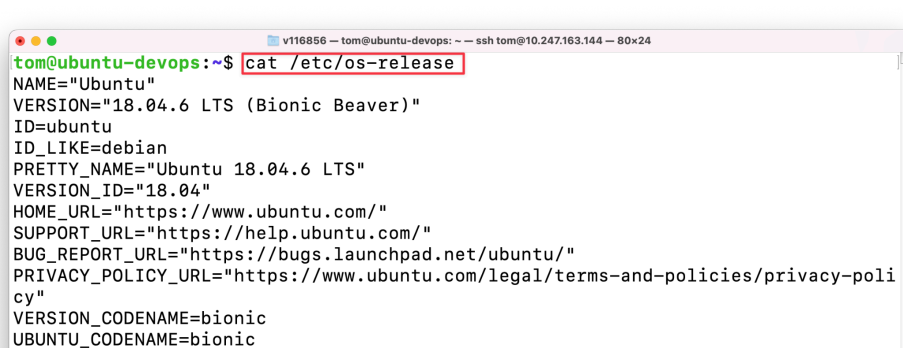
You can type these commands to print out string or display date like so:
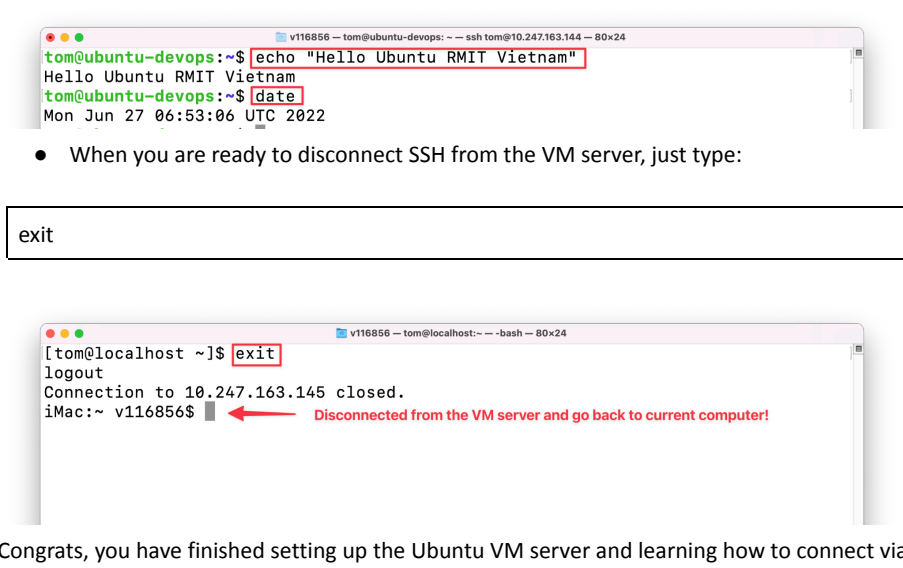
When you are ready to disconnect
SSHfrom the VM server, just type:
exit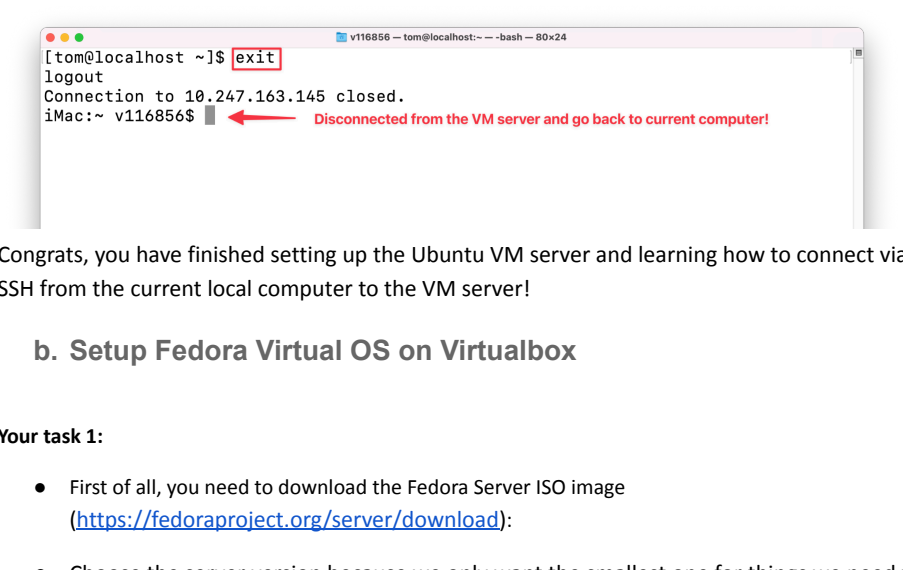
Congrats, you have finished setting up the Ubuntu VM server and learning how to connect via SSH from the current local computer to the VM server!
🔵 Fedora Server on VirtualBox
Create and install the Fedora virtual machine
First of all, you need to download the
FedoraServerISOimage ( https://fedoraproject.org/server/download) :Choose the server version because we only want the smallest one for things we need to learn DevOps:
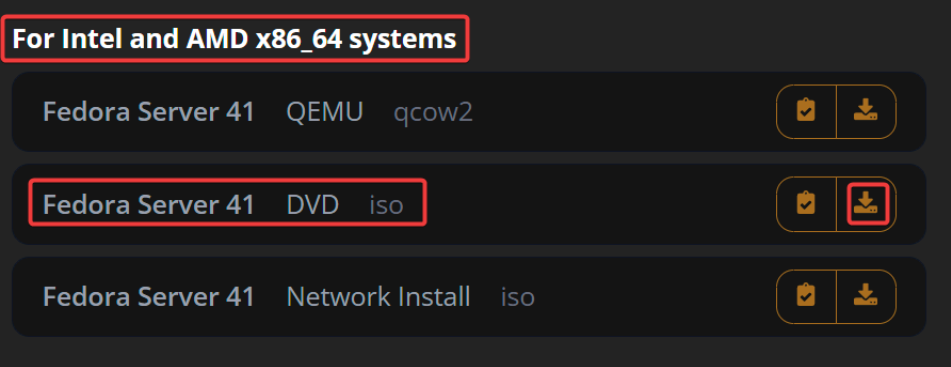
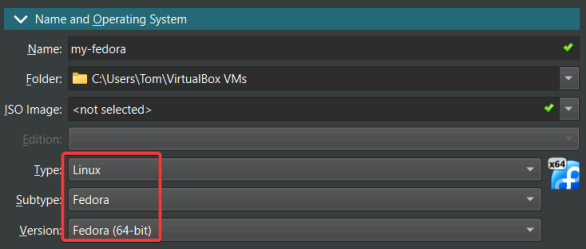
Can you do the same steps above and create another one for Fedora
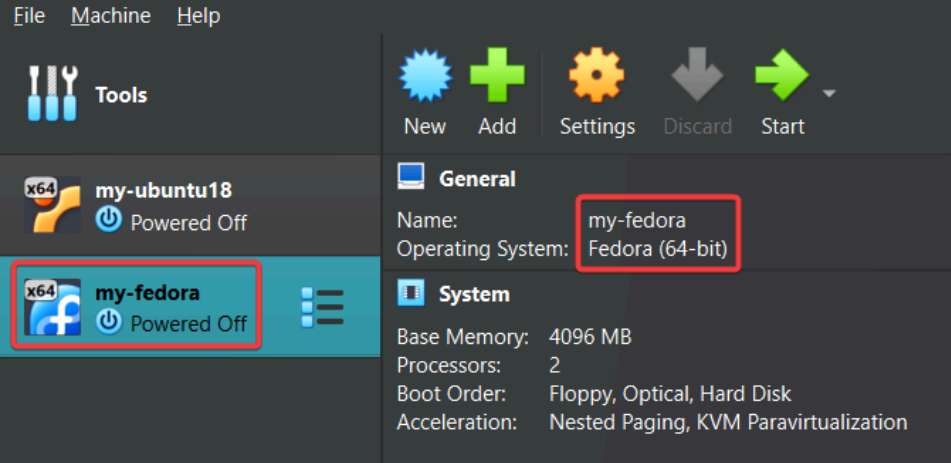
VMwith below settings?Name:
my-fedora(up to you)Type: Linux
Subtype: Fedora
Version: Fedora (64-bit)
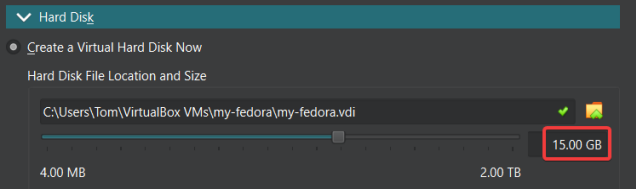
Other settings are similar to the above instructions for
Ubuntu!Like the Memory and CPU allocation:
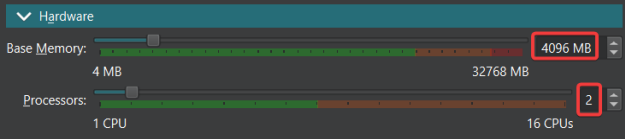
Like Hard Disk:
After you are done, you should have another Fedora VM like this:
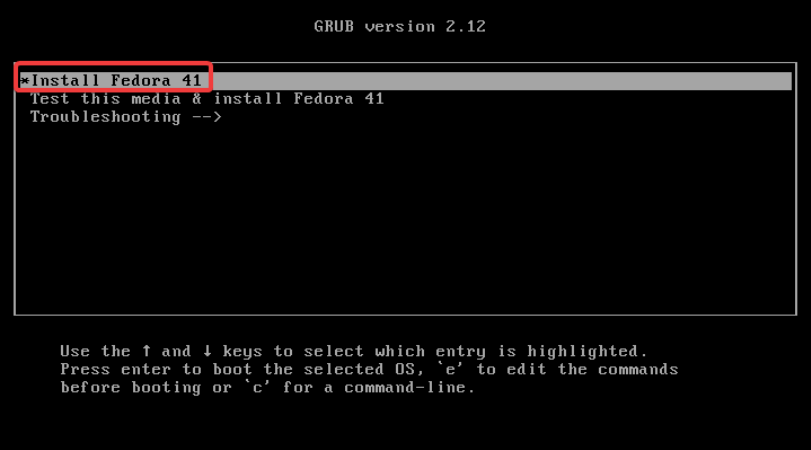
Start the VM and finish the installation steps:
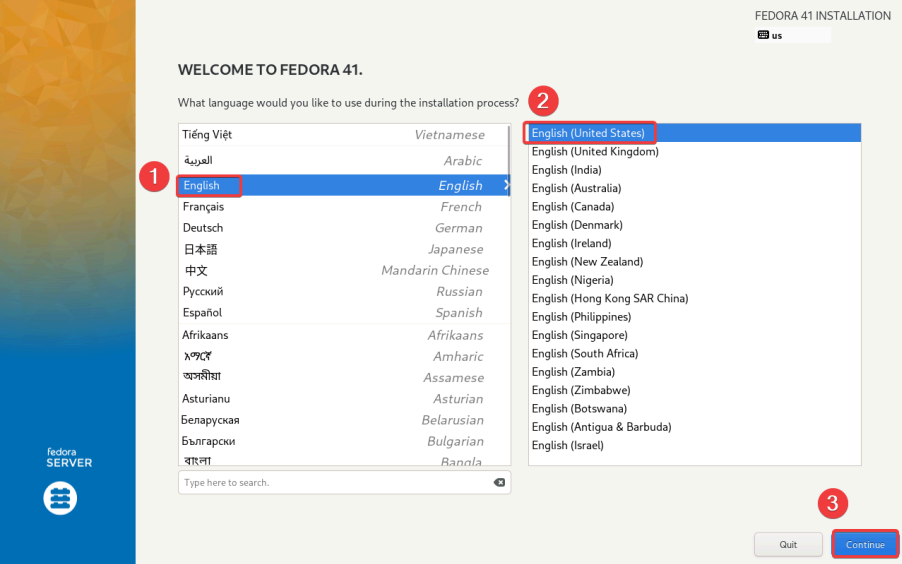
Continue with English language and keyboard layouts:
- [Important] If you saw this pop-up message:
![Visual showing [Important] If you saw this pop-up message:](../assets/tutorials/week-1/page-026-image-02.png)
Here are the explanations:
When working with
VirtualBox, understanding the interaction between your host machine (your laptop/computer) and the virtual machine (VM) is very important.- Mouse and Keyboard Capture:
When you click inside the VM display or press the host key, VirtualBox can "capture" your mouse interaction and keyboard. This means they are now interacting with the VM rather than with applications on your host machine. This occurs if the guest OS (the OS running inside the VM) doesn't support mouse interaction.
- The Host Key:
The host key acts as a toggle switch. Pressing it will either capture or release the keyboard and mouse, depending on their current state.
The host key is indicated in the status bar at the bottom of the VM window, next to a specific icon. By default, the host key is set to Right Ctrl.
When the keyboard and mouse are captured, they interact with the VM. When they're released (or "uncaptured"), they interact with the host machine.
This setup allows you to easily switch between interacting with your VM and your host machine, making the use of VirtualBox efficient and user-friendly. This mechanism ensures that you can dedicate your input devices to the VM when necessary, and effortlessly return control to your host machine with a simple key press.
- Mouse and Keyboard Capture:
For the settings, you just need to take care of two sections: Installation Destination and Network & Host Name
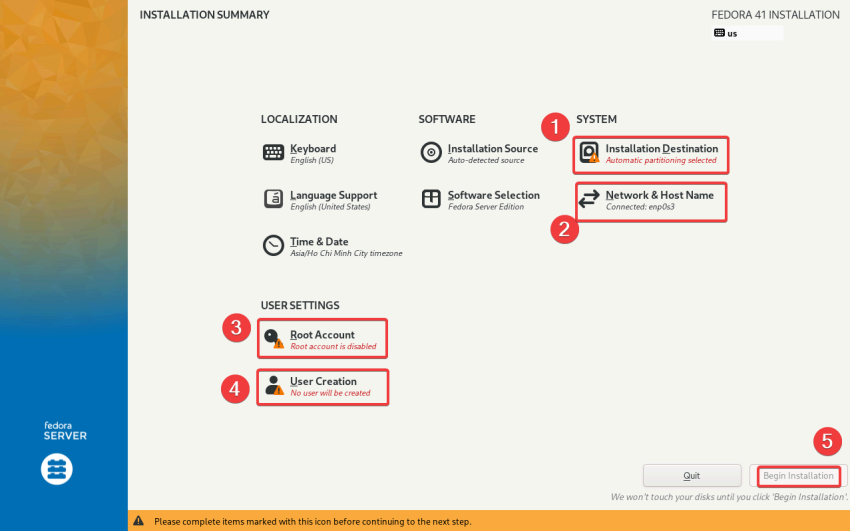
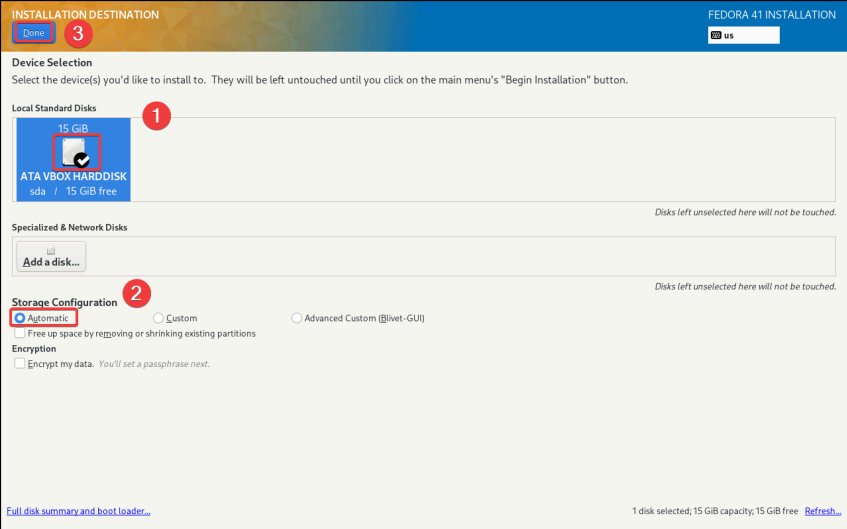
For the installation destination, we select the default partition to let the Fedora make that decision for us:
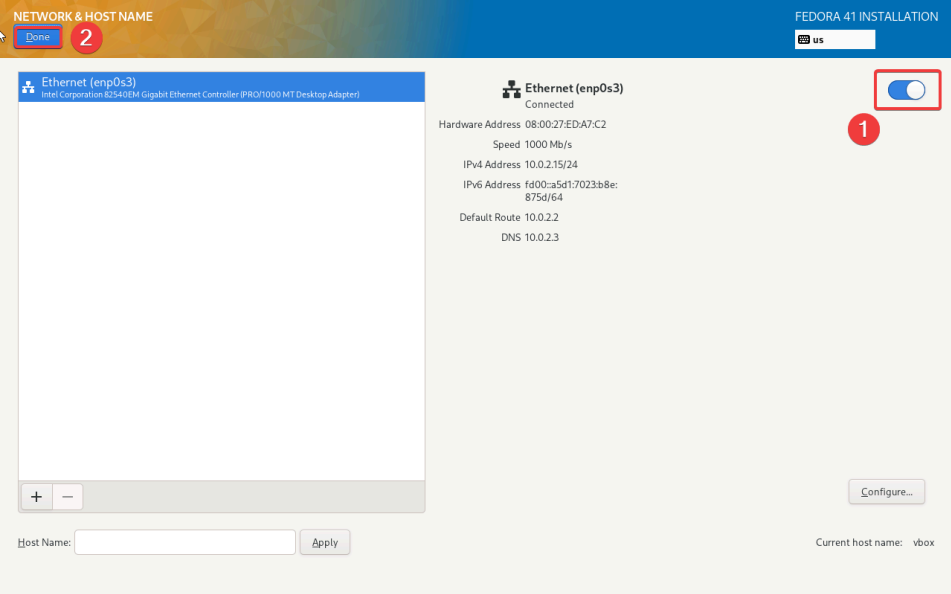
For the Network & Hostname, make sure you turn on the Ethernet option so our Fedora VM can connect to the internet:
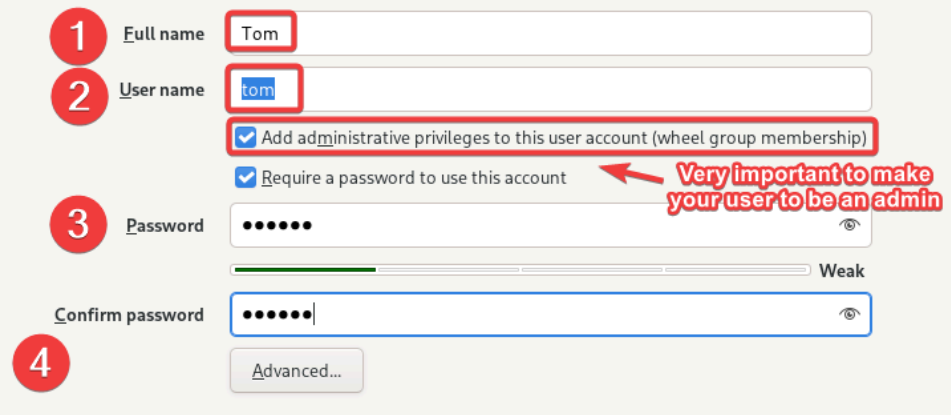
Next, we need to enter two sections for root password and user details:
To keep it simple, please use the same password for both of them
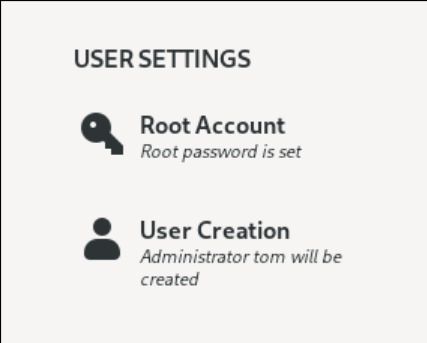
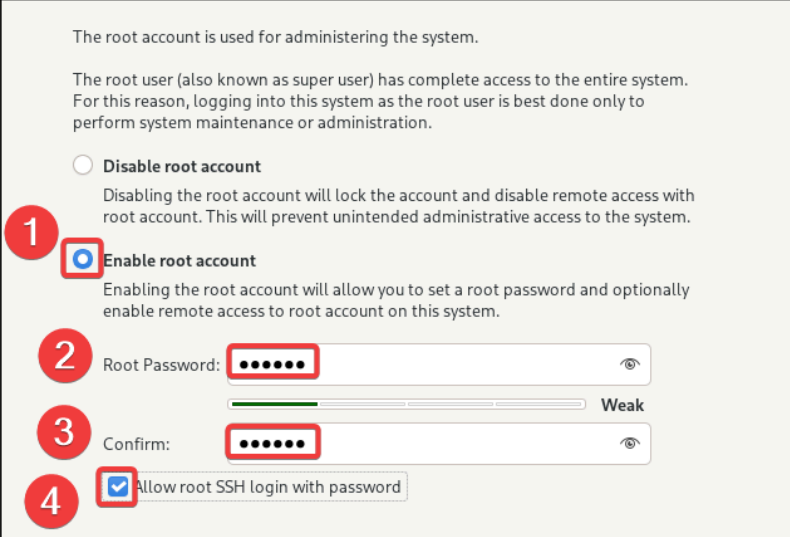
Enter the root password which will allows the user to have root permission to install/configure anything on the VM:
Make sure you tick on the option “Allow root
SSHlogin with password”
Enter user details (username and password):
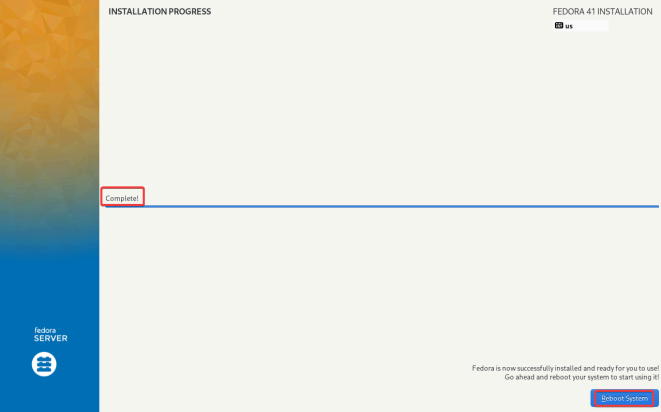
After that, we should begin the OS installation for Fedora!
After the installation completion, you can reboot the Fedora VM:
Important: Remove the Fedora ISO after installation
As you did for the Ubuntu VM, after Fedora finishes installing, make sure to remove the ISO file from the VM storage settings.
Go to: VirtualBox > Select Fedora VM > Settings > Storage > Controller: IDE > Remove the Fedora ISO file
Then start the Fedora VM again.
If you see the Fedora installation screen again after rebooting, it means the VM is still booting from the ISO instead of the installed Fedora system. Remove the ISO and reboot the VM.
Enter the username and password correctly:
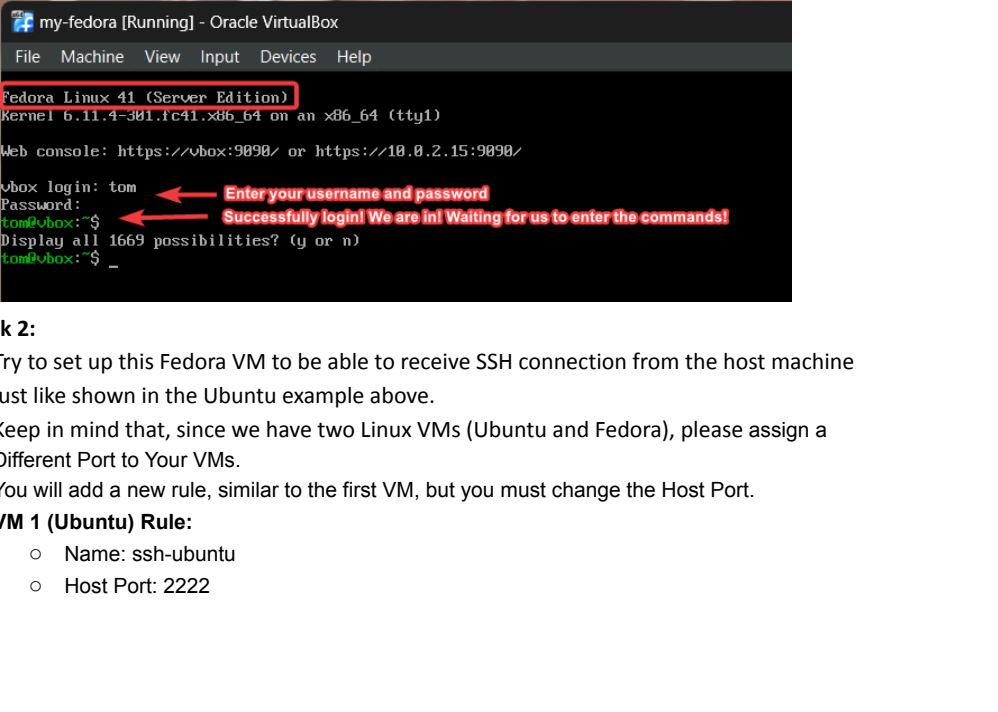
Configure SSH access to Fedora
Try to set up this
FedoraVMto be able to receiveSSHconnection from the host machine just like shown in theUbuntuexample above.Keep in mind that, since we have two Linux
VMs(Ubuntu and Fedora), please assign a Different Port to Your VMs.You will add a new rule, similar to the first VM, but you must change the Host Port.
- VM 1 (Ubuntu) Rule:
Name: ssh-ubuntu
Host Port: 2222
Guest Port: 22
- VM 2 (Fedora) Rule:
Name: ssh-fedora
Host Port: 2223 (This is a very important change!)
Guest Port: 22

Ensure the ssh service is running:
Run this command to check the status of ssh service:
sudo systemctl status sshd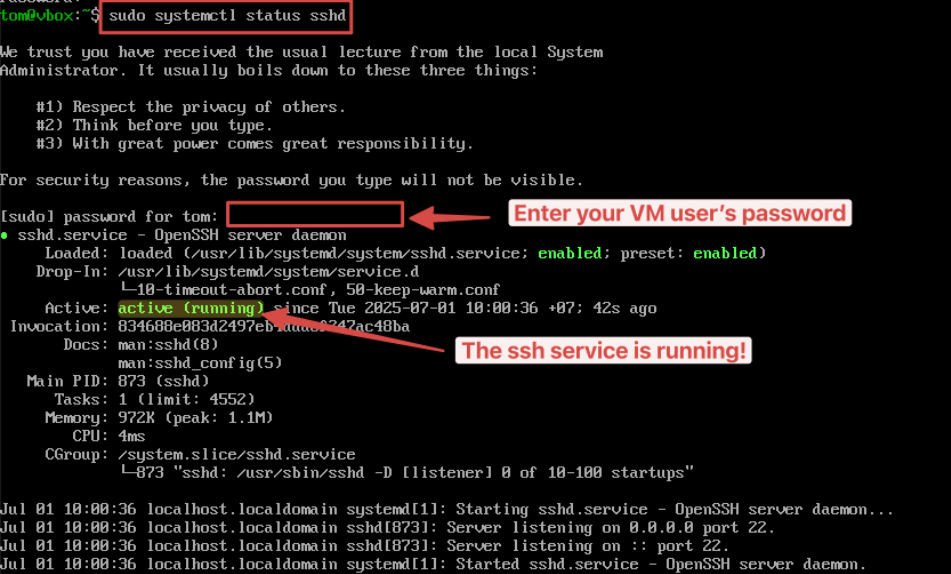
Make sure you can SSH from your terminal to the Fedora VM:
Shut down the Fedora VM safely
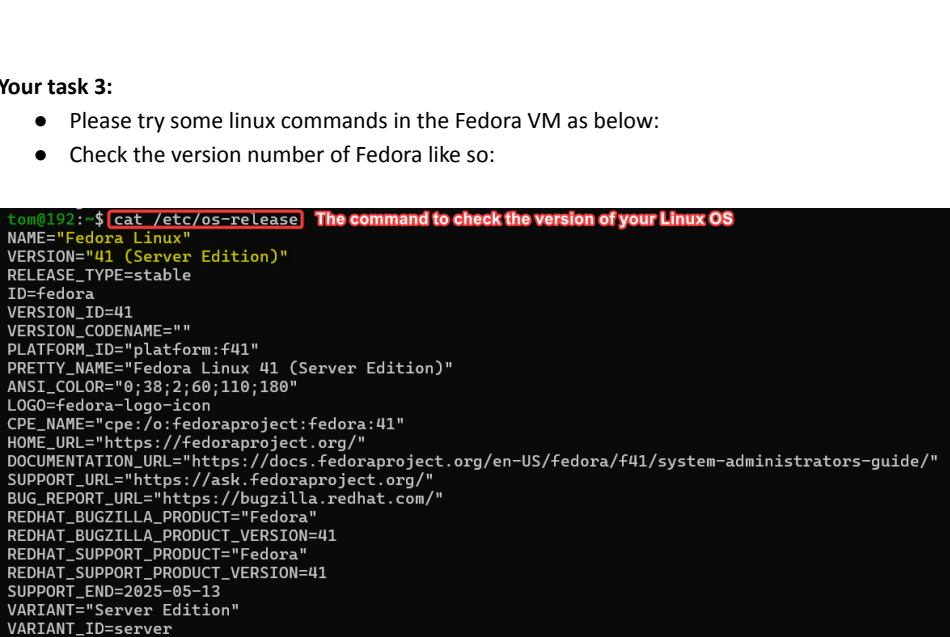
Please try some linux commands in the
FedoraVMas below:Check the version number of Fedora like so:
Also test out other commands like this:

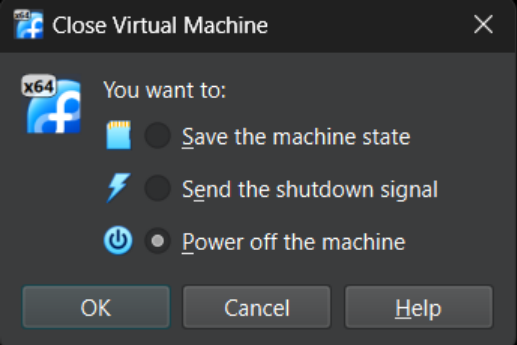
You can shut down the VM of VirtualBox just by clicking on the x and shut it down:
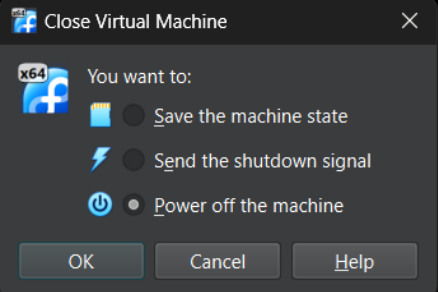
I hope you have successfully done these steps and set up these VMs to prepare for the next labs! Cheers!
🍎 Apple Silicon (M-series) setup notes
If you are using a MacBook with an Apple M1 or M2 chip, there are specific considerations for setting up virtual machines (VMs) due to the differences in hardware architecture. Unlike Intel-based Macs, Apple Silicon (M1/M2) uses ARM architecture, which impacts the compatibility of virtualization software and operating systems. Here are the key things you need to know:
Choose ARM-compatible virtualization software
Since M1/M2 chips are based on ARM architecture, you cannot use the standard version of VirtualBox that works for Intel chips. Instead, you need to download the ARM version of VirtualBox, or alternatively, use UTM or Parallels Desktop which also support ARM virtualization on Apple Silicon.
- ARM Version of VirtualBox: The standard VirtualBox versions will not work on M1/M2 MacBooks. Make sure to download
The ARM version of VirtualBox from VirtualBox’s official site
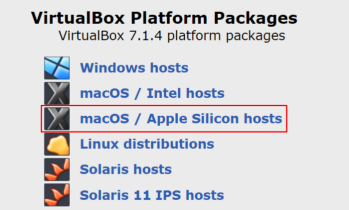
Or use UTM (https://mac.getutm.app/) for a more streamlined experience on M1/M2 Macs.
[Important] Since all of the instructions for this lab are written for VirtualBox, please ignore the UTM option and stick with VirtualBox for now!
Choose an ARM-compatible operating system
The operating system you install in your virtual machine must also be ARM-compatible, as the Intel-based versions of Ubuntu and Fedora will not run on Apple Silicon. Here’s what to use:
- Ubuntu ARM Version: For Ubuntu, download the
ARM64version from the official Ubuntu releases page.
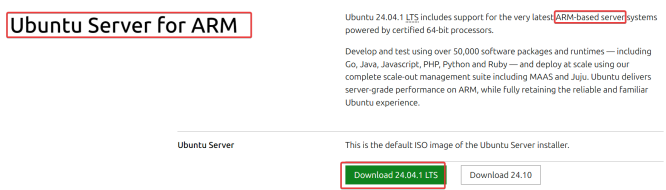
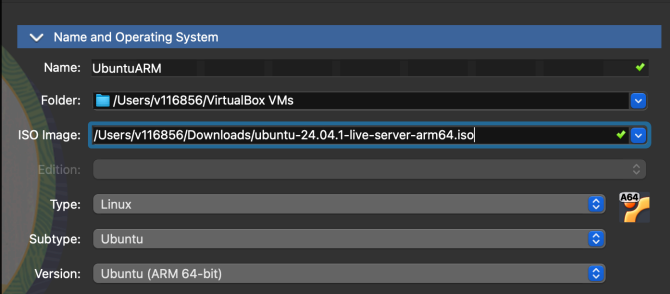
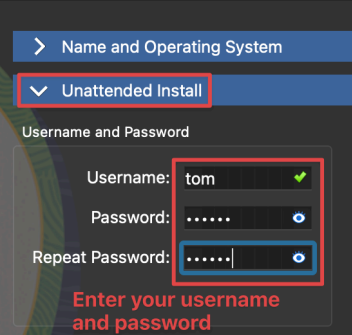
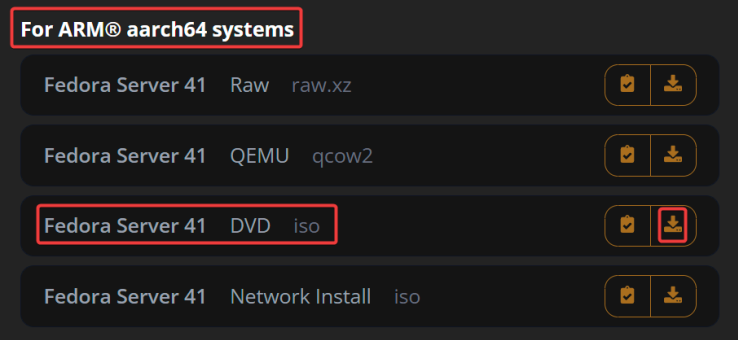
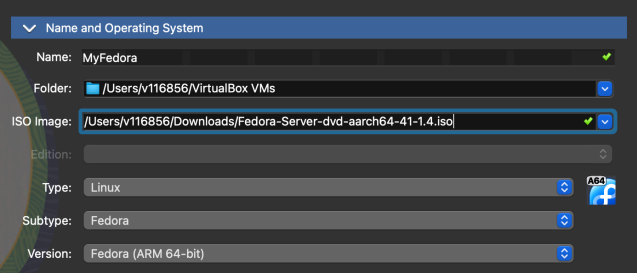
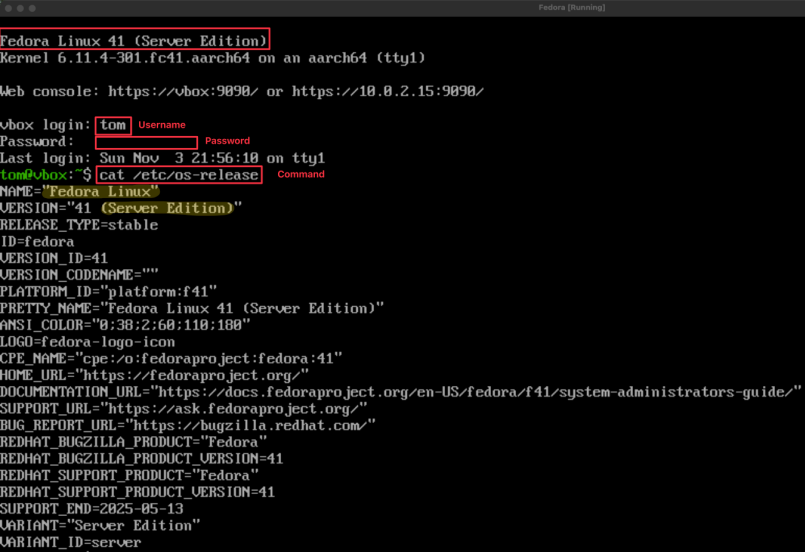
Fedora ARMVersion: please use Fedora ARM as it is a community-driven Linux distribution forRed Hat Enterprise Linux, known for its cutting-edge features and regular updates. Download the ARM version of Fedora.
Apple Silicon setup summary
Install
ARM-compatibleVirtualBox(or useUTM/Parallelsfor better compatibility).Install
Ubuntu ARM64as an option forDebianVMInstall
Fedora ARMas an option for Redhat VM
Important Note:
Even though you are using an Apple M1/M2/M3/M4 chip, it is important that you still read the rest of the provided instructions in the lab guide in section B, as they are highly relevant. The majority of the steps (such as configuring VirtualBox, networking, and SSH access) are very similar, regardless of your machine's architecture. Following those instructions will ensure you successfully complete your lab environment setup.
☁️ AWS Academy Learner Lab
As a RMIT student, you have access to the Academy Learner Lab which allows you to access different cloud services within $50 free credit.
I have added all students’ email to the AWS Learner Lab!
We will discuss in more details in later weeks about AWS. Thus, this week, you just need to make sure you have received an email from Academy Learner Lab from AWS and set up your account to prepare for the future labs when we learn about Cloud Computing.
Set up and sign in to AWS Academy
Set up your
AWS Academyaccount by responding to your email invitation and clicking Get Started. The email invitation will come from AWS Academy <notifications@instructure.com>. If you do not see the email, check your junk, spam, or promotional mail folder. Here is a sample invitation email:
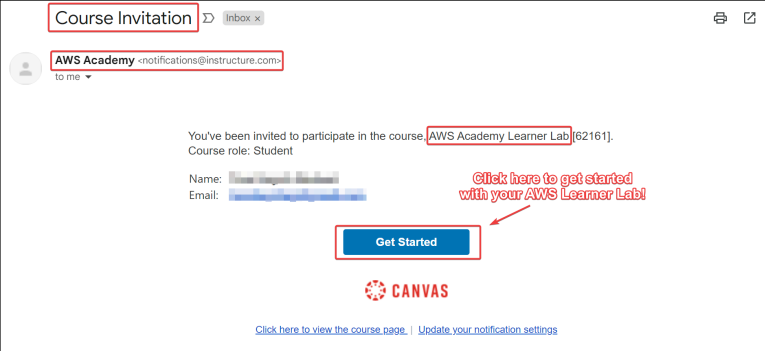
Go to https://www.awsacademy.com/LMS_Login to login.
Press Student Login.
Use the email address that received the email invitation for the email field.
- [Important note] The Canvas Instructure of AWS Academy is different from Canvas Instructure of RMIT, so if you do not have an account for AWS Academy before, you might need to create a new account using your RMIT student email in order to sign in!
![Visual showing [Important note] The Canvas Instructure of AWS Academy is different from Canvas Instructure of RMIT, so if you do not have an account for AWS Academy before,...](../assets/tutorials/week-1/page-037-image-01.png)
Open the Learner Lab
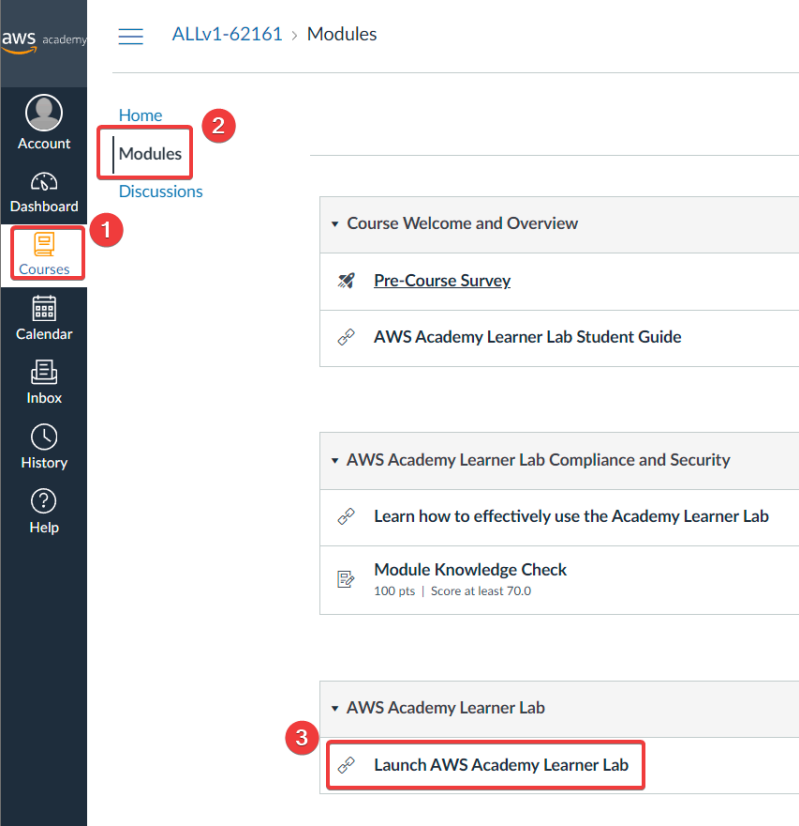
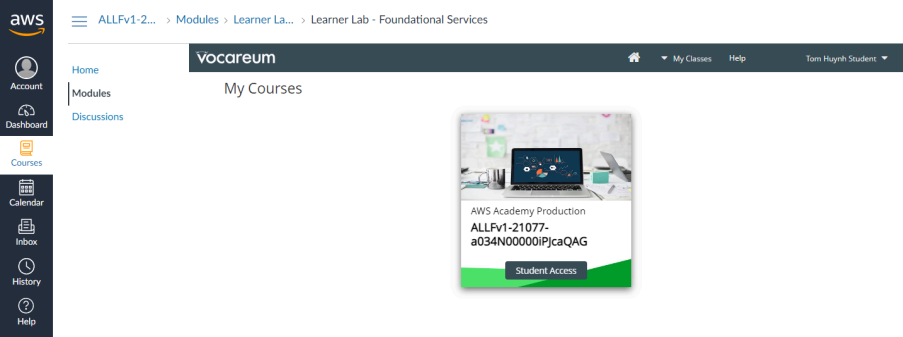
In the
AWS AcademyDashboard, click on theLearner Labyou wish to use. Students invited to more than one course/learner lab will see multiple tiles on the dashboard.
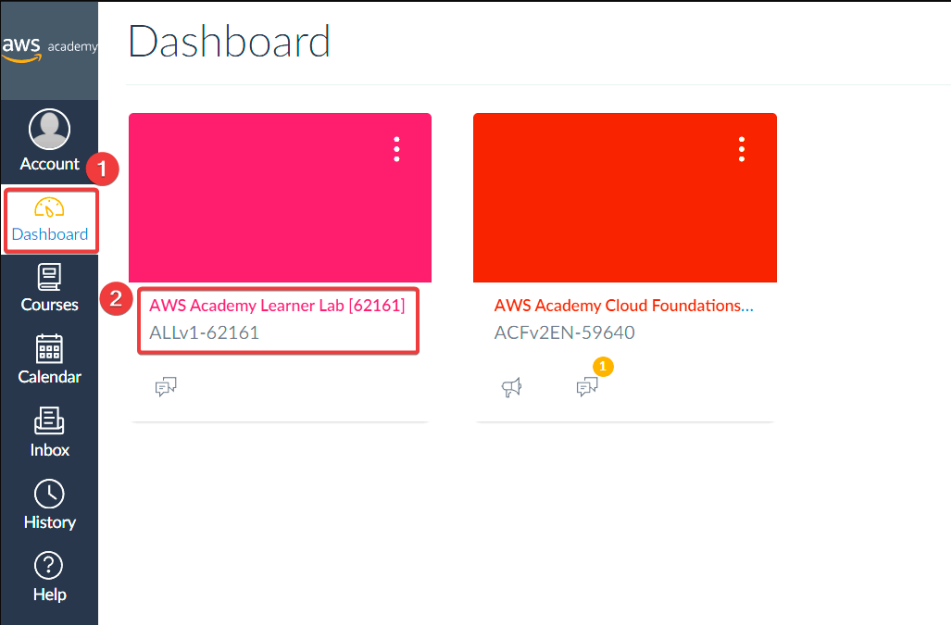
Select Modules.
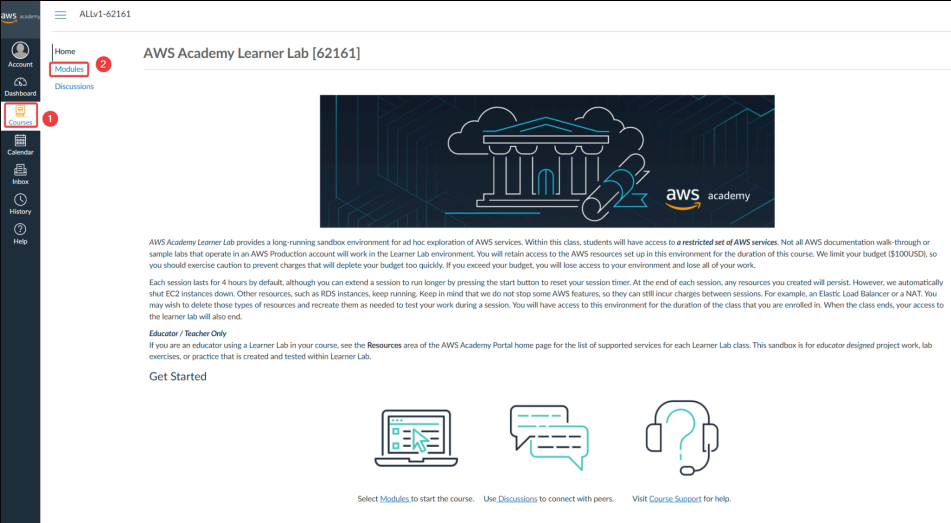
Select the Learner Lab item.
Use and manage the Learner Lab
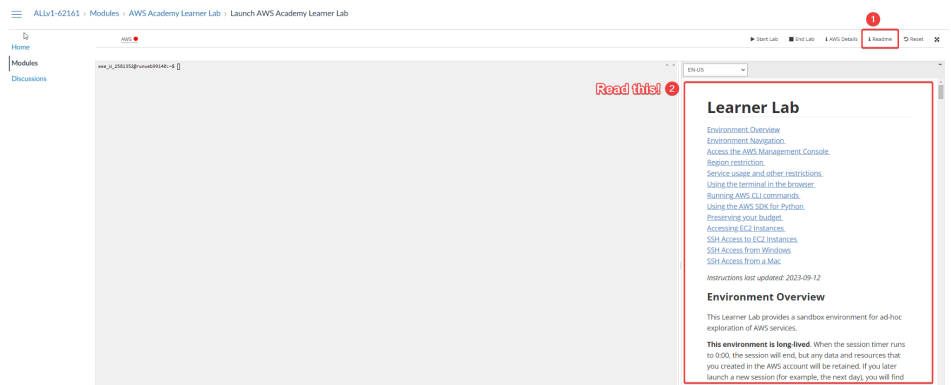
The instructions for using the lab environment are to the right of the console window. You can return to the instructions by pressing the Readme button. The instructions include important details about how to access and use your
AWSaccount, the AWS Services available to you, and the restrictions placed on some AWS Services.
Start the lab by selecting Start Lab.
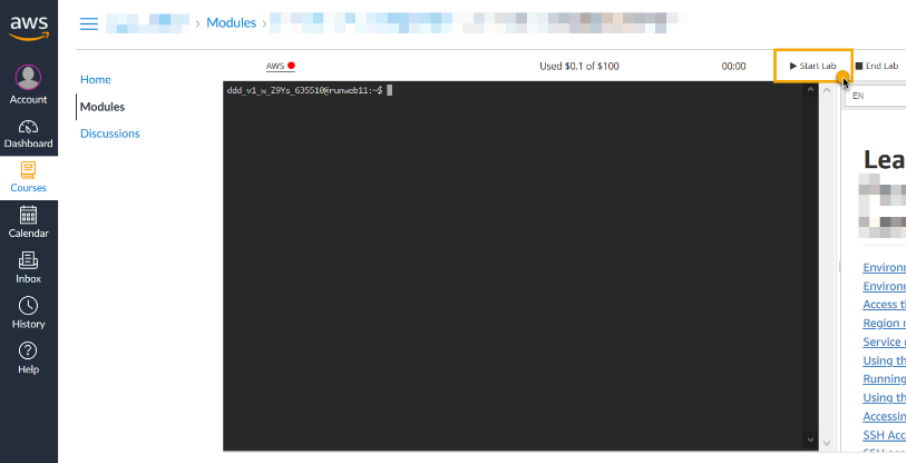
When the dot next to AWS turns yellow, your lab environment is still being prepared to use. So wait for it!
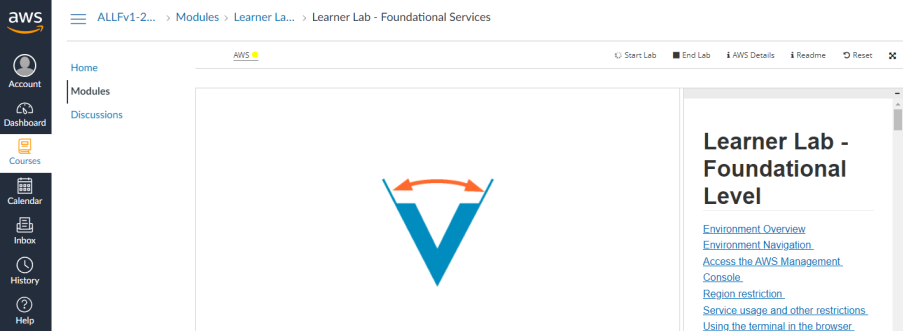
When the dot next to AWS turns green, your lab environment is ready to use. Click AWS to launch the
AWS Consolein a new tab.
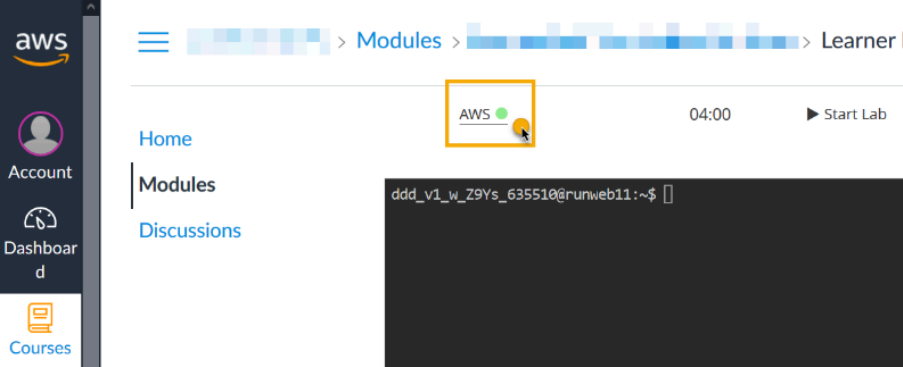
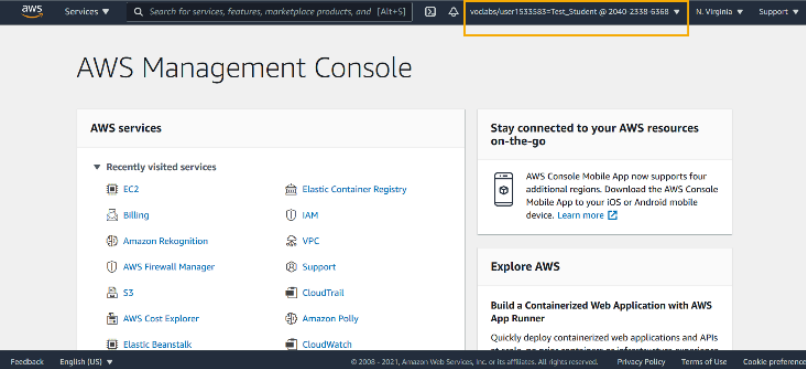
A new tab will open the
AWS Management Consolewhen you click on AWS. The system logged you into a temporary AWS account and the lab session will automatically end when the session timer expires. The system will save your work when you end the session or the session timer expires.Note: The system will suspend your
EC2instances at the end of a session and they will restart when you start the lab again. Press Start if you need to start up a new lab session.
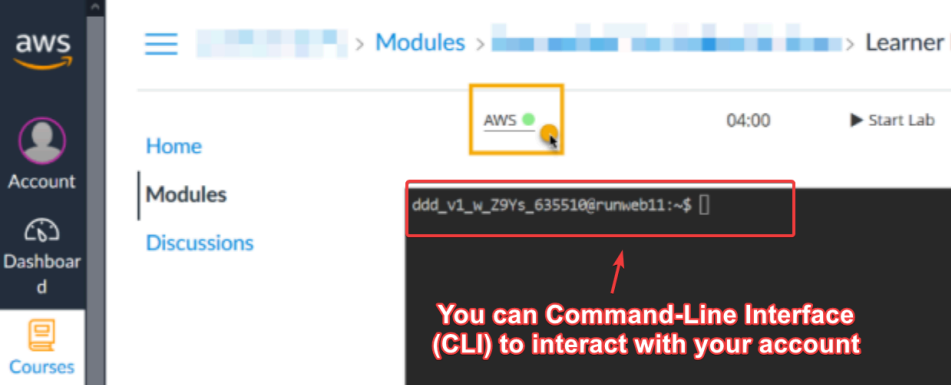
Alternatively, you can use the terminal window to the left of the instructions to use the AWS Command-Line Interface (CLI) to interact with your account.
Return to the
AWS AcademyLMS tab to view the lab instructions or to control your lab session.

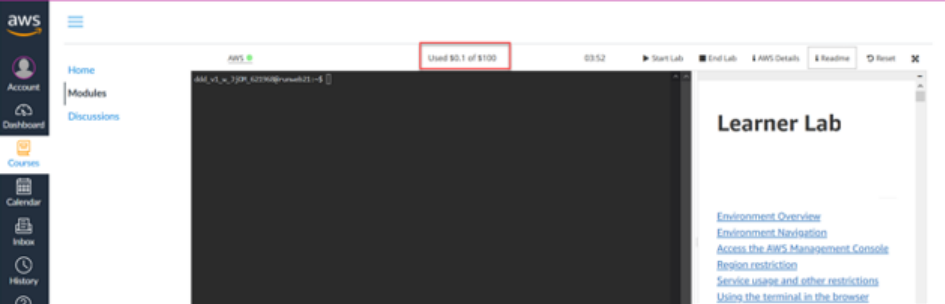
To monitor spending, see the area at the top of the lab instructions. Note: This information is provided by the AWS Budgets service and might be delayed by up to 8 hours. This is an approximate view of spending.
Note: If you spend the entire budget, you will lose all of your work, and the system will deactivate your temporary AWS account. Your $50 budget is sufficient for most academic projects, as long as you take care to stay within the budget guidelines.
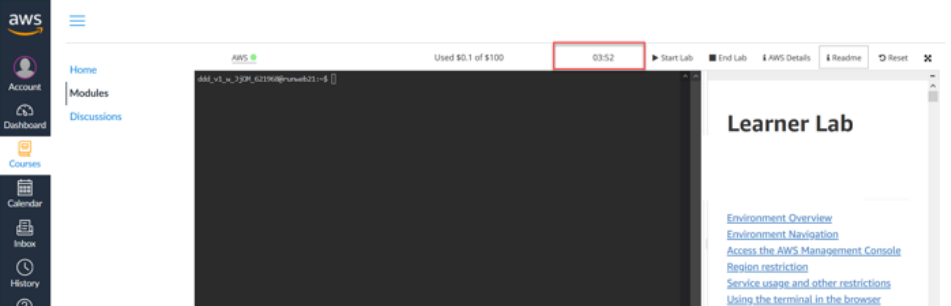
You can monitor your remaining session time at the top of the lab. Note: If you are actively working and you need more time, you can reset your session timer by pressing Start Lab again.
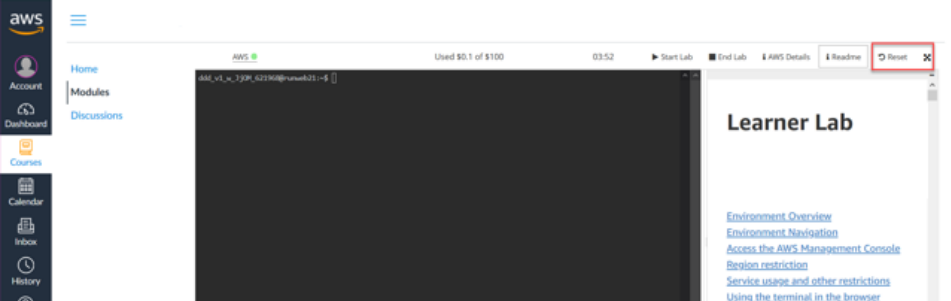
To delete all resources that you have configured in a lab and start with a fresh AWS account, choose Reset. Important: All work will be lost and cannot be recovered.
This option will not reset your budget. Any spending that you have incurred will continue to be tracked.
When you are finished with the session, choose End Lab.
Any running Amazon Elastic Compute Cloud (Amazon EC2) instances will be stopped. If you return and restart the lab, any stopped EC2 instances will restart and any other resources that you configured will still be available.
Important: If you created and started other AWS resources such as a
NATgateway or Amazon Relational Database Service (Amazon RDS) database, those resources will continue to run in the background and incur charges, even outside of your lab session time.
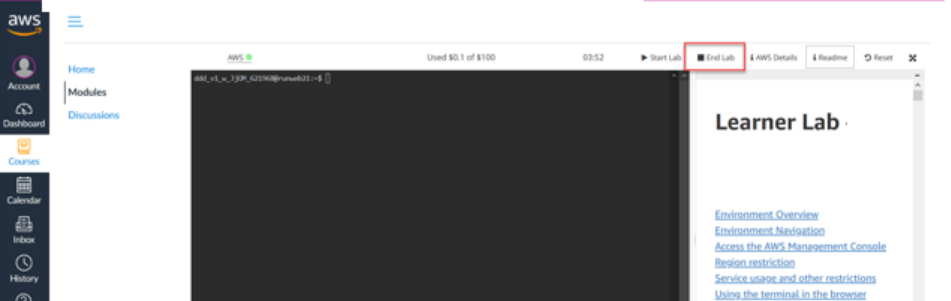
For this lab, we have no task regarding AWS yet so you can press the button “End Lab” to stop your lab from running.
That’s it! We are done for this week's lab!